Are you a frustrated DIY musician?
Irritated that the songs you’re cooking up in your home studio just aren’t sounding that good?
You need to learn the art of mixing. And you don’t need an expensive studio to do it.
You can learn to mix in your own bedroom!
By the end of this article, you’ll have everything you need to start mixing your own songs.
Get industry-quality every time (steal this framework)
I’m guessing you’re here because you want to make your mixes sound professional.
We put together a brief training that covers a totally new approach to music production. Until now, everyone has been teaching production totally backward.
Just click below to watch.
But if you just want to learn about the basics of mixing first, keep reading.
What IS Mixing?
So before we get into how to mix a song, we need to figure out what mixing actually is.
When I first started mixing, I thought it was just about putting cool effects on the vocals and guitars. I’d spend hours tweaking my delays and phasers, only to be disappointed that my mix still sounded like trash.
It took me almost a year to realize that effects are only a small piece of the puzzle. What you’re doing with mixing is much, much bigger.
So what is mixing? Mixing is the process of using tools like volume faders, compressors, EQs, and reverbs to make the individual tracks of a song sound balanced and emotional.
In other words, mixing is the process of making your recordings sound like a song instead of a collection of raw tracks.
To learn about the two main goals of mixing, check out our video below:
To make your song ready for the radio, you need to learn how to mix it.
Luckily, that’s exactly what you’ll be learning today, step-by-step. Today we’ll be going over the 8 Steps of Mixing:
- Step 1: Prep
- Step 2: Volume Balance
- Step 3: Compression
- Step 4: EQ
- Step 5: Space (Panning, Reverb, and Delay)
- Step 6: Volume Automation
- Step 7: Effects
- Step 8: Final Checks
[A quick note: there will be a lot of words in this article that will likely be new to you! If you come across any that confuse you, check out our Audio Terms Glossary here for a little help.]
Step 1: Prep
Before you can begin to mix, you have to prep your session. The more organized you are, the faster you’ll mix.
It also keeps you from getting overwhelmed by the mess of audio files you have. A good prep will even improve the quality of the audio!
There’re 12 steps involved with prepping your session. Check them out below:
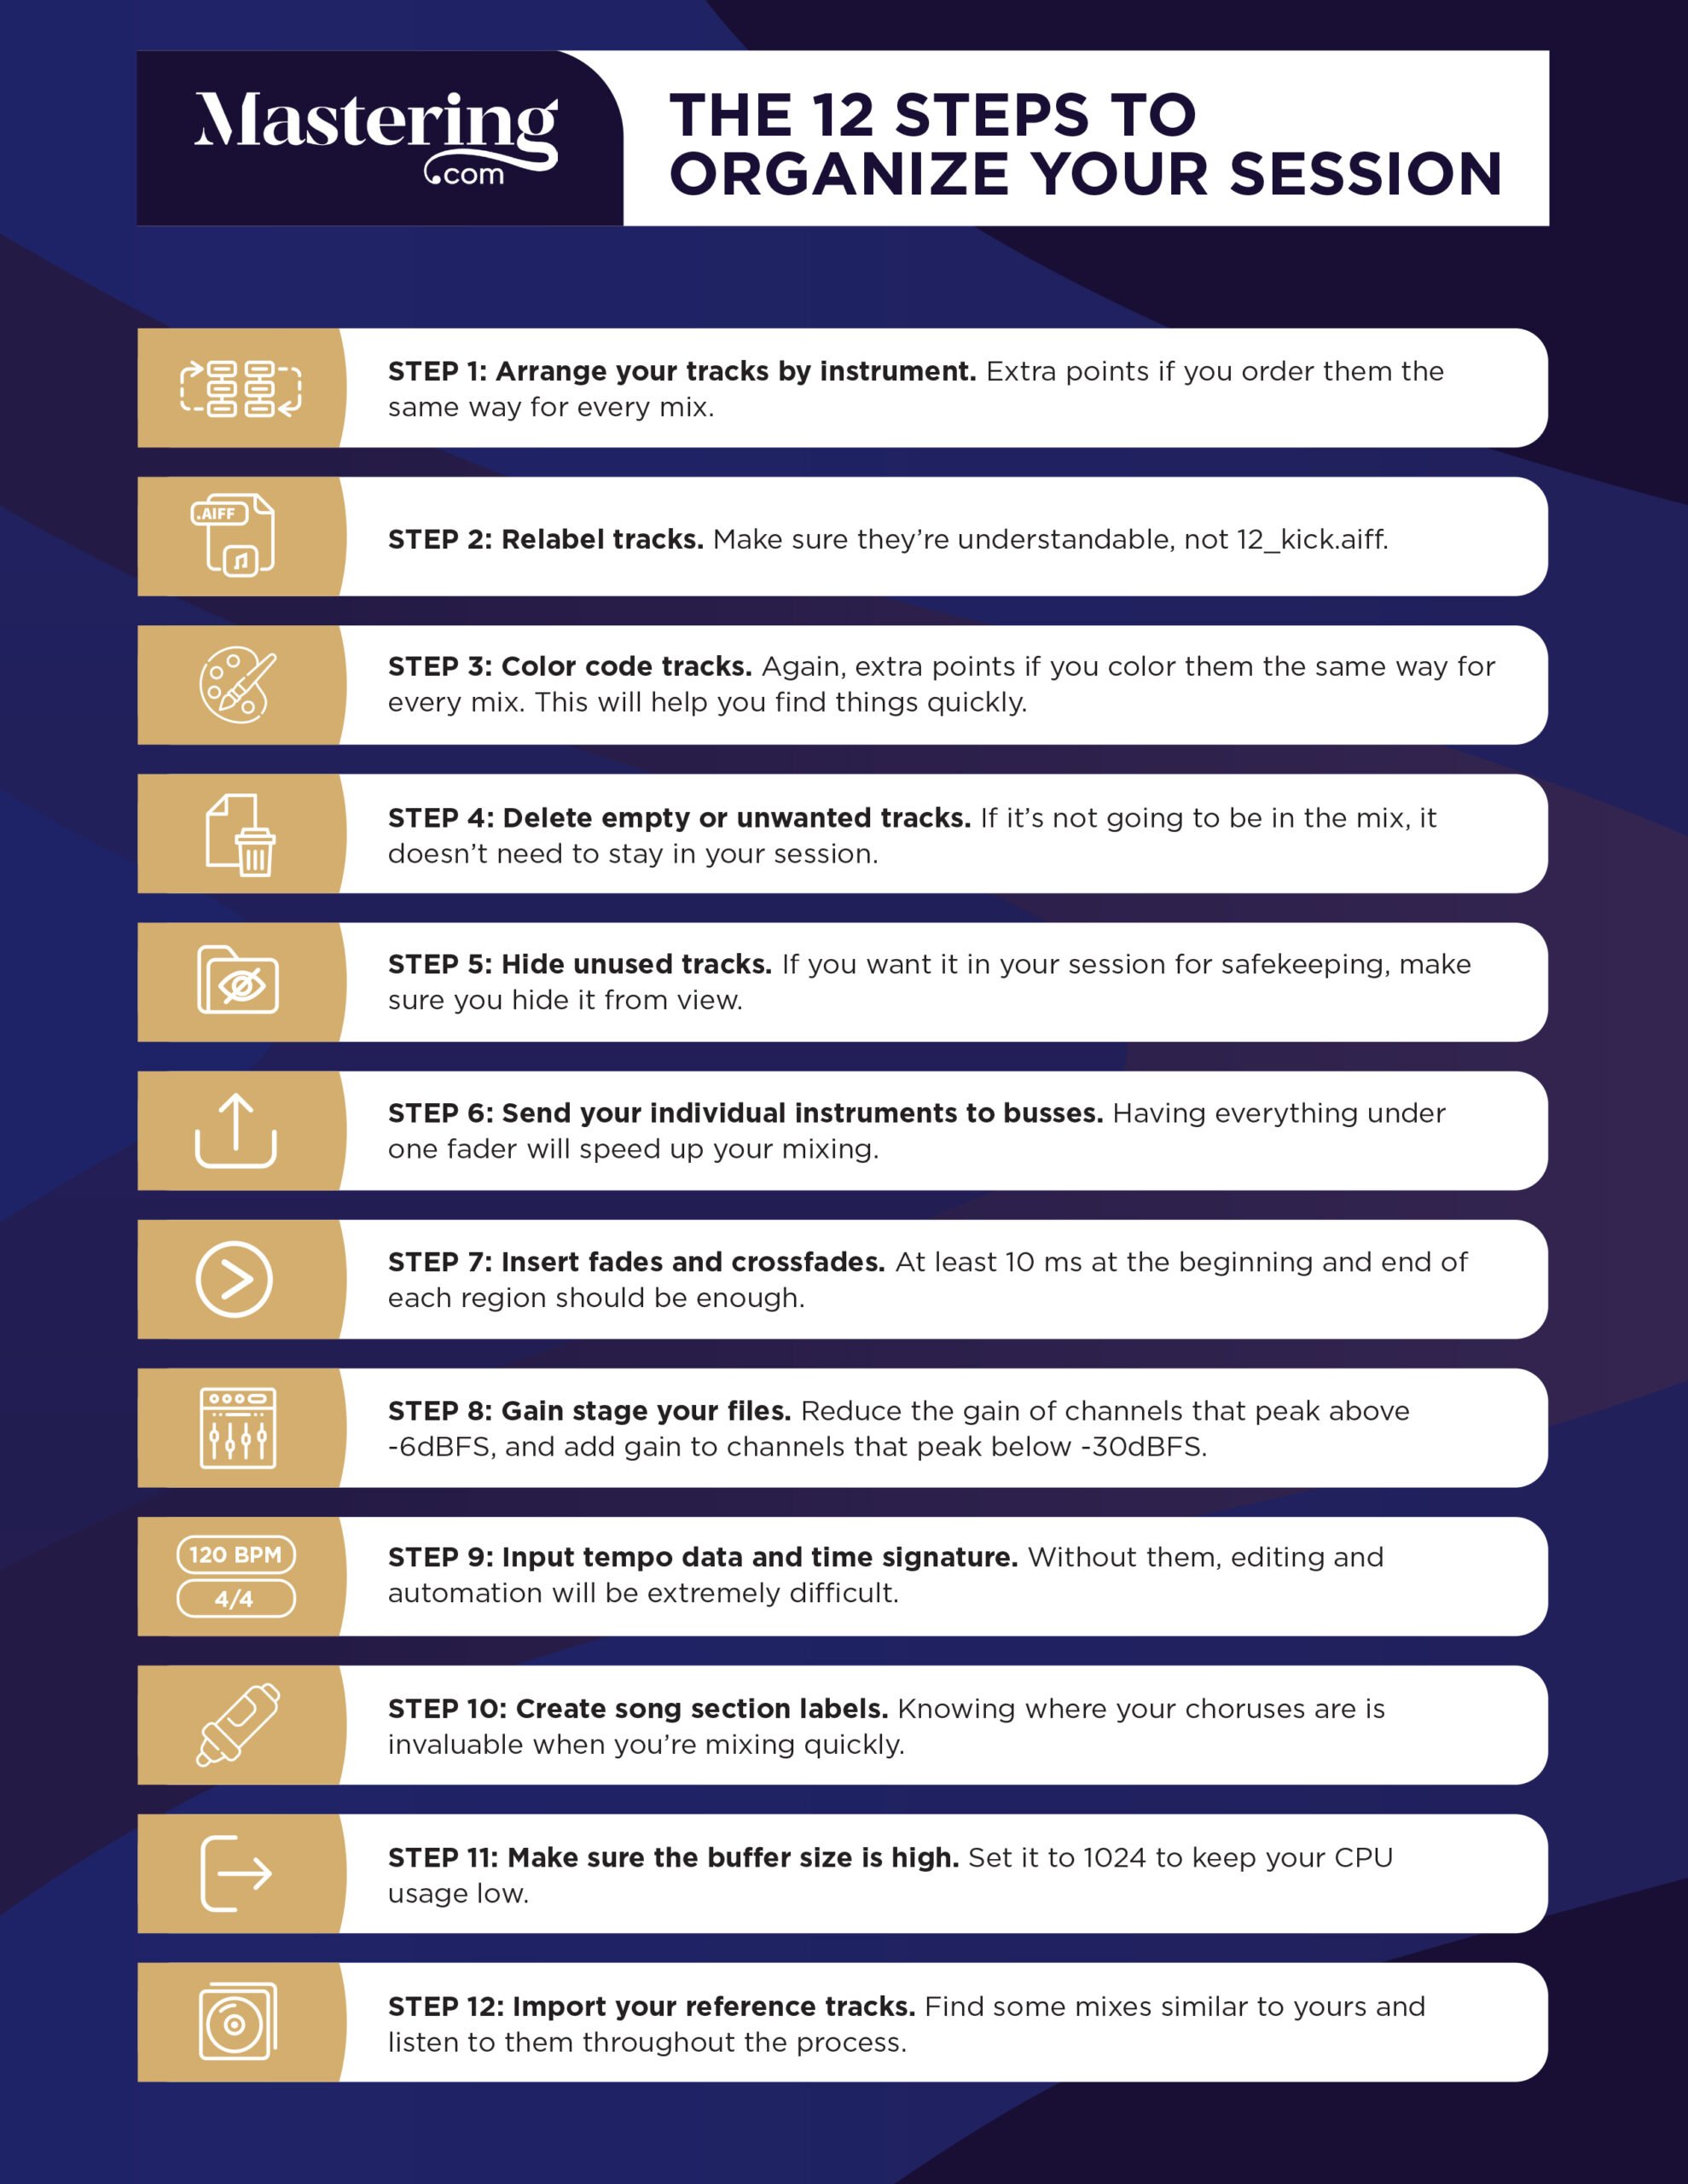
Most of these steps are pretty self-explanatory, but there are a few I want to elaborate on. Let’s check them out.
UPDATE: Want some tips on a great mix prep workflow? Check out our latest video:
What are Busses?
Bussing is a marvel.
If you’re unfamiliar, it’s when you change the outputs of each recording of a certain instrument to the same “bus.” All of the recordings are then directed to one aux track that you can use as a “master fader” for your instrument.
Think of it this way:
A school bus picks up each of the students at their houses and then takes them to a single place – the school. This is exactly what bussing is doing with your recordings.
Essentially, you are routing all of your recordings of an instrument into a single track.
From there, any plugins that you add get applied to every single one of those recordings.
Not only does it help “glue” your track together, but it massively cuts the number of plugins you need to finish a mix.
For example, imagine you had three different acoustic guitar parts, each with two microphones. You’d have to use six different compressors just to control their dynamics.
But with bussing, rather than six compressors, you just need one. That means you’re going to mix faster and you’re going to save a huge amount of CPU.
Not only that, but you’re compressing multiple parts at once. So it creates the feeling that all of the individual tracks are part of the same instrument.
It glues them together, so to say.
Do this with all of your instruments, and your mixes will get finished faster and sound better!
What Are Crossfades?
If you’re splicing two audio regions together, you’ll want to apply a crossfade. A crossfade will fade out the audio clip on the left at the same time as it fades in the clip on the right.
That means that any tracks you’ve cut together will transition smoothly. Without a crossfade, you’ll hear a nasty pop where the two audio regions meet.
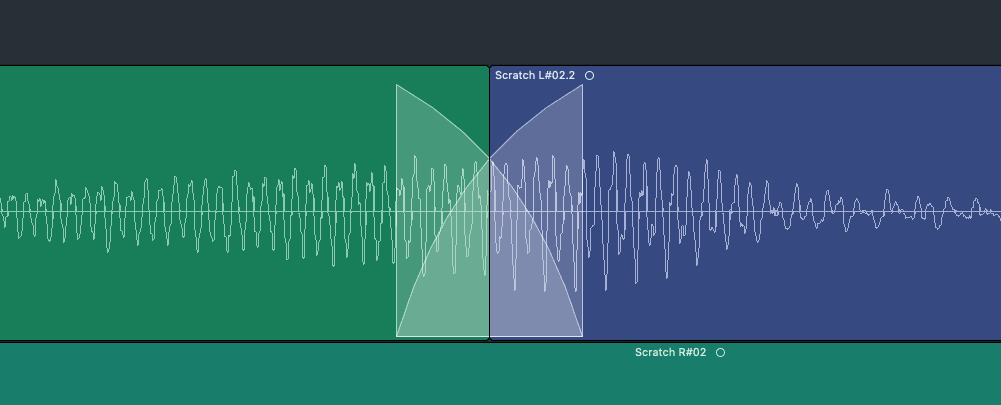
When creating crossfades, use at least 10 ms. That should be enough.
Most DAWs have a way to apply fades and crossfades to an entire session. Do a little Google research to figure out how your DAW’s fade system works to save some time.
What Is Gain Staging?
Let’s take a quick trip back to the 1960s.
Back before computers, studios had sound consoles and “outboard gear” to mix their songs.
Because of the analog nature of this tech, you had to record your tracks at a certain volume level to make sure they didn’t sound too noisy.
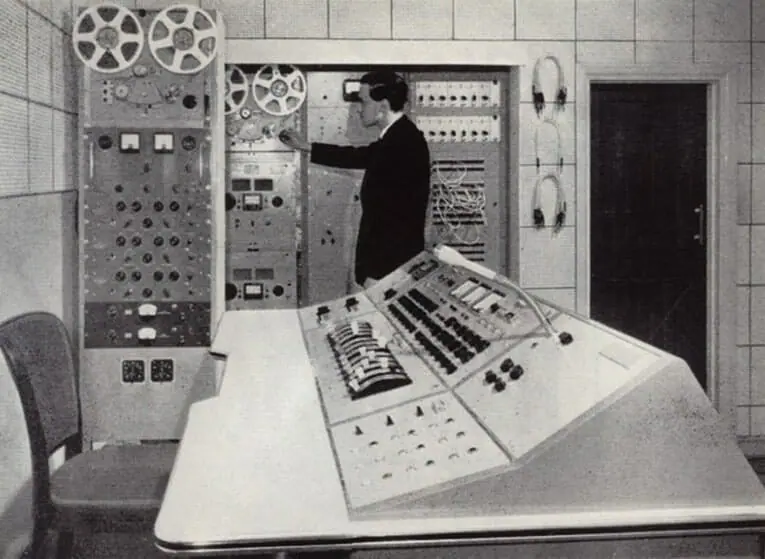
Because of that, most of those old mixing tools were made to sound best when they processed audio at that level… This is what we now refer to as the Sweet Spot in mixing.
Let’s fast-forward to today.
Most of the mixing tools you will use – compressors, EQs, reverbs, and so on – are based on those old models from the analog age. That means their Sweet Spot still exists!
So the point of gain staging is to make sure your audio is the right volume to hit the all-coveted Sweet Spot.
So what is the Sweet Spot? 0 dBVU.
To learn how to gain stage your tracks, check out the step-by-step graphic below:
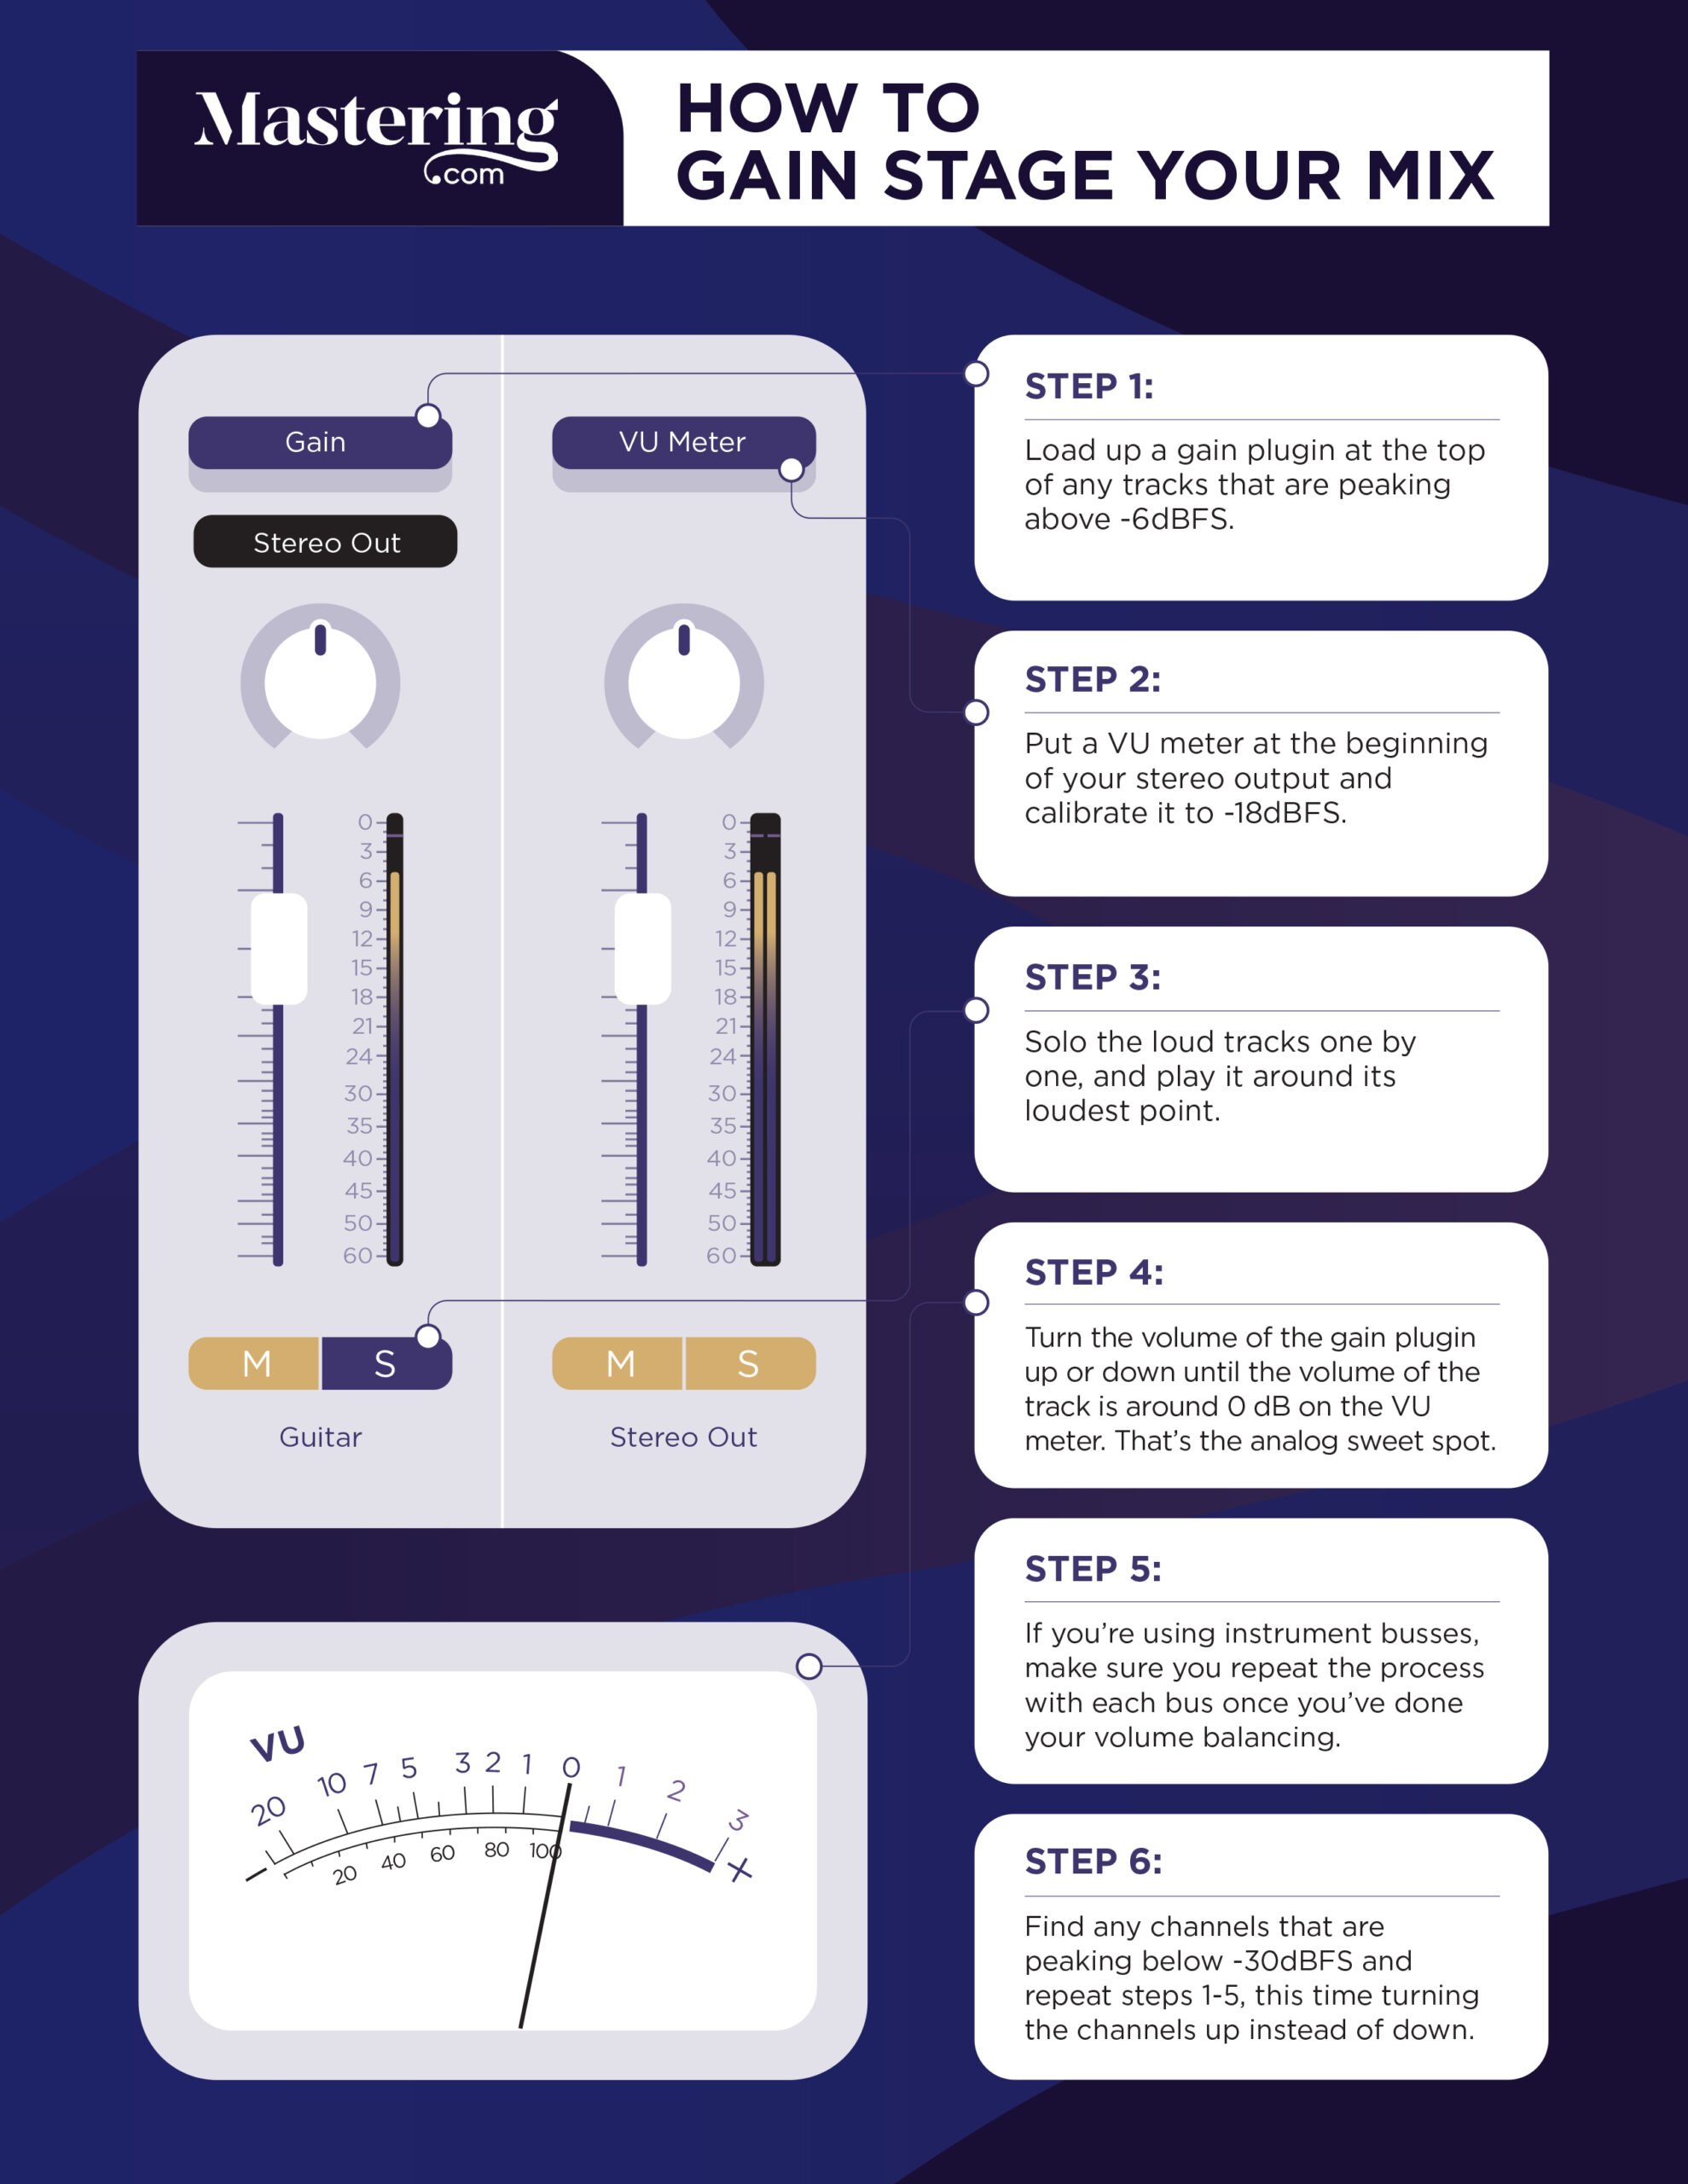
Now, most DAWs use dBFS meters for their volume meters. To do this trick properly, grab a FREE copy of TBProAudio’s mvMeter2.
I used it myself for several years. Just don’t forget to set it to VU mode!
What Are Reference Tracks?
A reference track is simple: it’s a professionally mixed song that you compare your mix to as you go along.
Imagine this:
You are a painter, trying to capture a beautiful countryside view.
You hike for miles and miles until you find the perfect view. After gazing out at it for a few minutes, you head back to your artist studio.
You then try to paint what you saw from memory.
How accurate do you think that painting is?
Now imagine you took a camera with you.
You take a photograph of exactly what you’re wanting to paint. Then you hike back to your studio and use your photo as a reference.
Between the two options… THAT will be the accurate painting.
That’s exactly what referencing is. It’s comparing your mix as you go to a professionally mixed track.
Without a reference track, it’s like you’re “mixing blind.”
You never want to mix from memory. Your mixes will end up sounding pretty good in your own speakers but will fall apart anywhere else.
Comparing every aspect of your mix to a reference track – the low end, the mids, the snare volume, the vocal reverb, and so on – will increase the quality of your mixes tenfold.
For more on how to find the right reference track for your song, check out our complete guide, or the video below:
Now that your mix has been prepped, let’s move on to the actual first mixing step – the volume balance!
Step 2: Volume Balance
The most powerful tool in your mix toolkit isn’t compression or EQ… it’s volume.
The volume balance of your mix is the most important step to nail for a radio-ready song.
To get a great volume balance, try following these steps:
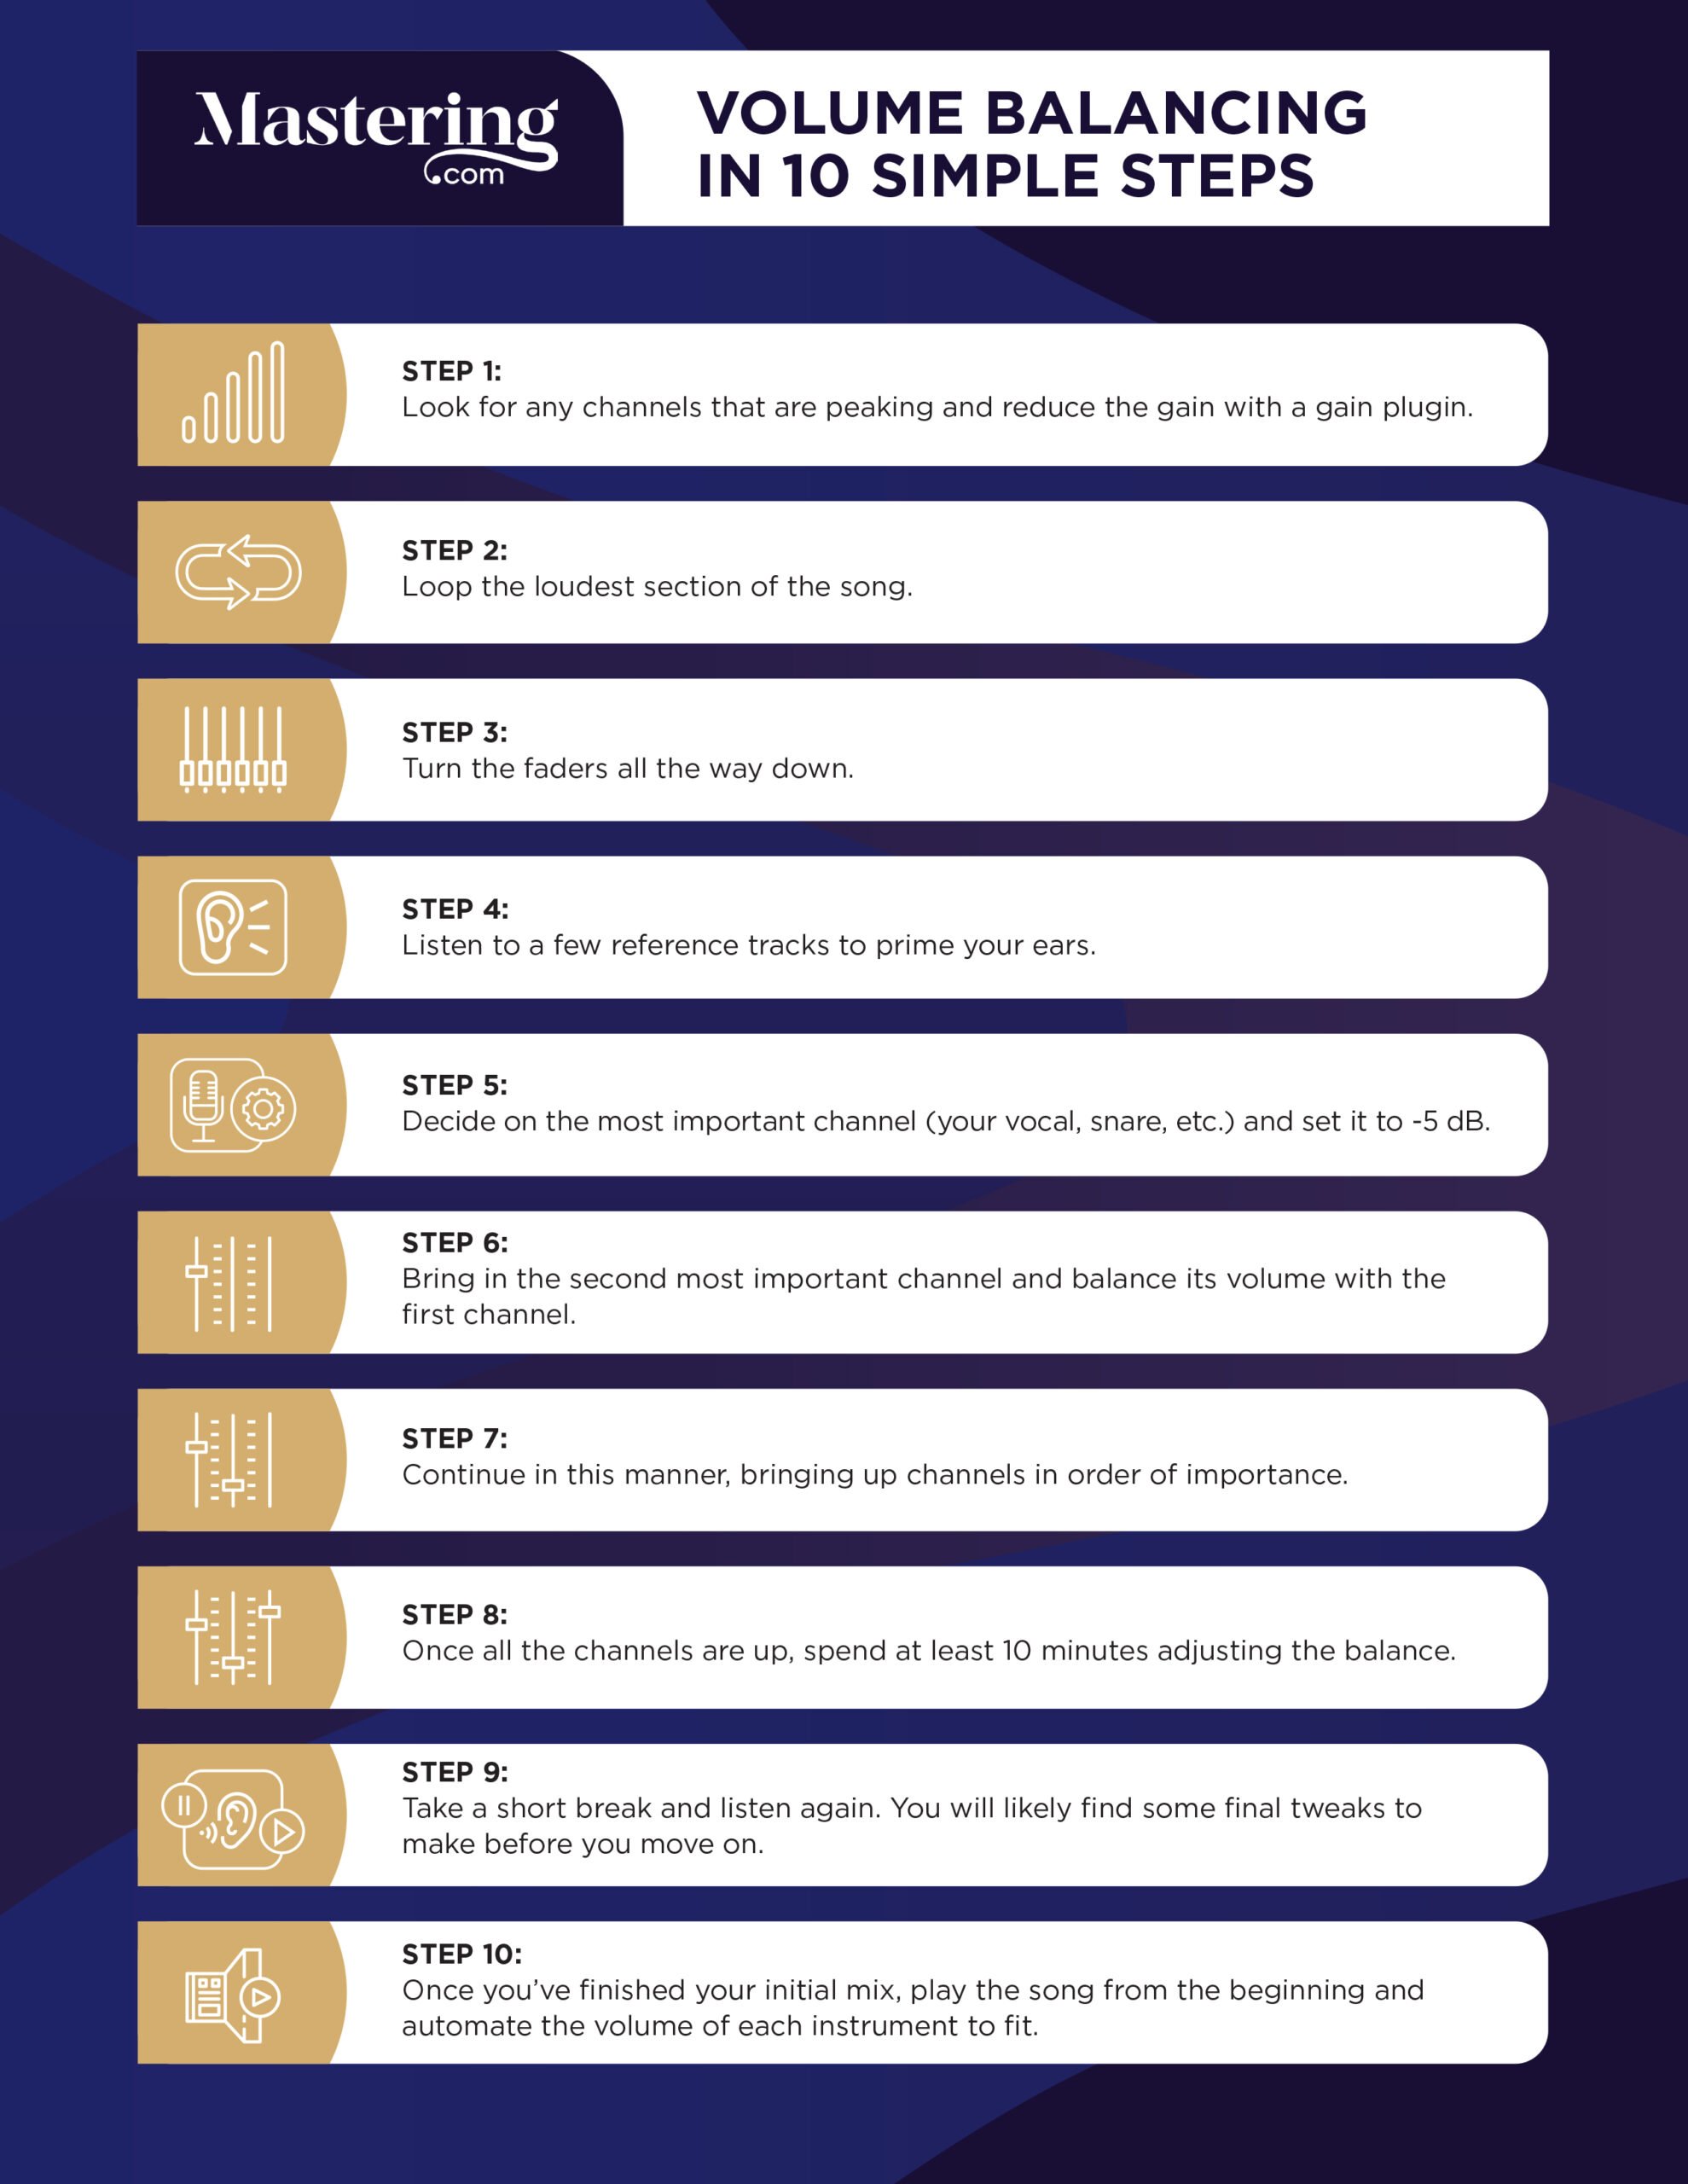
This volume balancing system is pretty simple, but it’s very powerful.
To learn more about volume balancing, check out this video:
While working on your volume balance, I’d recommend listening to your monitors or headphones at a low level. That will keep your mix moves accurate.
The louder you listen to your mix, the better the mix sounds. That’s great in the moment.
But it means you can make some mixing decisions that sound crappy when played at quiet volumes!
You want to set your monitors at “conversation level.” Loud enough to hear the details of the mix but quiet enough that you can have a conversation with a friend while it’s playing.
Also, remember the reference tracks you set up in the last step? Now’s the time to use them!
Listening to reference tracks is one of the best ways to get a stellar volume balance. It helps you know how loud the vocals, drums, and bass are in most other songs.
Those are the instruments that are the most heard or the most “felt.” So getting their balance right is crucial to a mix that plays well on all speakers.
To learn how to use reference tracks in your songs, check out the video below:
Now, let’s learn about our first mixing tool – compression.
Step 3: Compression
Compression levels out the dynamics of an instrument and shapes its tone.
In layman’s terms, it compresses the volume of an instrument. When an instrument gets too loud, a compressor turns it down.
Compression is used all over mixes to make your tracks more consistent, more exciting, and more cohesive.
Before we learn how to use a compressor, let’s start with the different parts:
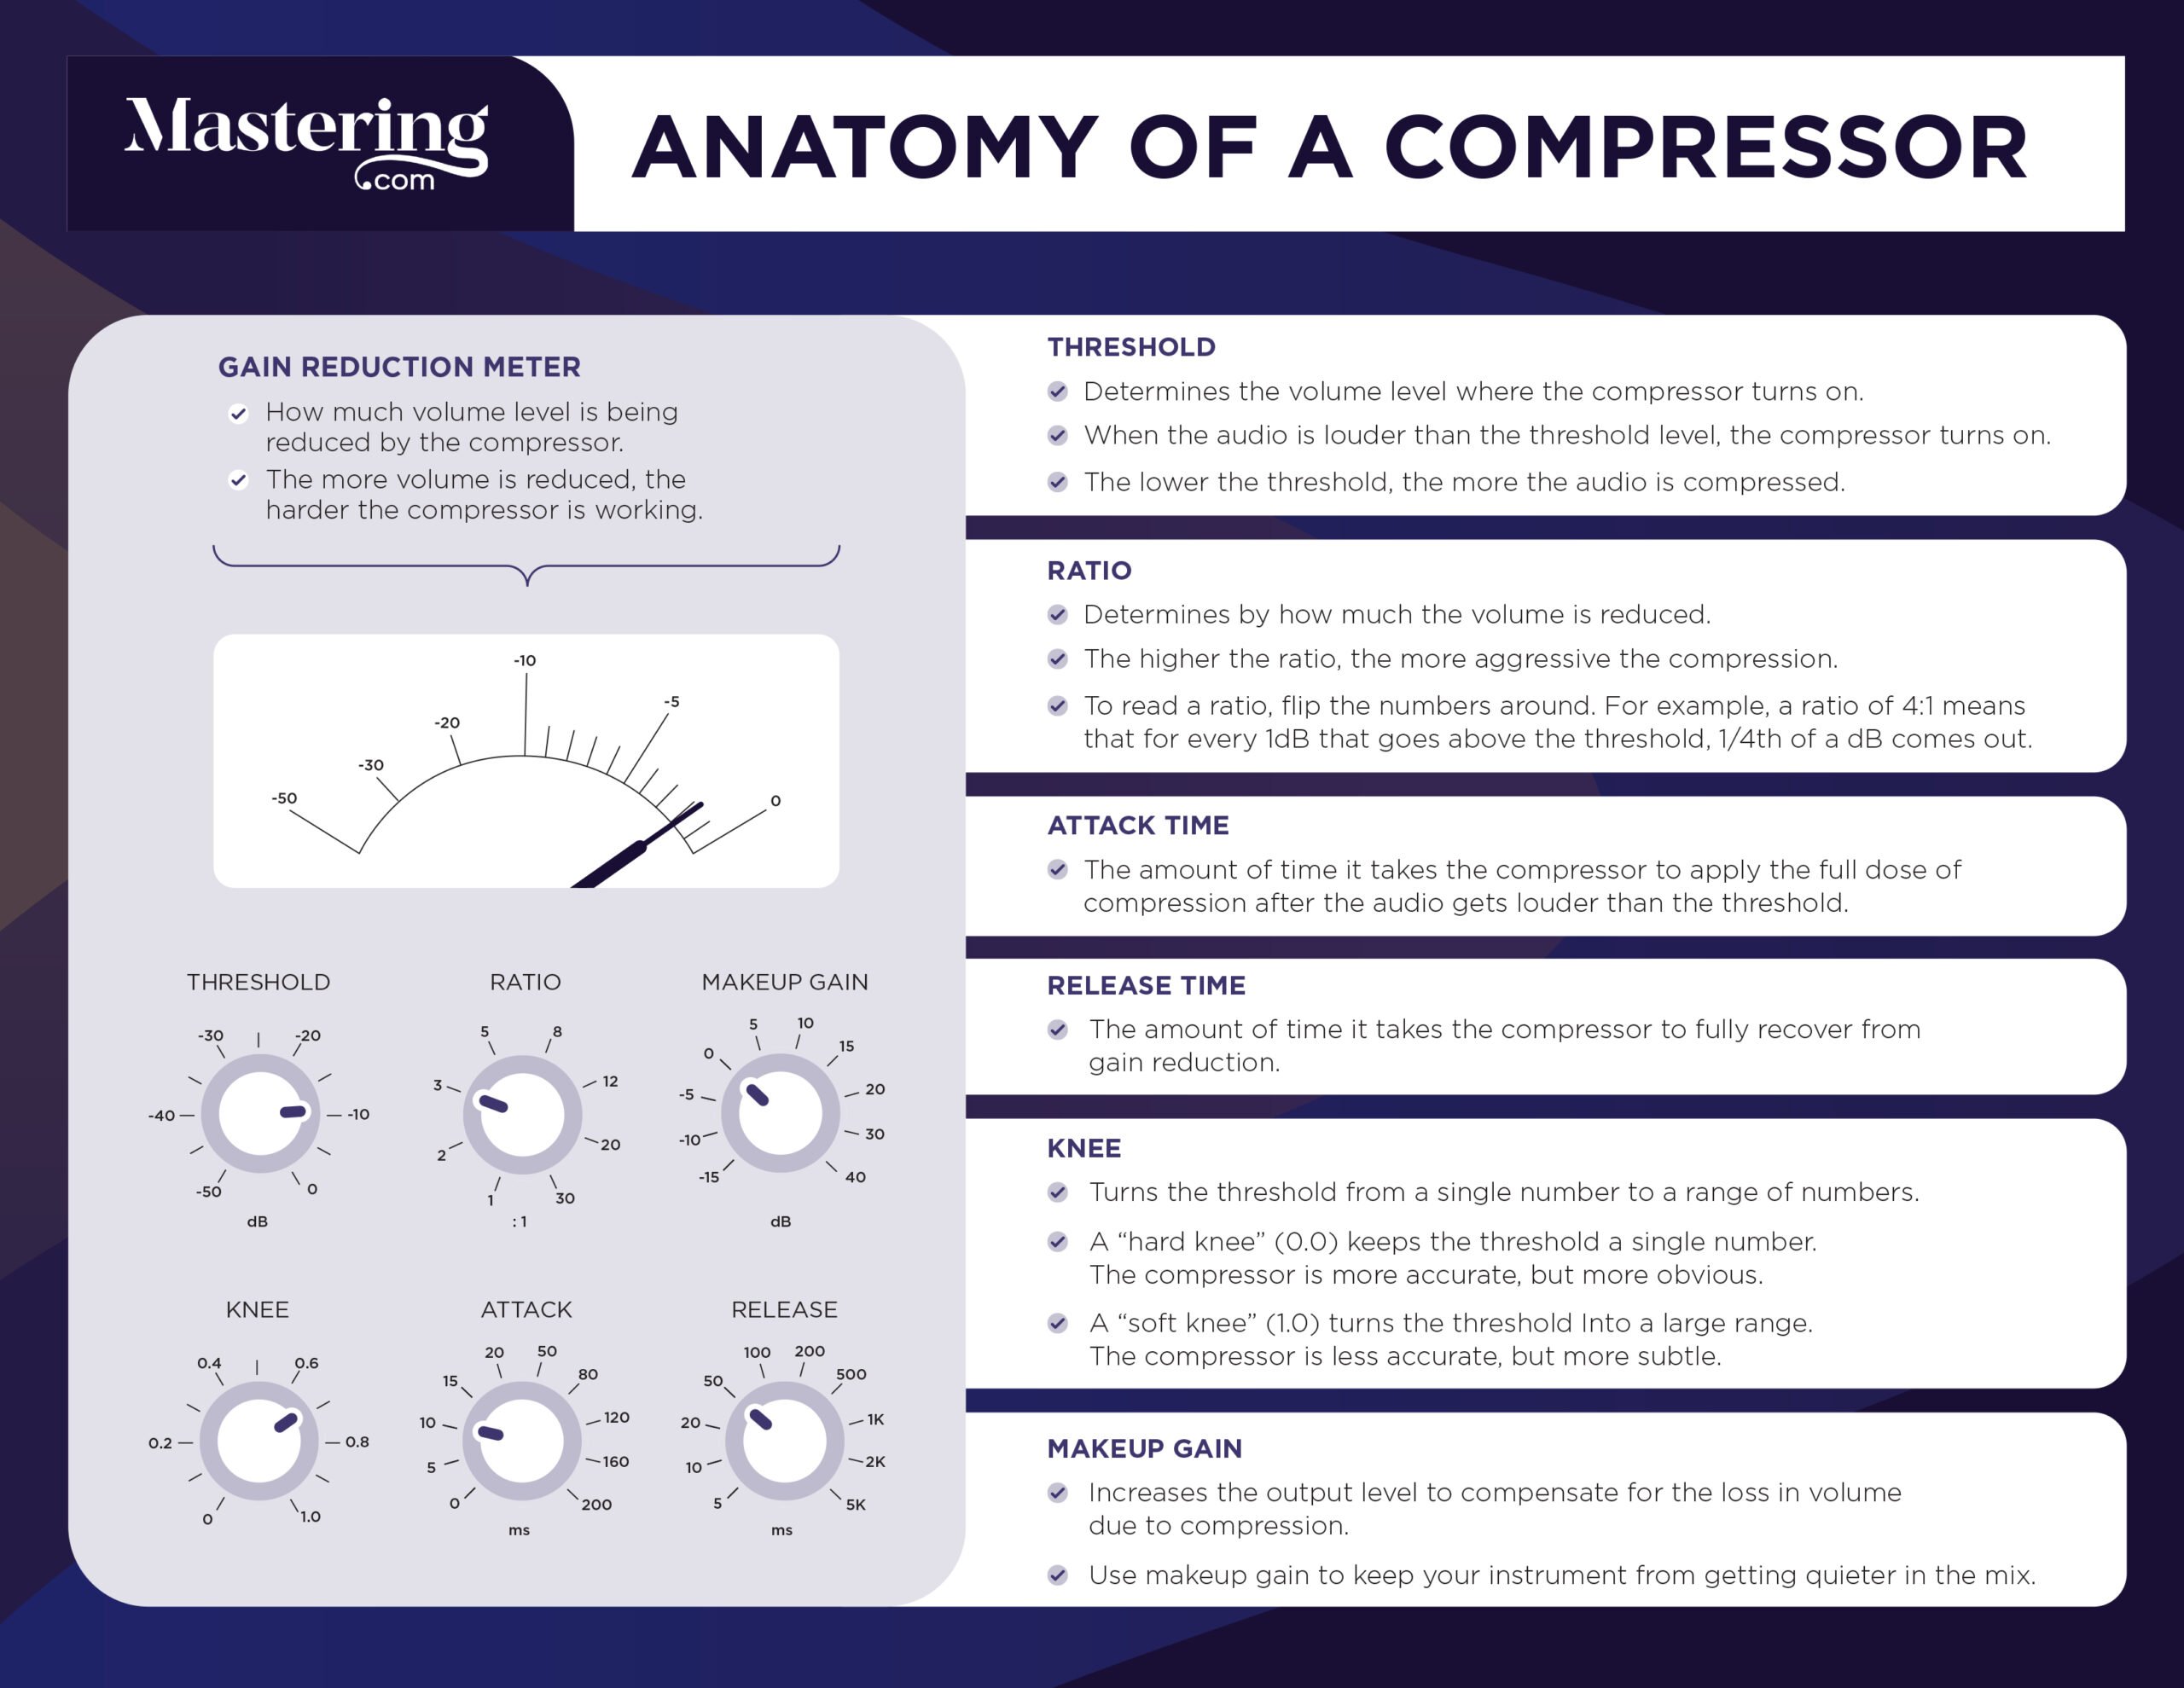
Now that you know the different parts of a compressor, let’s learn how to use one:
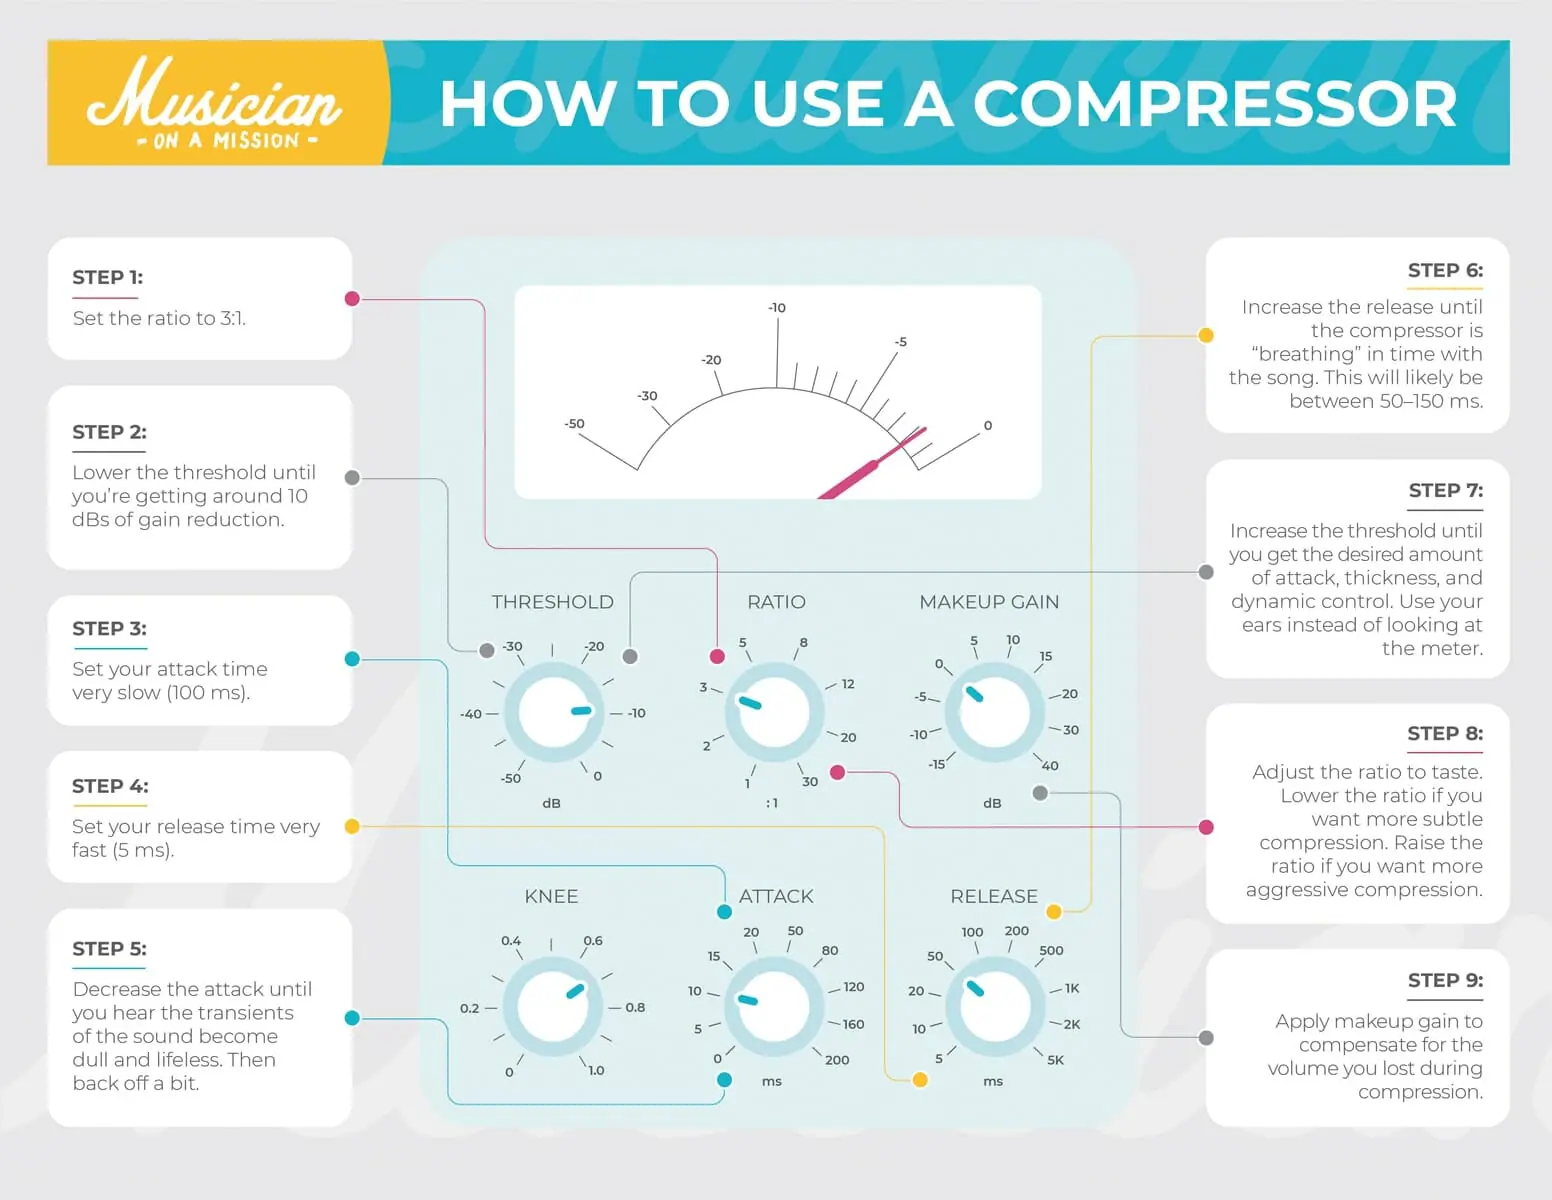
Compressors are subtle, but they make a big difference in your mix.
The key to using a compressor is practice. The more you do it, the more you can hear the changes you’re making in the sound.
Want to see what compression sounds like? Check out the video below:
I’ll usually use compression on whatever instruments I feel need more control in the mix. If I want it to sound upfront-and-center, it’s likely going to need some compression.
Be aware, though, compression is different depending on what genre you’re mixing!
Some genres use heavier compression (like pop, rap, and rock) while others use barely any compression at all (like jazz, classical, and some folk).
Keep this in mind while learning to compress your mixes.
Before we move on to the next step, check out this video on how to avoid the most common mistakes that musicians make when compressing their mixes:
Up next, the frequency-fixer and tone-shaping master… the EQ.
Step 4: EQ
An equalizer (or EQ for short) is a mixing tool that helps to shape the tone of an instrument.
It’s essential to creating a mix that “fits” together.
This may seem a little vague right now, but stick with me. Before you can learn what an EQ is, you need to understand the frequency spectrum.
Music is created by different sound waves interacting with each other in unique ways. Each individual sound wave is known as a “frequency,” which is measured in hertz (or Hz).
The lower the pitch of the sound, the lower the hertz of that sound. For example, a bass might play a note that resonates around 50 Hz.
Conversely, the higher the pitch of the sound, the higher the hertz of that sound. For example, a violin might play a note that resonates around 2,000 Hz, or 2 kHz.
So what is the frequency spectrum? The frequency spectrum is the entire range of human hearing.
So let’s take a look at an average parametric EQ plugin…
See how the spectrum starts at 20 Hz on the left, and ends at 20 kHz on the right?
That’s the range of human hearing. Inside of it are all of the sounds a human can possibly hear.
For me, this breaks down into five very distinct sections.
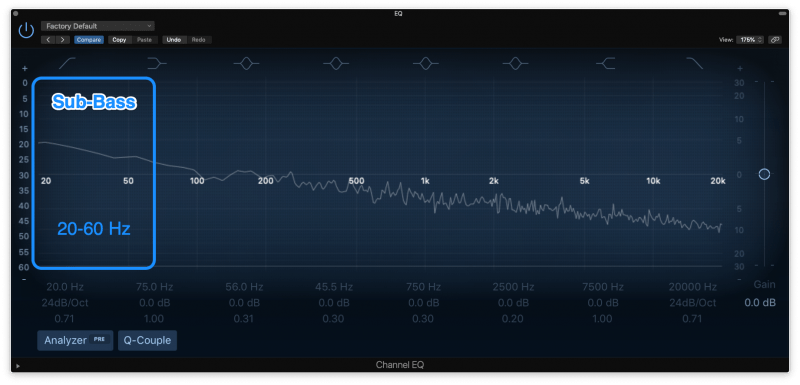
Sub-Bass (20–60 Hz)
The first area we’re going to focus on is sub-bass.
Everything below 60 Hz is sub-bass. Generally you need a subwoofer or a good pair of headphones (open-back headphones, for example) to hear that.
You should be able to hear it a little bit if you’re on monitors or headphones. But if you’re listening on a laptop or a phone, there’s no way you will hear it.
This is the part of the frequency range that you “feel” rather than hear.
Ever been to a club and felt the booming of the bass synth in your chest? Those are the sub-bass frequencies.
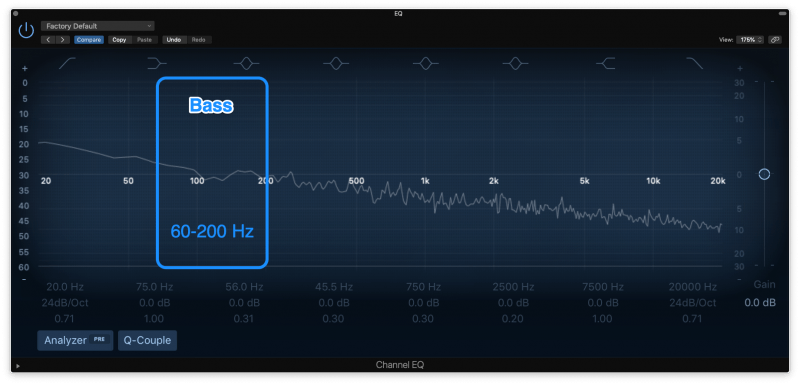
Bass (60–200 Hz)
After that, we get into what I would call bass. For me, this is everything between 60–200 Hz.
In this area, we’ve got lots of bass guitar. Lots of the low-end vocals as well, because male vocals are going to have the fundamental below 200 Hz in most cases.
The bass area is the foundation of a mix. Without bass, a song just feels… weird. Everything in your mix will be built on top of the bass frequencies.
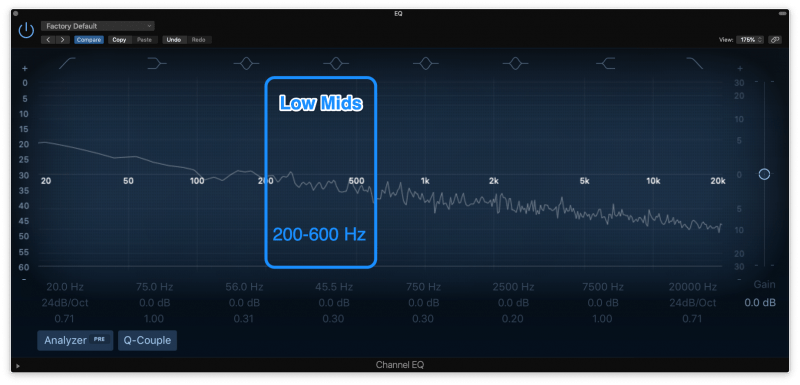
Low Mids (200–600 Hz)
Next up, if you go from 200–600 Hz, this is what I would call low mids, and this is a really important area for mixing.
Now, this area is crucial for home recording. It’s where you get a lot of buildup with guitars, vocals, even the top end of the bass guitar, especially.
This is an area that’s really guilty for adding mud to a mix.
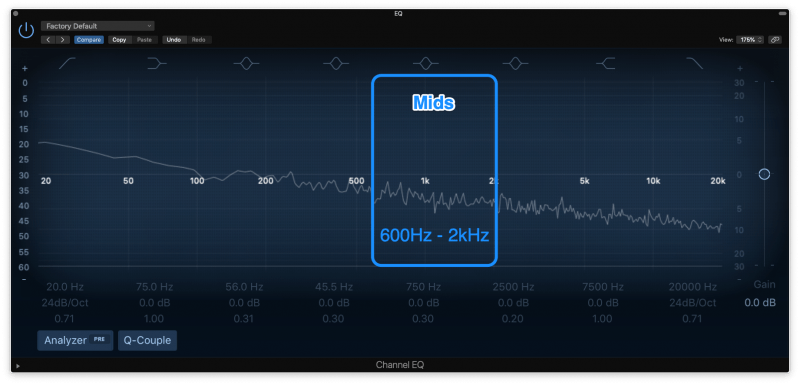
Mids (600 Hz–2 kHz)
The human hearing focuses mostly on this frequency range…
So it’s crucial to get this range right. You want the main focus of the track (e.g., vocals) to have lots of room in this range.
Be aware that this is also where you can start to get into harshness and aggressive tones.
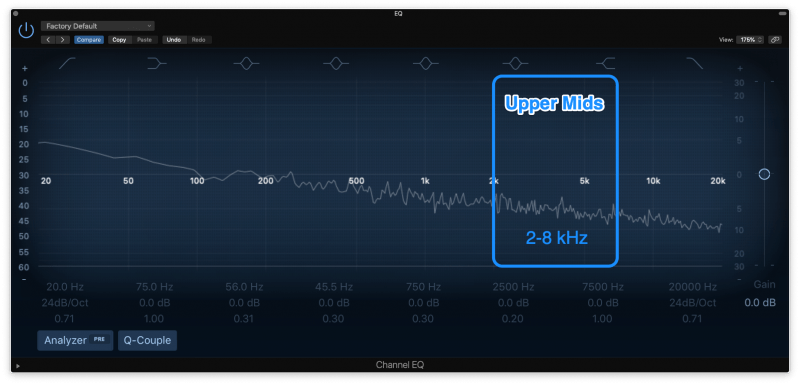
Upper Mids (2–8 kHz)
Then we’ve got upper mids between 3–8 kHz, and this is where things really start to get harsh. This is where we have brittleness a lot of the time.
It’s also an important range for clarity and aggression, especially in vocals.
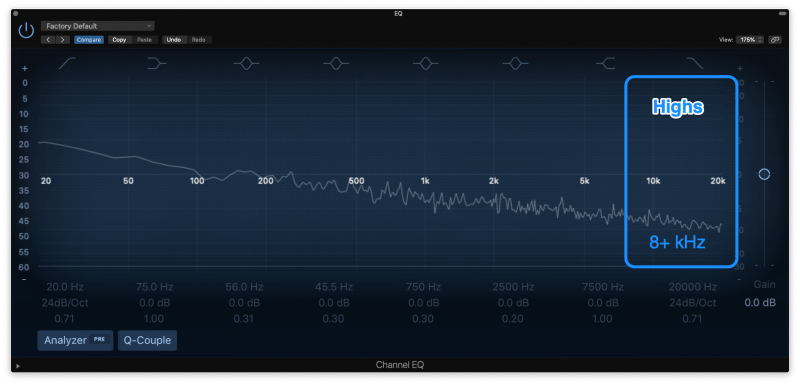
Highs (8+ kHz)
After that, we get to treble, or the highs. This is everything above 8 kHz. This is where we have air.
You could split this even further into 8–12kHz, that’s what I would call treble, and then 12+ kHz is what I would call air.
But for now, we’re just going to leave this as the highs, and this is everything above 8 kHz.
Here’s a breakdown of the entire frequency spectrum:
Frequency Range |
Description |
| 20 Hz to 60 Hz | Sub-bass |
| 60 Hz to 200 Hz | Bass |
| 200 Hz to 600 Hz | Lower mids |
| 600 Hz to 3 kHz | Mids |
| 3 kHz to 8 kHz | Upper mids |
| 8 kHz to 20 kHz | Highs |
So all that being said, what does an EQ do?
An EQ is like a volume fader for the frequency spectrum. It can turn up or down different parts of the spectrum to change the tone of an instrument.
Is a guitar sounding too bright? It may need a cut in the upper mids.
Is a vocal sounding too weak? It might need a boost in the low mids.
EQing is making these cuts and boosts in different instruments to enhance the sound of the song.
So now that you know what EQ is, let’s look at the different parts of the plugin:
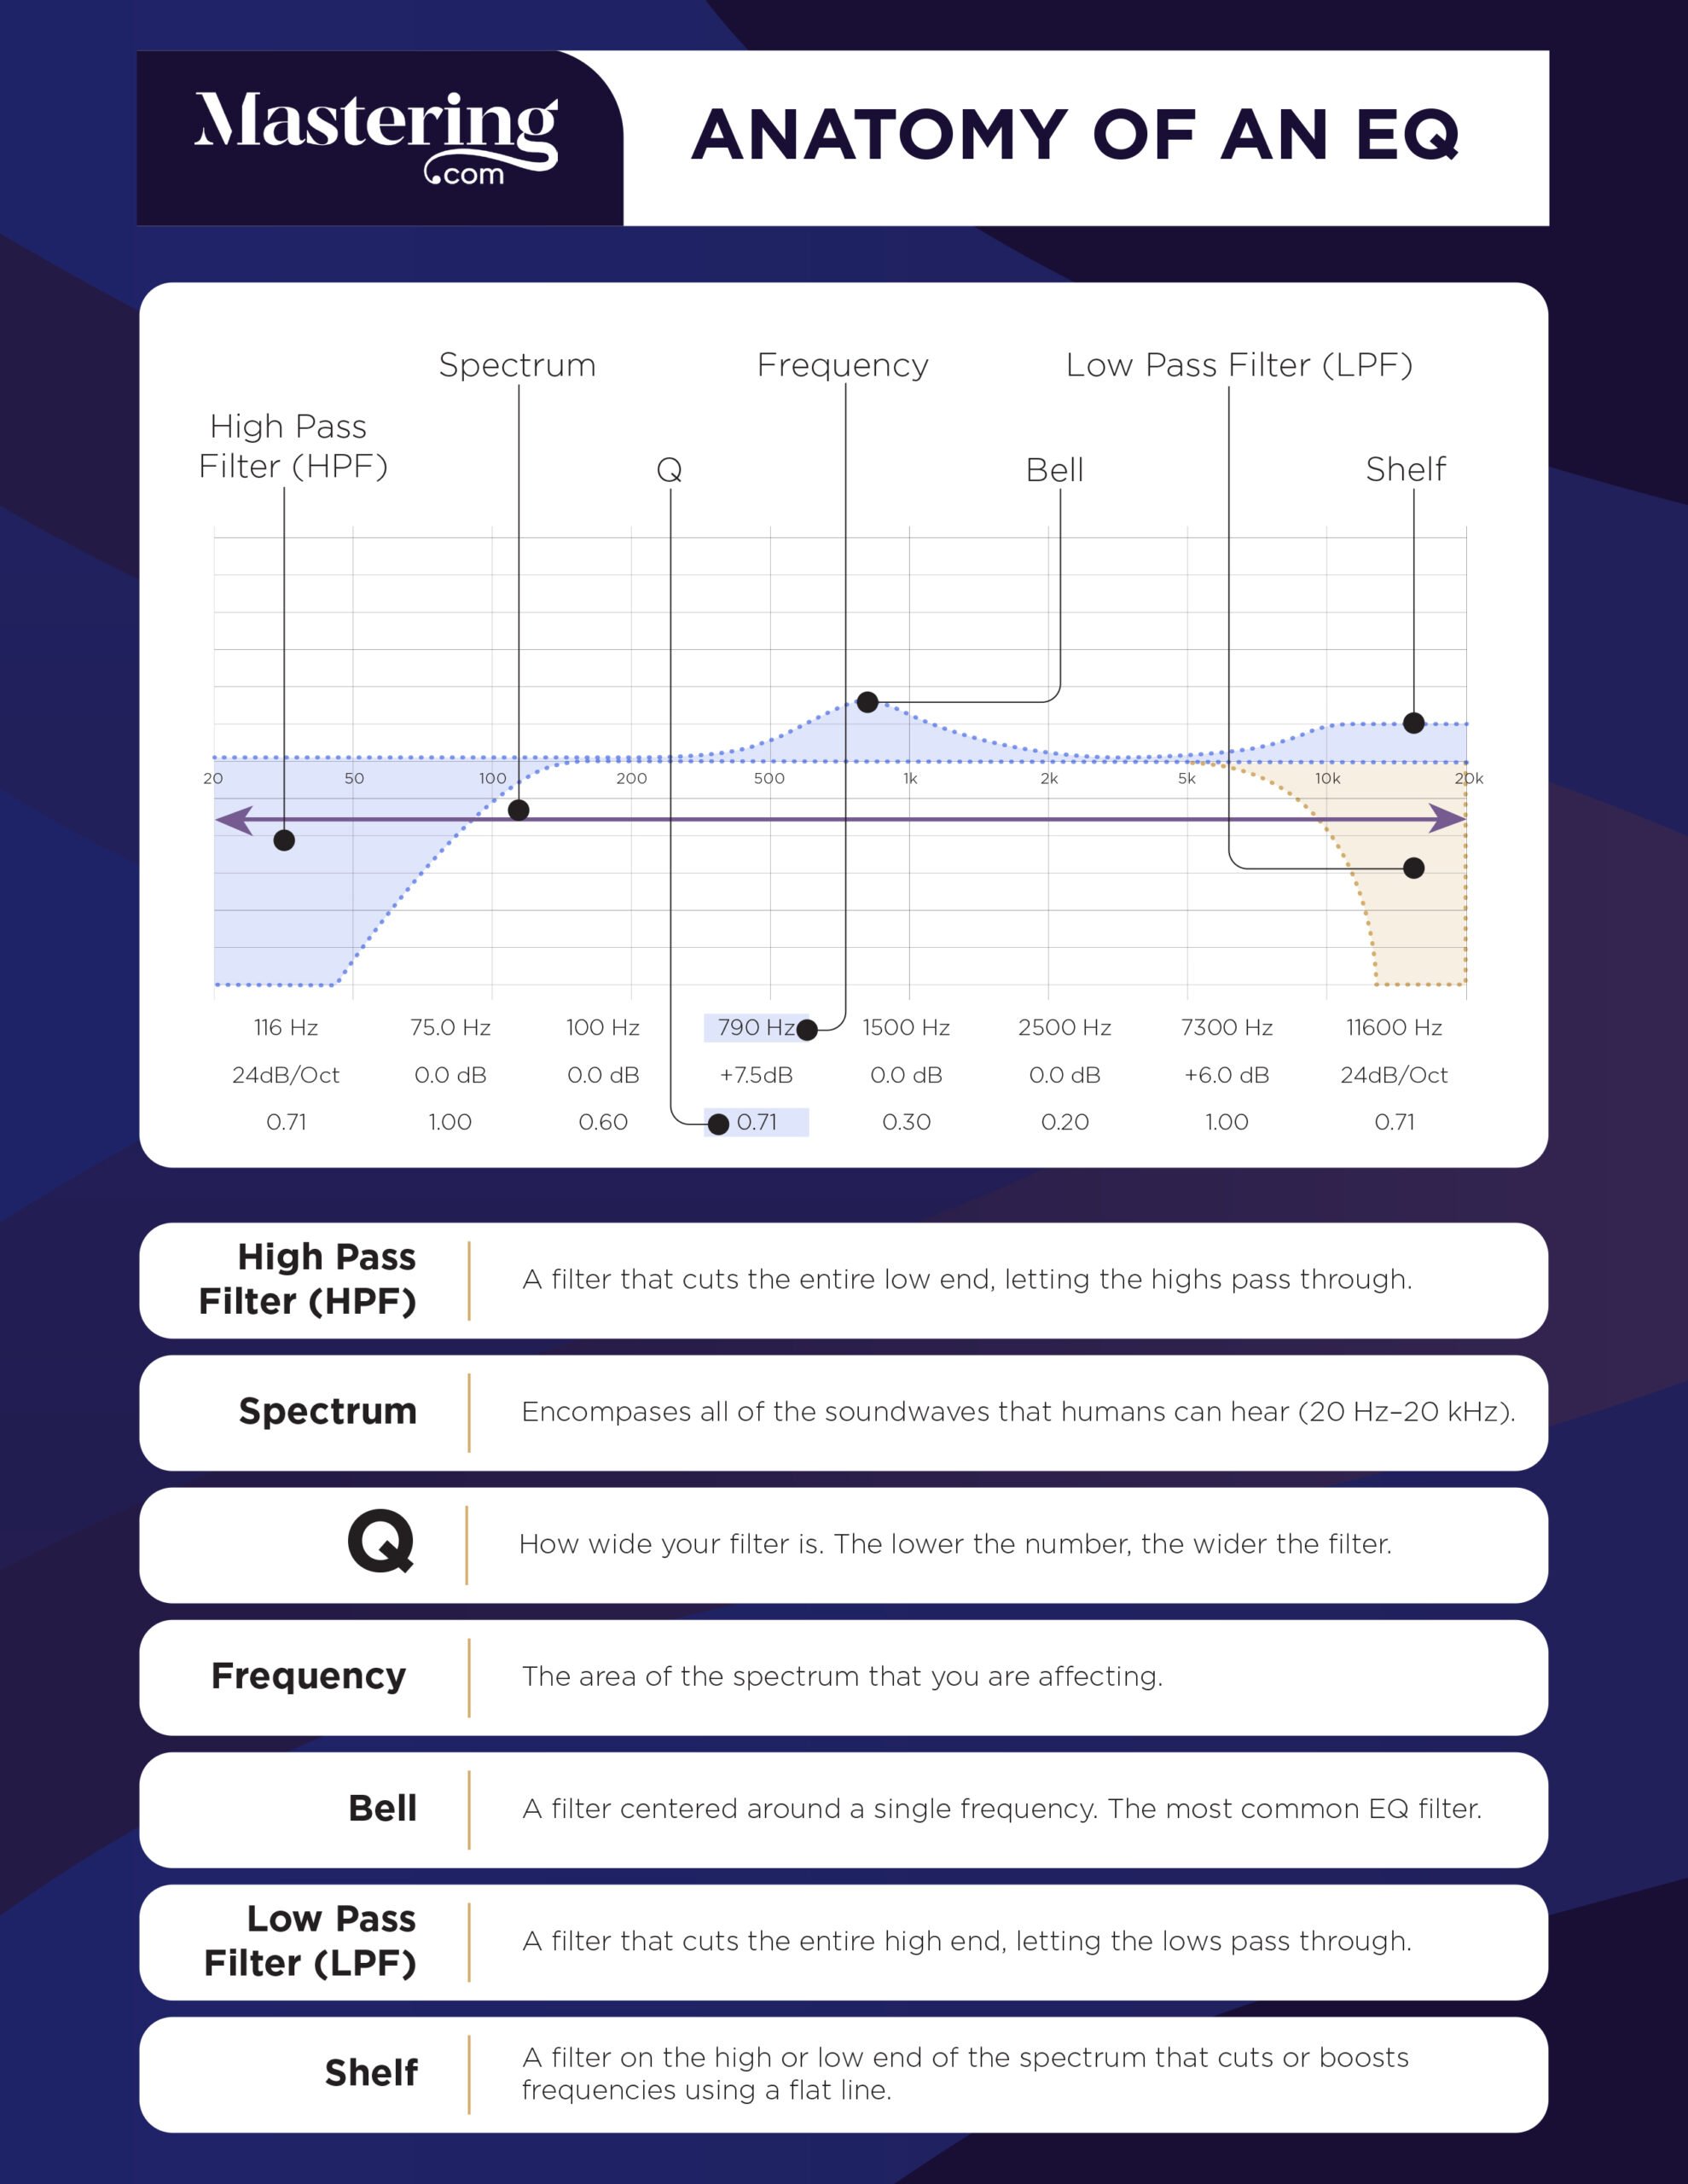
You’ll use “filters” to cut and boost different parts of the spectrum.
Which parts of the spectrum you cut or boost are up to you. Ask yourself the question: what are you trying to achieve with your EQ?
There’re four different problems you can solve with an EQ:
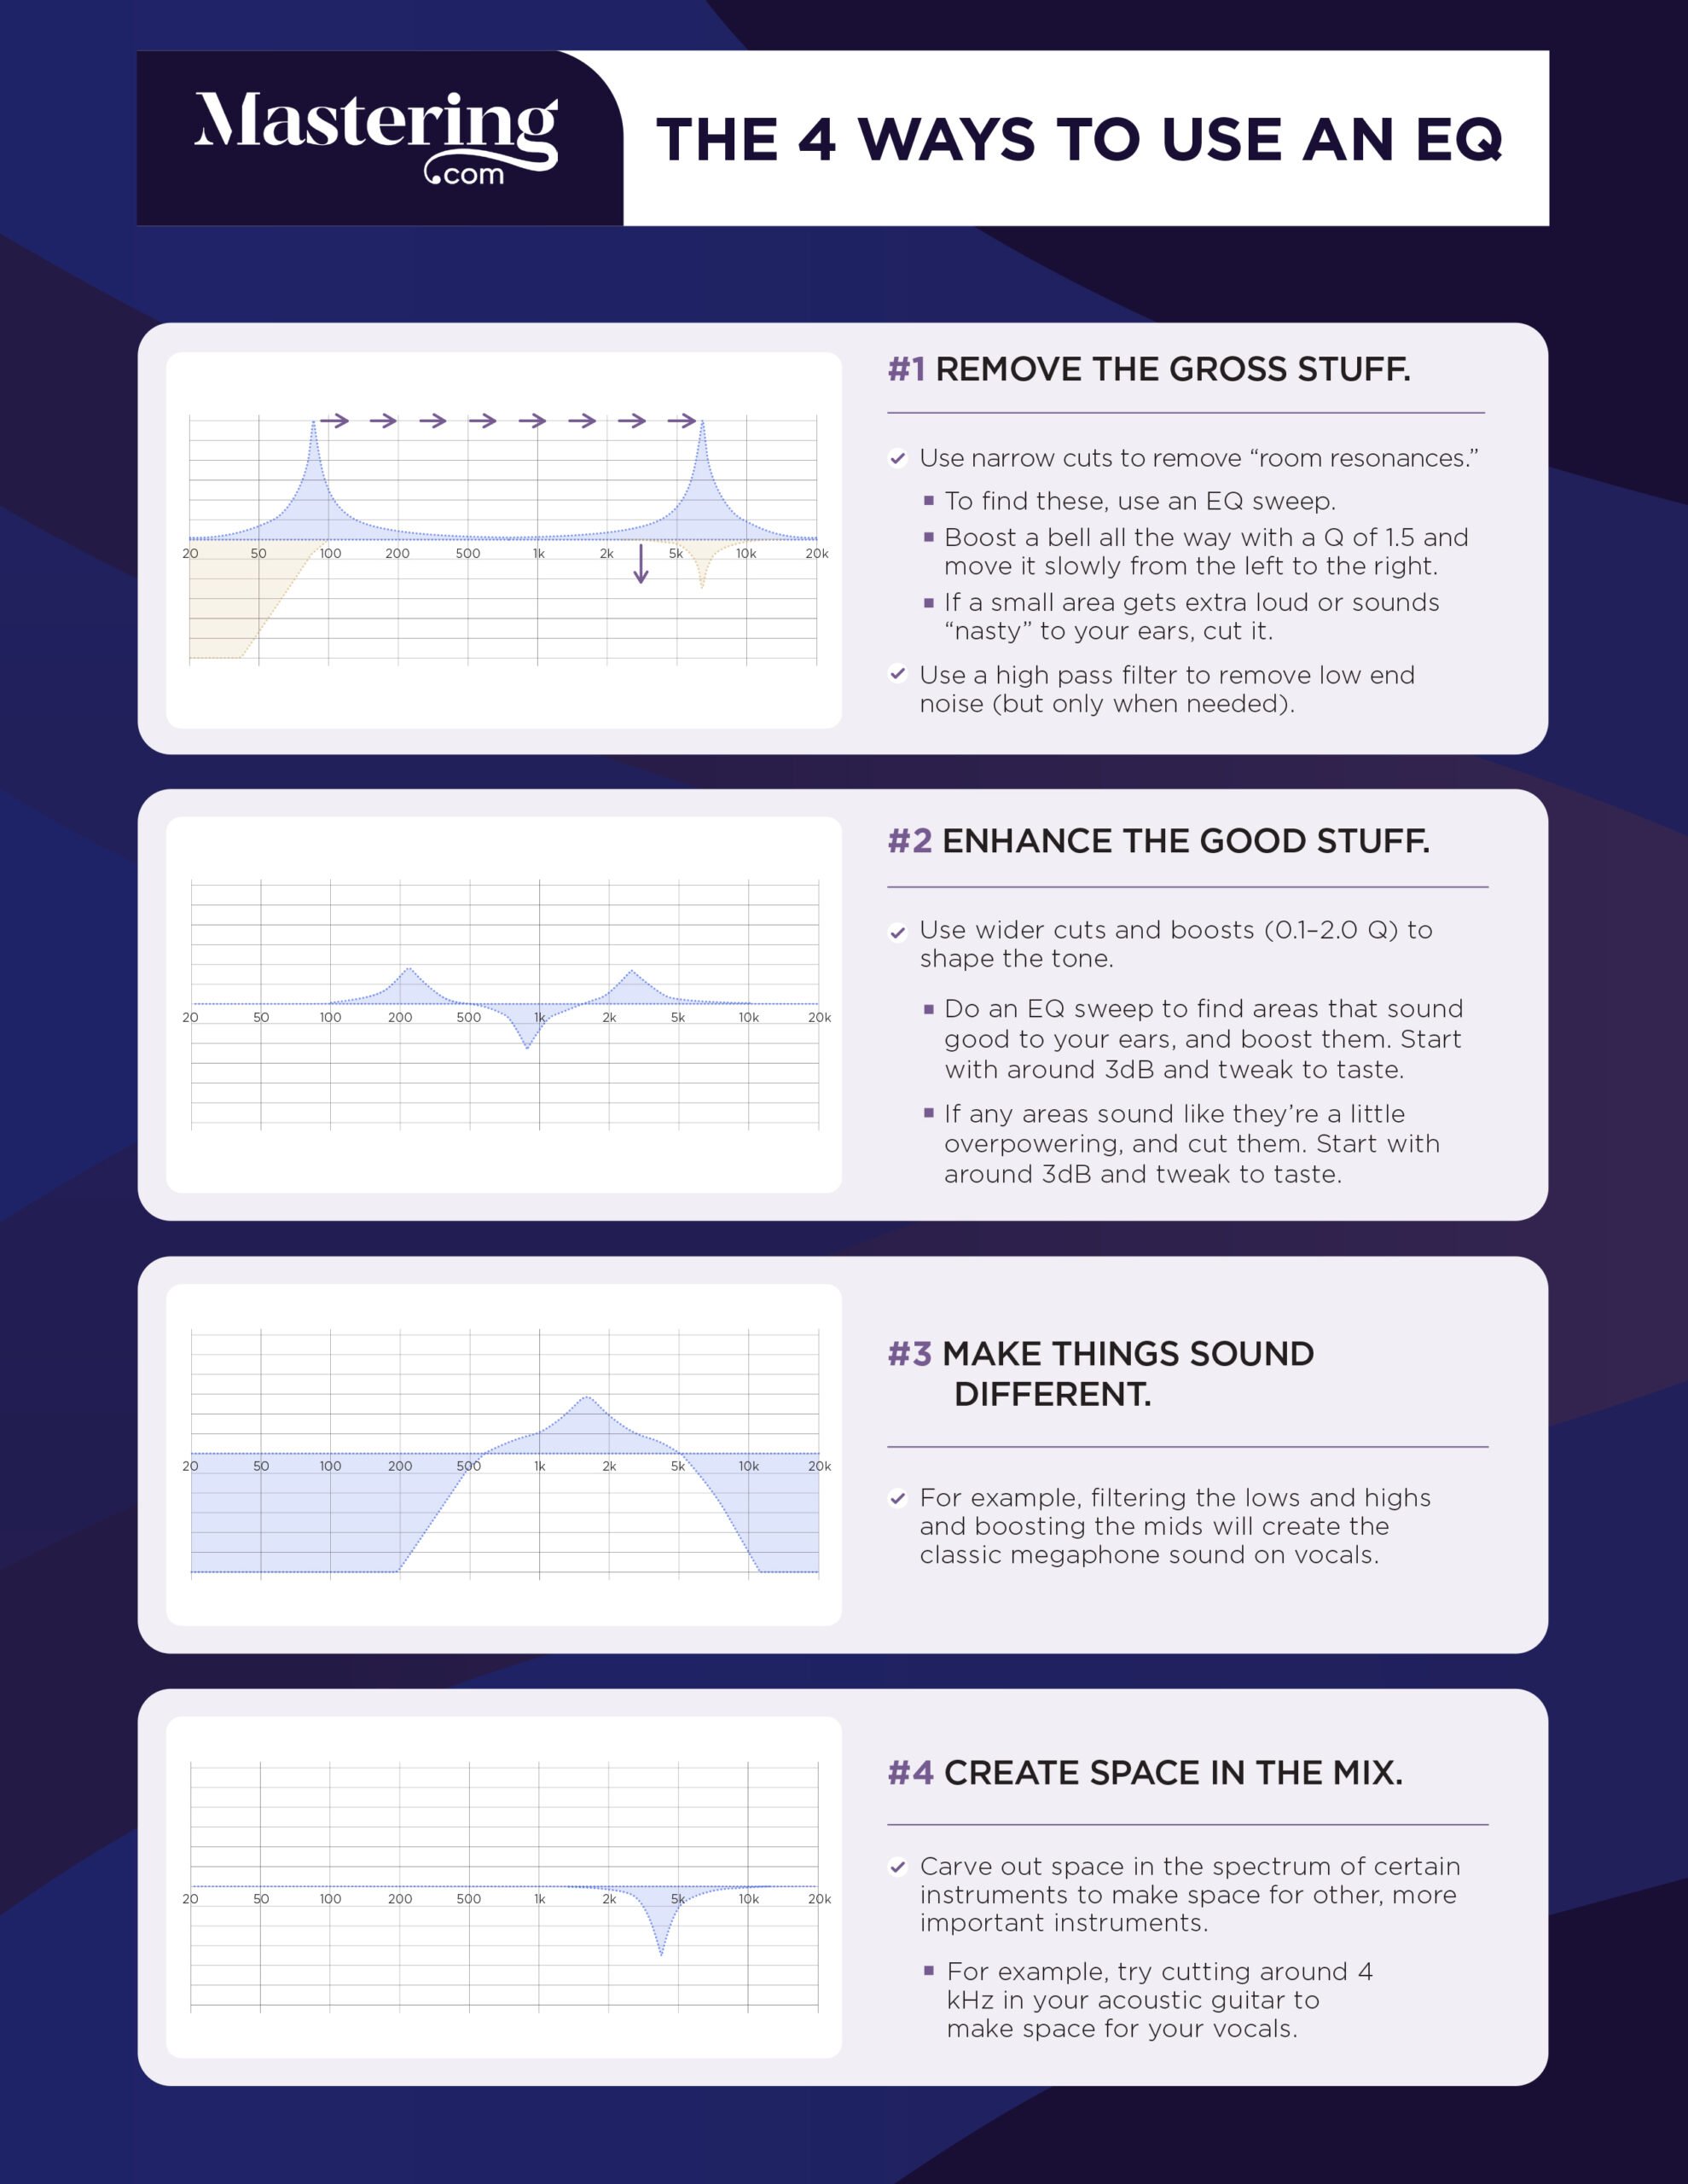
You’ll want to choose a direction before you start EQing. Always think, “What am I trying to achieve with this EQ?” rather than just slapping on an EQ and changing stuff just because you think you should.
And check out this handy diagram of frequency problems you might run into. It’s great at helping you identify what’s wrong with an instrument
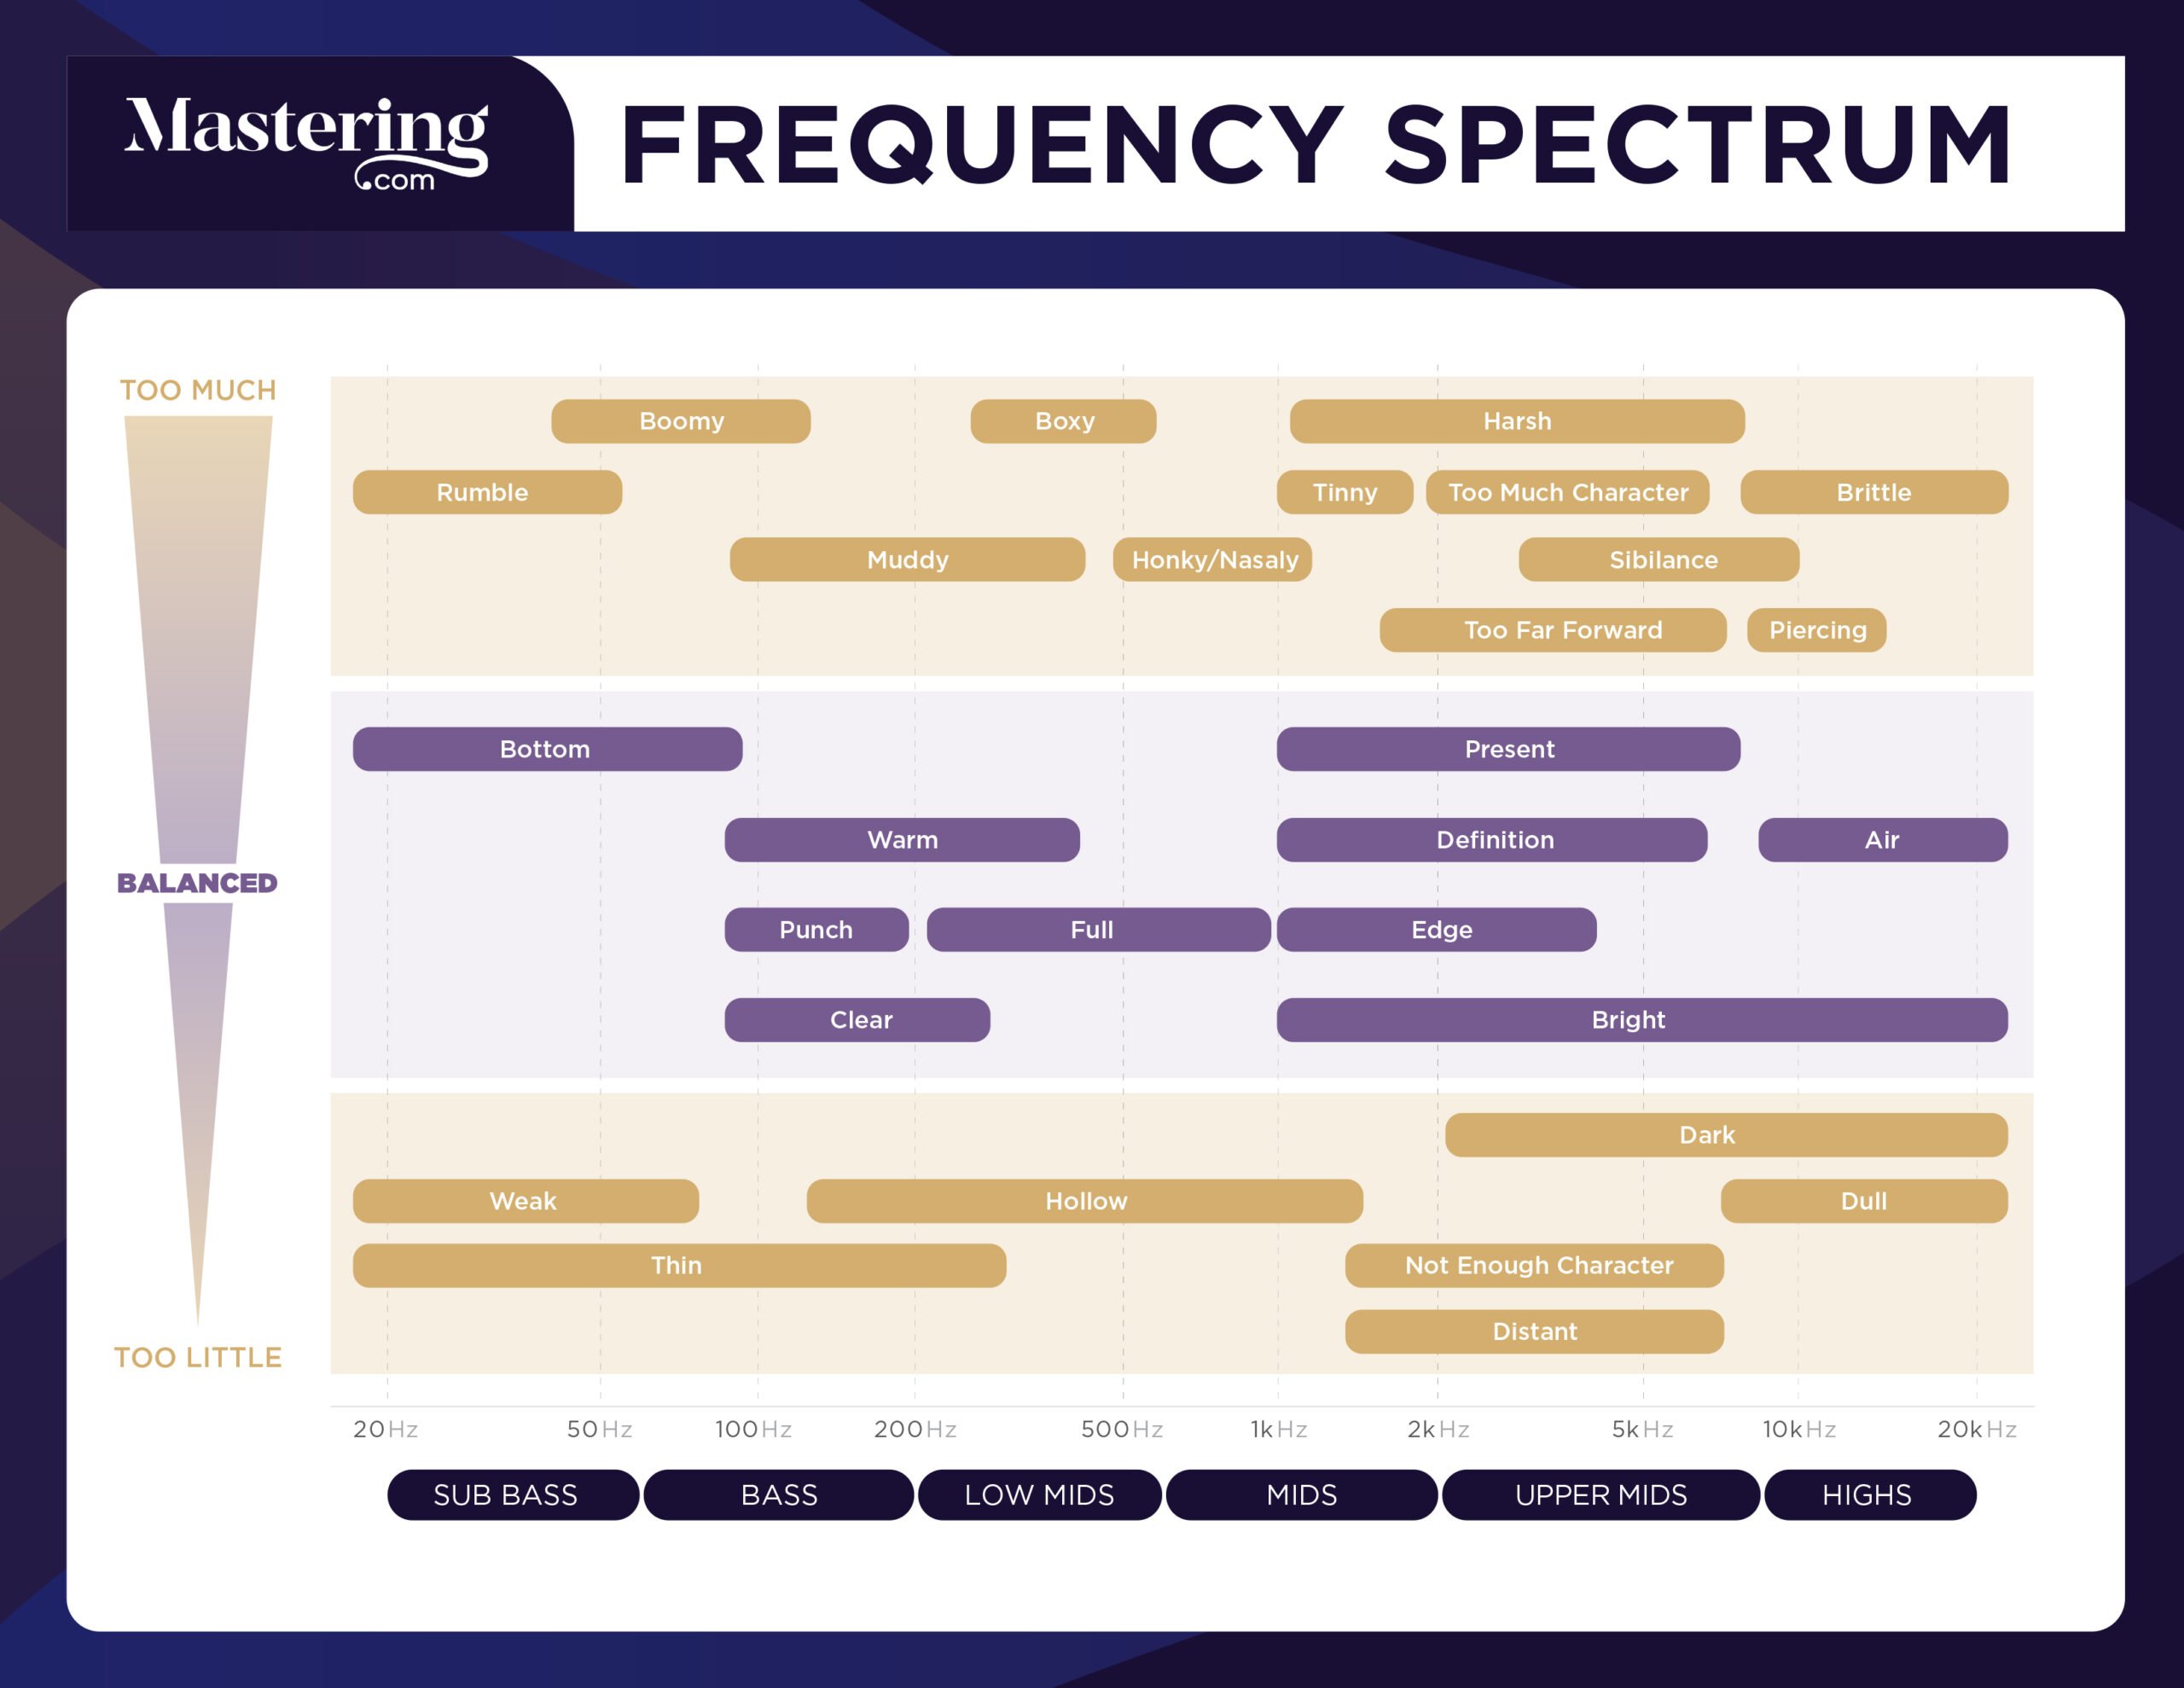
Before we move on, check out this video we made on the worst EQ mistakes I’ve made over the years. Hopefully it will put you on the right track from the beginning:
To learn more about how to EQ a mix, check out my complete guide to EQ.
NOTE: Here’s a great tip for getting really engaging and interesting mixes:
Step 5: Space (Panning, Reverb, and Delay)
By now, you’ve created a pretty decent mix using volume, compression, and EQ. But the instruments still feel like they’re competing for the same “space” in the mix.
What can you do?
Imagine a stage. The whole band is playing on it, and the listener is below in the crowd.

Right now, your mix is one-dimensional.
That means that every instrument in your band – the vocals, the drums, the guitars, the bass, and everything else – is squished together in the exact same spot on that stage. They’re all taking up the same point in space.
Because of that, everything sounds jumbled up! We need to give each instrument their own space on the stage to balance things out.
Let’s make our band 3D. The first thing to use is panning.
Panning
Panning is moving an instrument into the left or right speaker.
It allows you to make your mix two-dimensional. This lets you spread out your band to the left and right sides of the stage.
You pan an instrument by using the pan knob on the track’s channel strip.
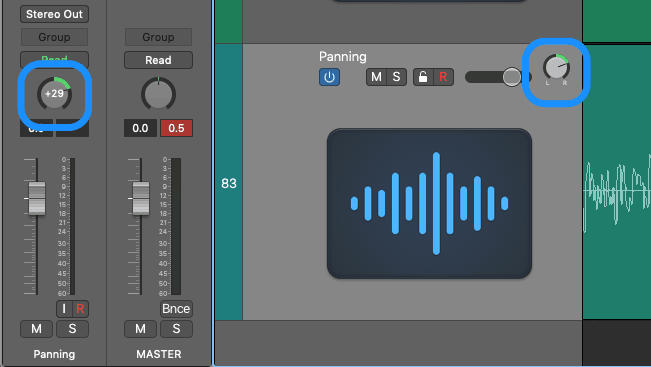
To move something towards the left, turn the knob to the left. To move it towards the right, turn the knob to the right.
Simple as that!
Panning can be as simple or as complicated as you want it to be. To keep my mixes wide (but not too wide), I use the 50/50 Panning Method.
Basically, I pan all my instruments to one of five places:
- 100% to the left
- 50% to the left
- right down the middle
- 50% to the right
- 100% to the right
Using this, the panning step is simple while creating a more cohesive stereo image.
One quick tip: make sure to keep the low end instruments and the melody in the center! Don’t pan your kick drum, bass, or vocal. Those need to keep the audience’s attention.
Now let’s add another dimension to our mix using Reverb.
Reverb
Let’s think about our band onstage again.
Right now, we’ve panned the instruments to the left and the right. So the whole band is now spread out at the very front of the stage.
But they’re still too crowded! They have width, but no depth.
It’s still hard for each musician to stand on the stage. We need to push some of them back so that everyone has their own place to stand.
This is what we’re going to do with our mix. We’re going to make the mix 3D by adding the final dimension: depth.
To do this, we’re going to use reverb and delay. Let’s start with reverb.
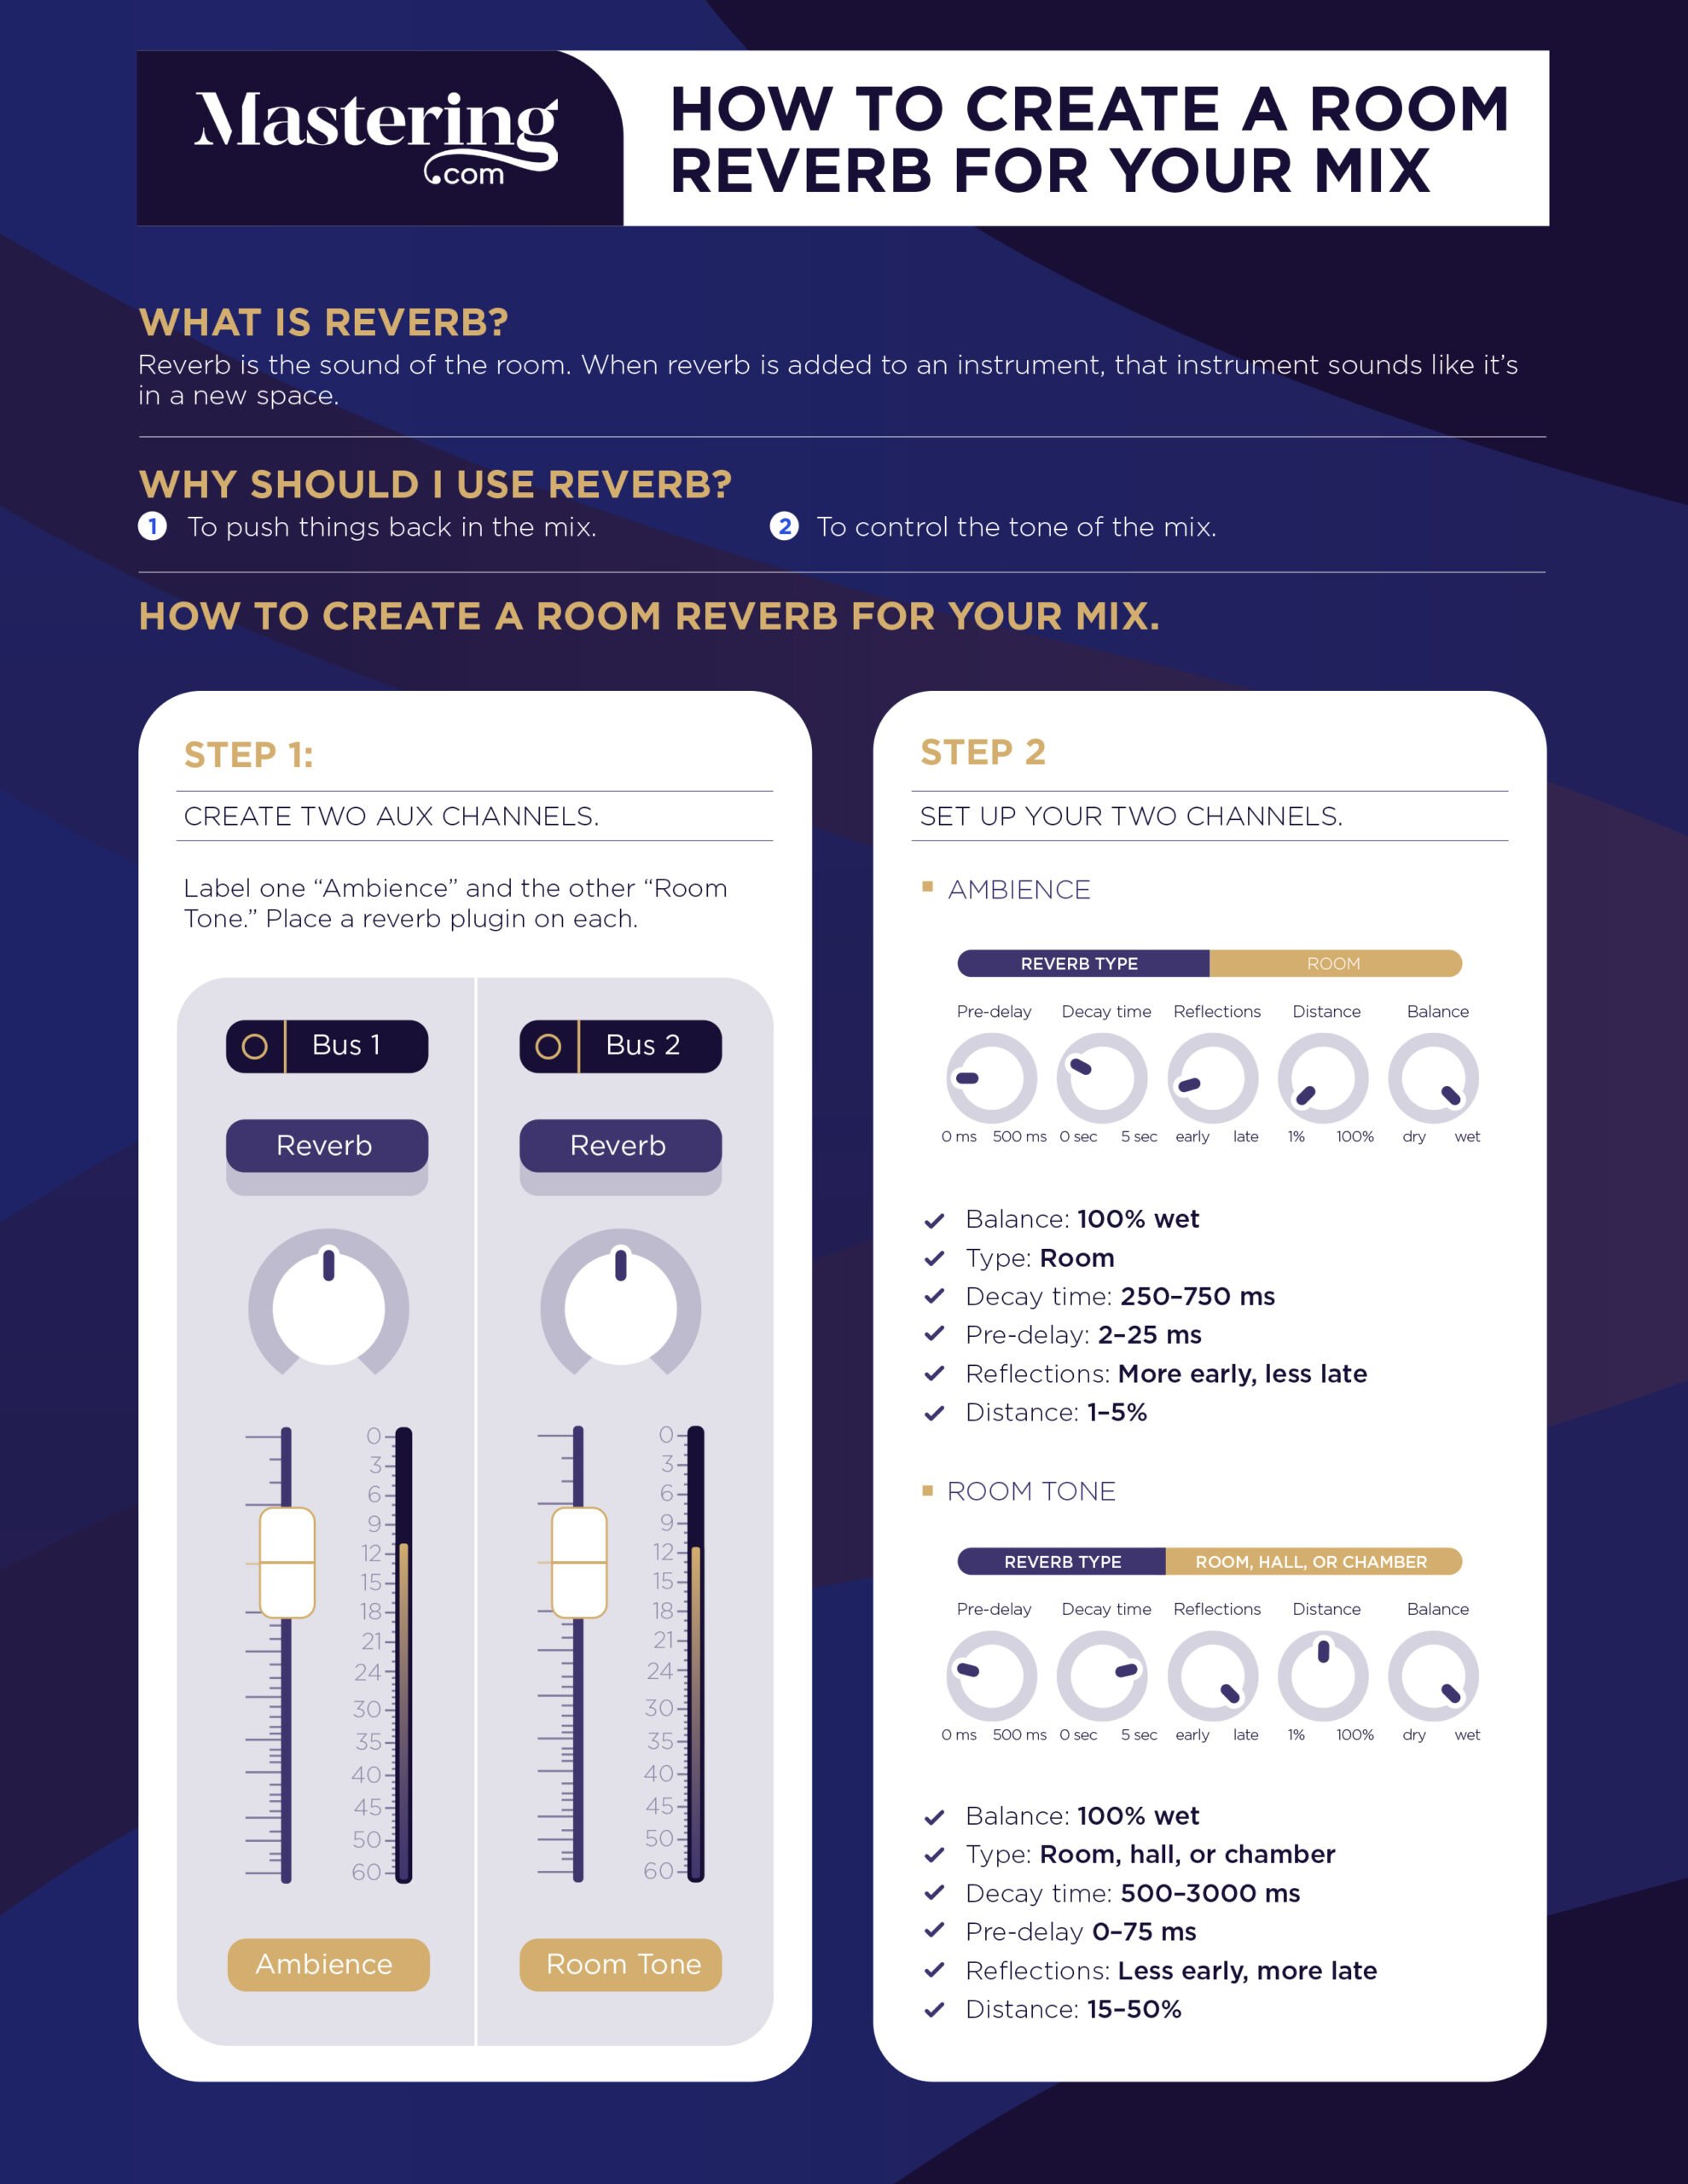
Reverb is the sound of the room. When reverberation is added to an instrument, that instrument sounds like it’s in a new space.
It could be a big concert hall, a tiny bedroom, or anything in between. It creates a “wash” of sound behind the instrument.
Plus, it creates the illusion that the instrument is farther away from the listener.
That means that instruments at the front of the stage should have only a little reverb. But instruments at the back of the stage should have a lot more.
To do this, we’re going to create two room reverbs to send each instrument in your mix. One to create depth, and another to create a cool tone:
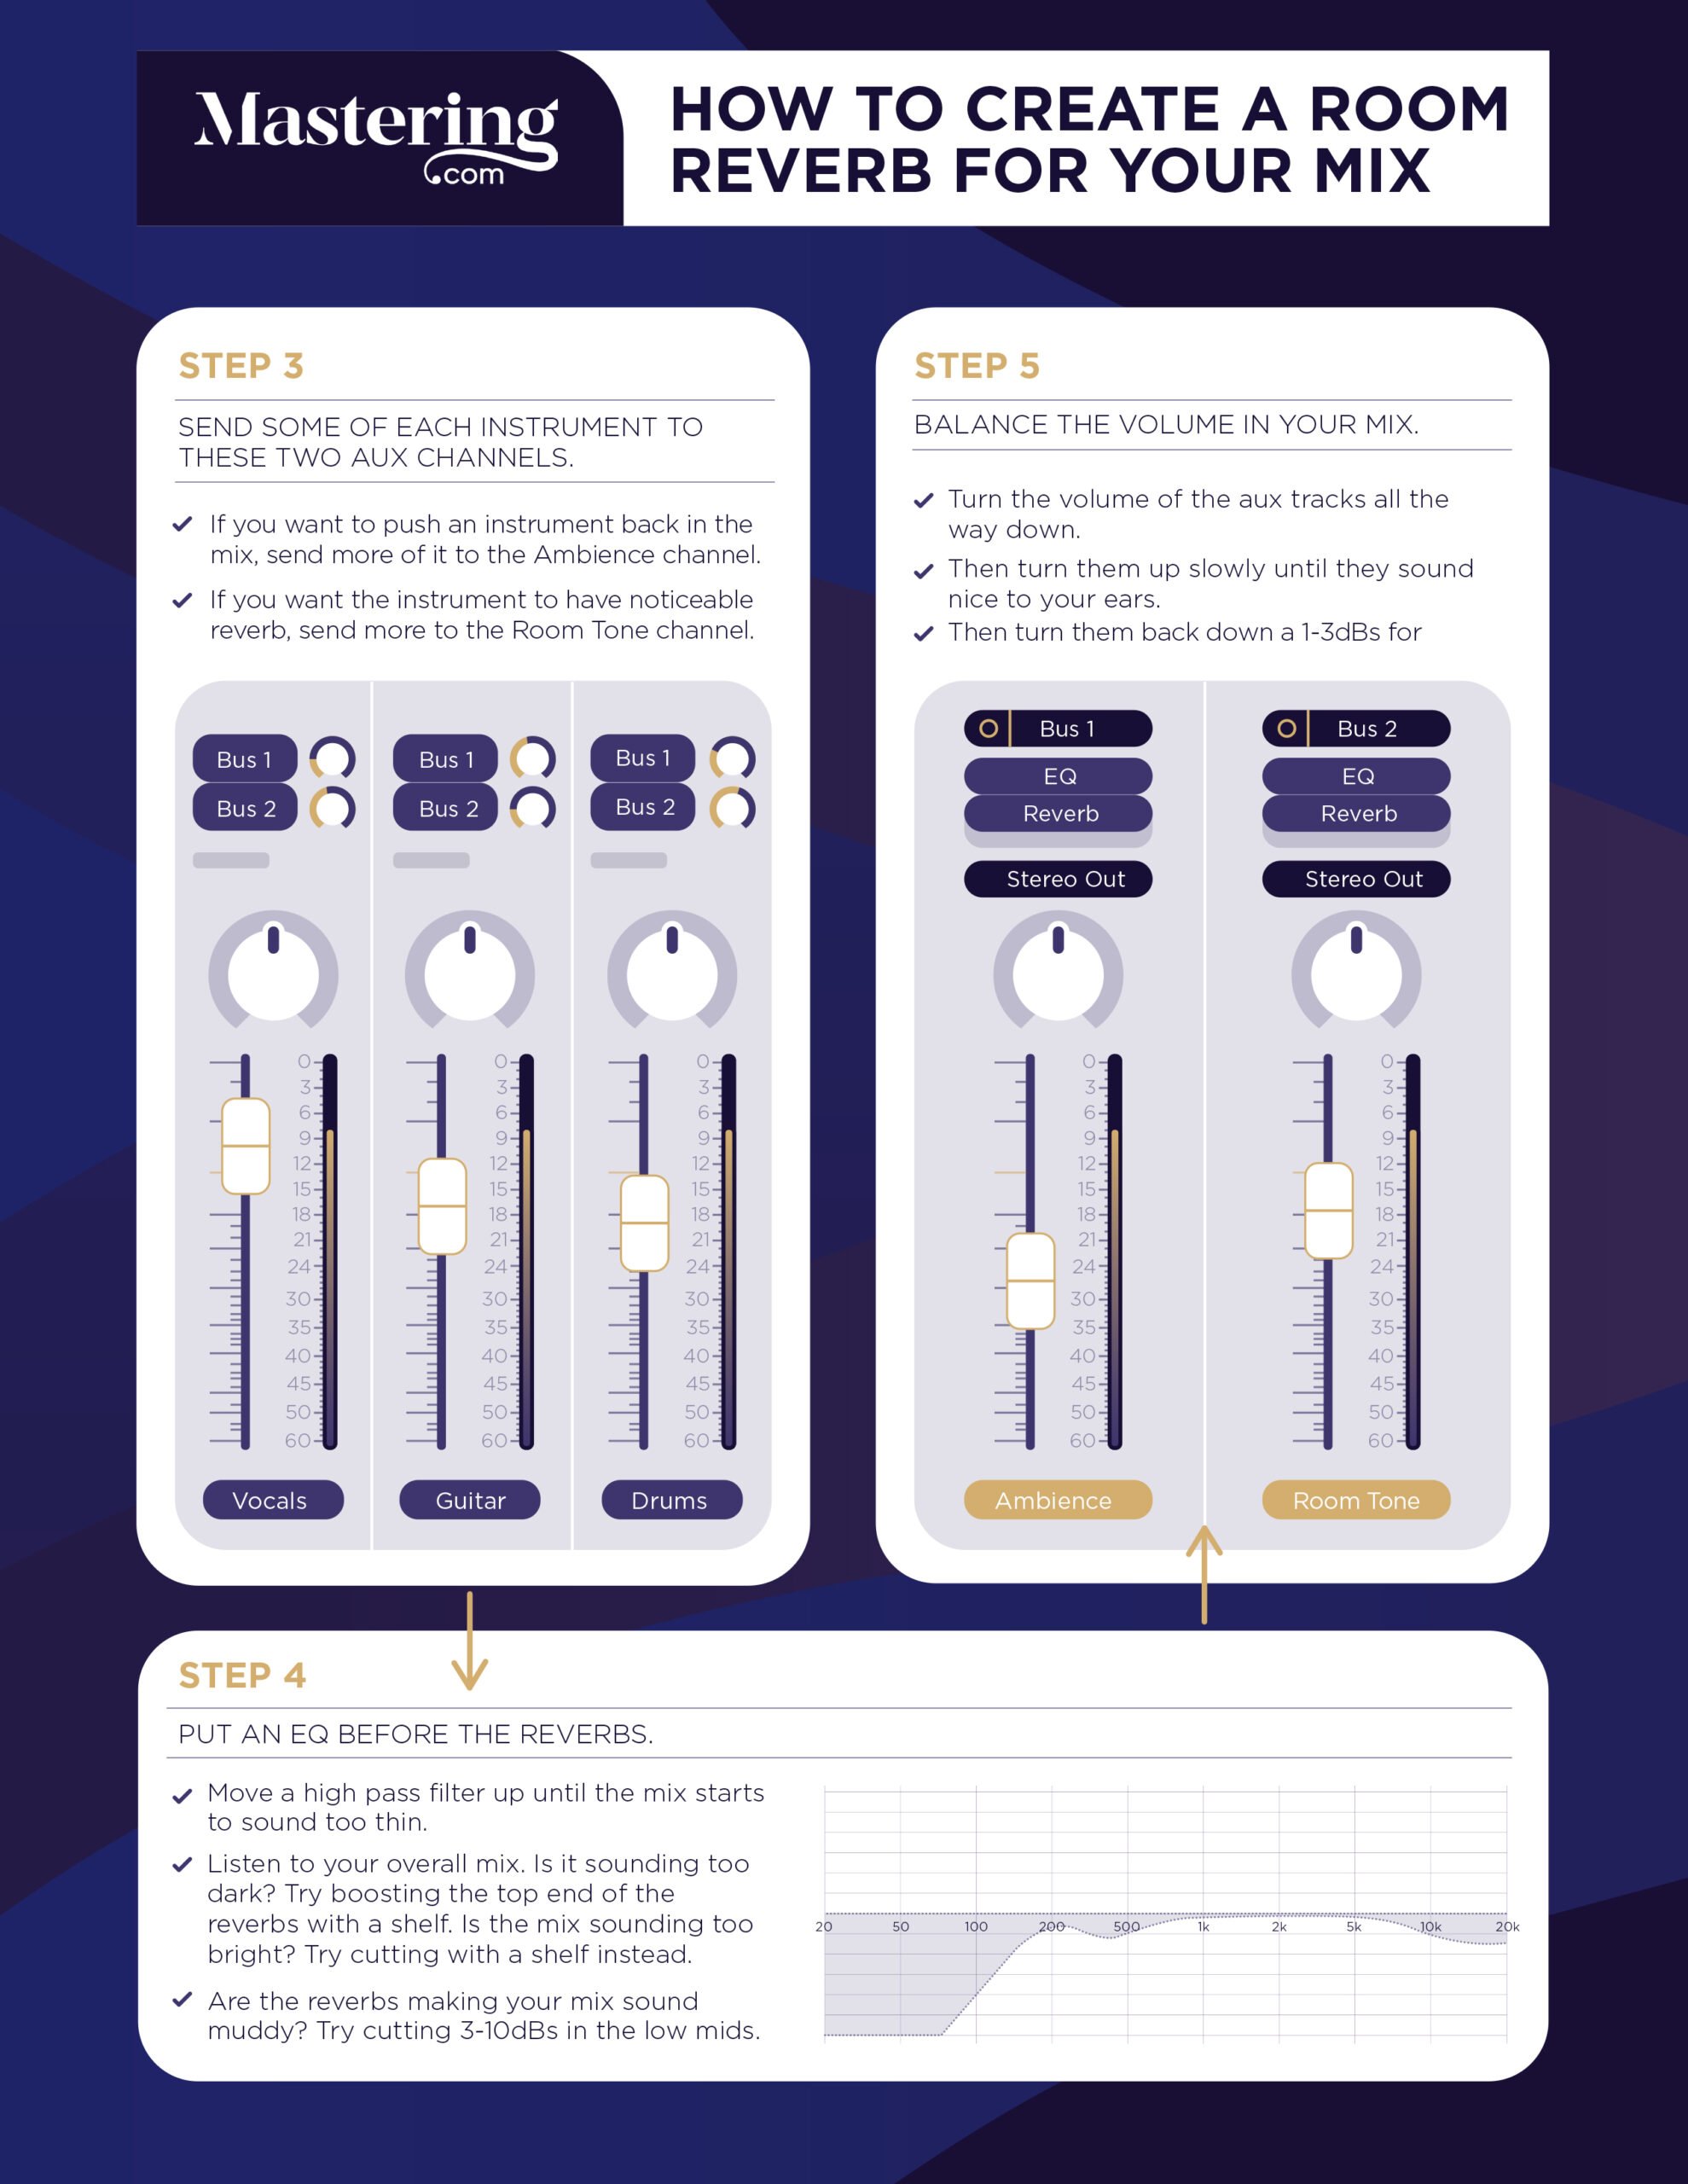
If you follow those steps, you should have a more cohesive-sounding mix already.
Sometimes, though, you want to give an instrument that “3D” sound without pushing it too far away from the listener. If that’s the case, then you’ll want to try delay.
Delay
Delay is much more precise than reverb. It’s just one repetition after another of the notes of an instrument.
Like the echo you’d hear if you yelled into the Grand Canyon.

Delay does a great job of creating a space around an instrument without pushing it too far back in the mix.
It’s especially great for vocals that you want to keep front and center.
To create a vocal delay, try out this method:
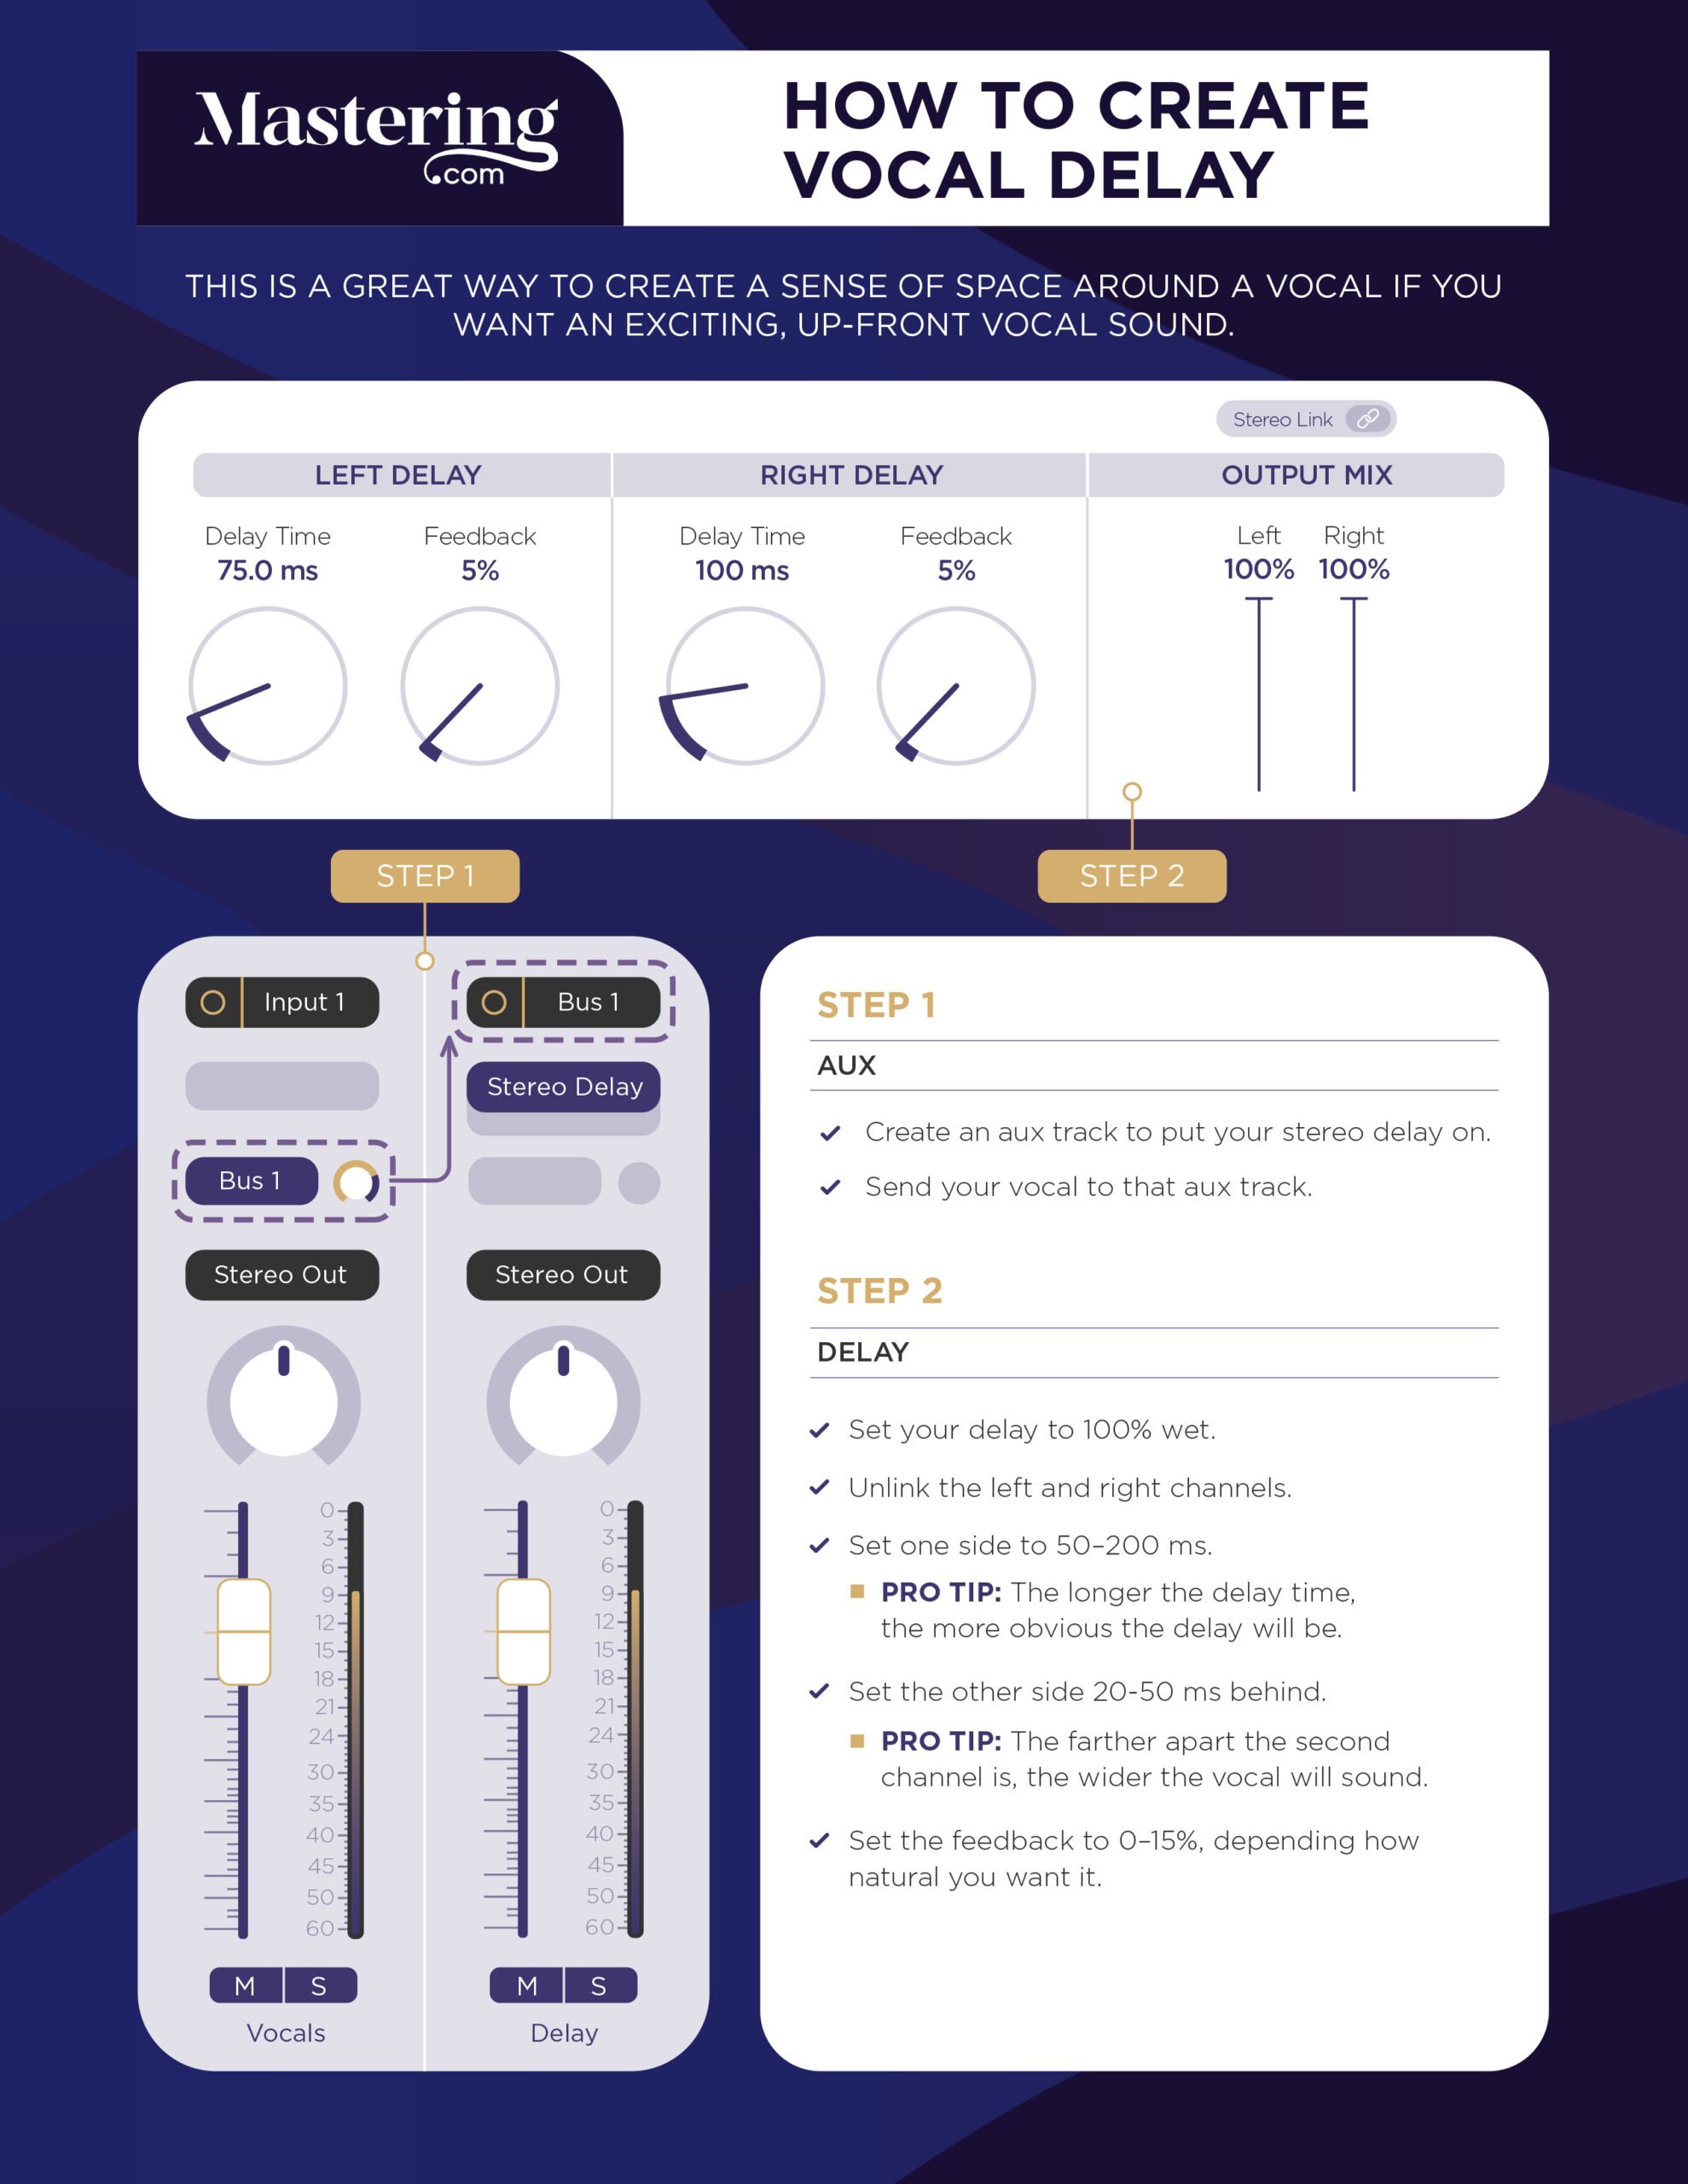
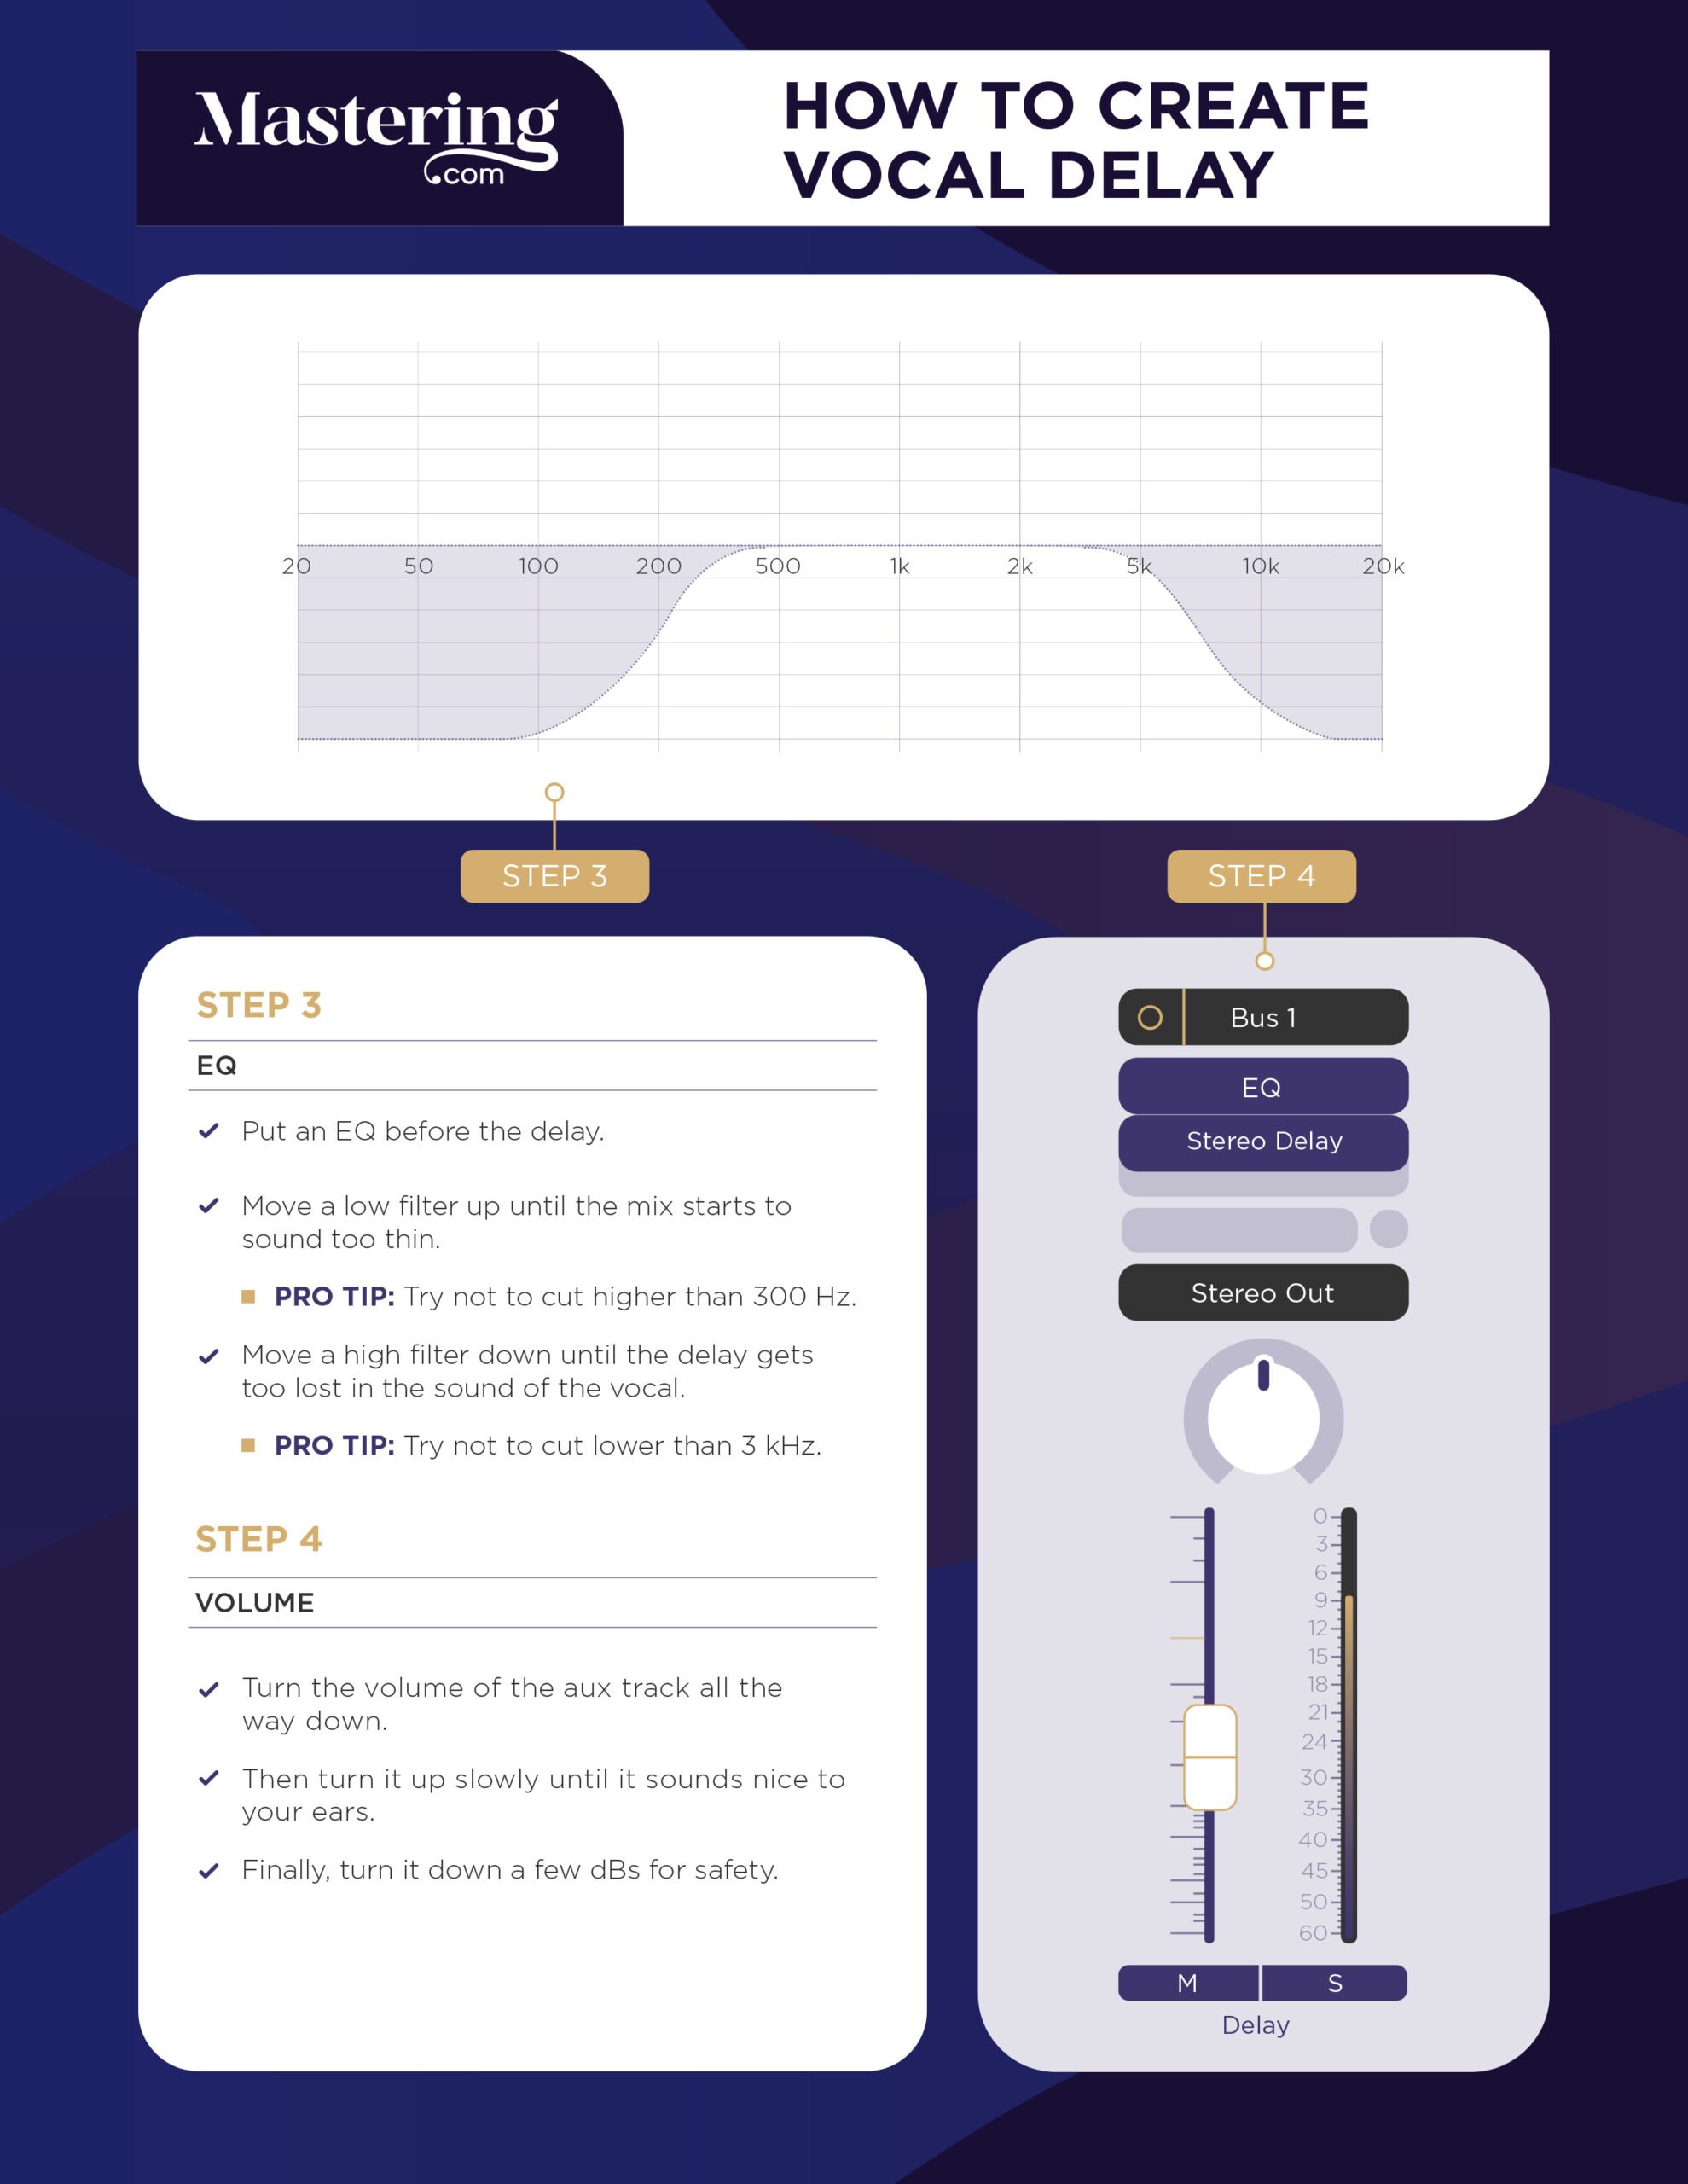
This “stereo slapback” delay works great on any melody instrument you have in your mix. I personally love using it on guitar riffs and solos as well!
Now that you’ve made your mix 3D, it’s time to work on the consistency of the entire mix.
Step 6: Volume Automation
Right now, the section you’ve been looping probably sounds great. You’re probably feeling pretty happy with it.
But if you listened through the entire song, you’d realize that every other section sounds… weird.
That’s because you’ve made your volume balance to fit the loudest section of the song. Not every second of the song will have the same volume balance.
So what we need to do is listen to the song beginning to end. Use automation to make the volume consistent throughout.
Before you start, I’d listen to your reference tracks again. You want to refresh your ears when you start creating the volume balance for the entire song.
The actual act of volume automation is pretty simple.
Open up your automation channel. Create points around the section you want to make louder, and pull that instrument’s volume up.
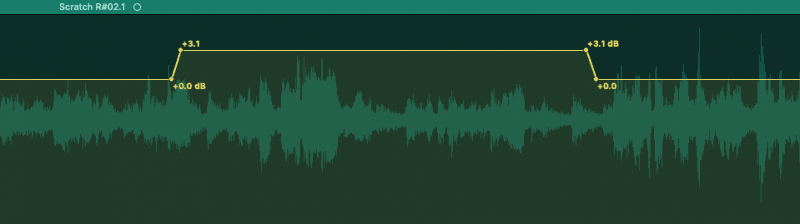
Make sure to spread the slope of the automation out a bit to make the transition more musical.
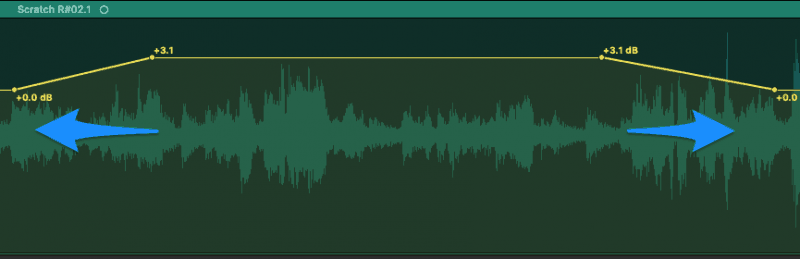
You can also use automation to catch the listener’s attention. For example, during spaces between the vocal, the audience’s interest tends to wane.
This video shows you how to use automation to highlight other instruments in those gaps between melodies.
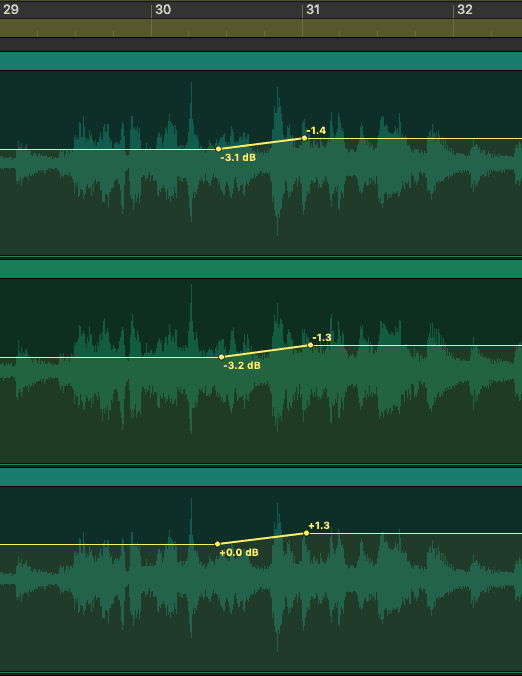
You can also use volume automation to build excitement in a song. I’ll often make the instruments grow a little in volume right before a big chorus to help build the energy of the song.
Keep in mind that this step is almost always mandatory. Unless it’s a very simple song or a live performance, it most likely won’t be consistent in volume for the entire song.
Don’t skip it!
Step 7: Effects
Now that your entire song is sitting well, it’s time to add something fun.
Effects are great to give your song a tonal edge. They help to create interest in the sound of the song, rather than relying on just the song itself.
There’re tons of different effects that you could add to different sections of a song. Far more than we can cover in one article.
So we’ll just be going over the most common ones.
Many people use delays as an effect. These delays are meant to be loud and obvious rather than the subtle delay you used for the vocals.
You’ll set them up in the same way as the vocal delay described above, but the delay time can be any length you want.
For a starting place, a quarter note delay often sounds cool as a vocal effect. And a dotted quarter note delay can sound very cool on an electric guitar.
Check out the video below for some other cool delay effect ideas, plus a few reverb effects as well:
Another effect that’s used often is distortion (also known as “saturation”).
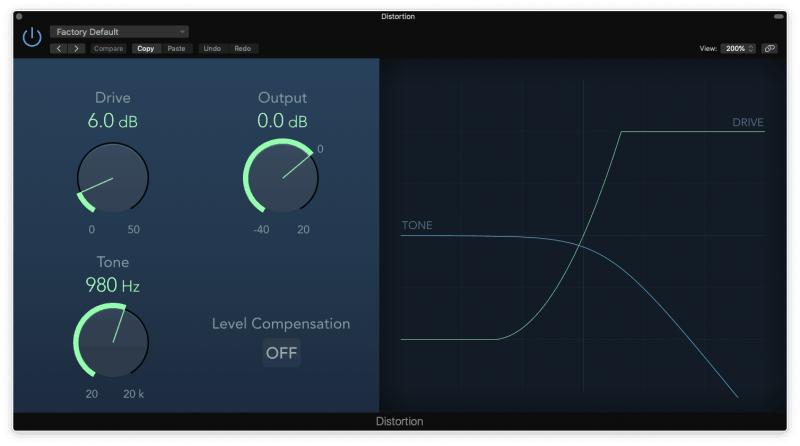
You see this often used on electric guitars, vocals, and sometimes even drums.
This can be used either as a send (like delay or reverb) or put directly on the channel. It just depends on how aggressive you want the crunch to be.
Another popular effect is chorusing.
A chorus effect makes an instrument sound like it’s been doubled. If used aggressively, it’s like it’s swimming underwater:
You’ll hear this effect on guitars, vocals, and pianos.
Step 8: Final Checks
And with that, you’re almost done! Now it’s time to go through with a fine-tooth comb and make sure everything is fitting well.
During your final checks, anything is fair game. You may need to tweak the EQ of a guitar, or change the compression of a bass, or add more reverb to a vocal.
You may need to add more effects to the drums during the verses. Or turn up the synths in the bridge.
Anything we talked about in this guide can be tweaked.
This last step is important. Some of the tools in your mixing toolbox will affect the sound of other tools.
For example, compression often changes your volume balance. Because it’s making those soft sounds louder.
Adding distortion to a sound might make it sound too harsh, causing you to go and tame the top end in your EQ.
A few tips for using your final check step effectively:
- Give yourself at least a 12-hour break before starting. Let your ears reacclimate to the sound of the world. You’ll hear more problems with your mix with a set of fresh ears.
- Listen to the song from beginning to end and take notes. What would you change about this mix? That list is your guide to finishing this step up.
- Don’t forget to use your reference tracks. Listen to them every fifteen minutes or so to re-acclimate your ears to the sound of a professional mix. You’ll find more problems in your own mix that way… which means you can fix those problems!
Once you’ve finished up your final checks, you’re done! The mix has been completed.
Now all that’s left is to send the mix to a mastering engineer or a service like Landr or Aria to get mastered. Once you’ve got your mastered track in your hand, you’re ready to release your masterpiece.
UPDATE: If you feel like your Mixes are plateauing, then you need to watch this:
BONUS: Mixing Different Instruments
The basics of mixing are the same regardless of what instrument you’re working on.
But sometimes different sounds call for different solutions.
Here’s our little treasure trove of mixing tips for different instruments. Just click the button of the instrument you want to learn to mix. Enjoy!
Vocals
How to Make Vocals Sit In The Mix
ARVE error: The [arve] shortcode needs one of this attributes av1mp4, mp4, m4v, webm, ogv, url
How To Use a De-Esser
ARVE error: The [arve] shortcode needs one of this attributes av1mp4, mp4, m4v, webm, ogv, url
How to Do a Full Vocal Production
ARVE error: The [arve] shortcode needs one of this attributes av1mp4, mp4, m4v, webm, ogv, url
How to Mix Background Vocals
Drums
How to Mix Drums
How to Compress a Snare
How to EQ a Kick Drum
Bass
How to Compress a Bass Guitar
Guitars
Top 7 Tips for Mixing Guitar
ARVE error: The [arve] shortcode needs one of this attributes av1mp4, mp4, m4v, webm, ogv, url
One Last BONUS…
Sometimes, it’s nice to just have a few simple tips.
There’s been a ton of info in this article! I applaud you on making it this far.
This next video has 16 mixing tips that are simple, consistent, but powerful.
Using these tips on your songs will result in at least a 10% boost in quality. I guarantee it.
ARVE error: The ARVE error: The [[arve]] shortcode needs one of this attributes av1mp4, mp4, m4v, webm, ogv, url
UPDATE: We released another mixing tip video that demonstrates 21 mixing tips I wish somebody had taught me when I was a beginner.
CONCLUSION: Mixing
Phew. That was a lot, wasn’t it?
Congrats on making it all the way through this jam-packed article!
Next Steps
If you want to dig deeper into music production and learn what it actually takes to make mixes that sound pro…
And you’re an intermediate or advanced producer…
Be sure to check out the free masterclass:
Enjoy!