Sidechain compression is an extremely confusing but powerful tool that every producer has at their fingertips.
It’s an incredible tool for creativity (I’m looking at you, EDM) AND a secret trick for creating space in your mixes.
Today, we’re going to learn how to create sidechain compression and my 5 most powerful tricks to make your mixes sound like the pros.
Once you grasp the basics of sidechaining and these 5 techniques, you can produce mixes that have more space, energy, rhythm, and separation.
I’m guessing you’re here because you want to make your mixes sound professional. We put together a brief training that covers a totally new approach to music production. Until now, everyone has been teaching production totally backward. Just click below to watch.Get industry-quality every time (steal this framework)
But if you just want to learn about sidechain compression specifically, keep reading.
What is Sidechain Compression?
You might be wondering…
What is sidechain compression? How is it used in music and mixing?
Compression, in its basic form, is a tool that allows us to control the dynamics of a source.
In essence, it’s an intelligent volume control. You are telling the compressor to turn something down once it goes above a certain level.
Now, sidechain compression is exactly the same as regular compression. You have a threshold, ratio, attack and release times…
But there is one key difference.
With regular compression, the plugin will monitor the level of the channel and control the volume of the same channel.
However, when you engage the sidechain, you can tell the compressor to monitor something else. A different channel or instrument, for example.
So the compressor is monitoring one thing, and controlling another.
When the other channel (sidechain) gets louder, the compress clamps down on the channel that it is applied to.

Let me give you a basic use case. Sidechaining first became popular among DJs. They would load up a compressor on the channel that was playing the music but sidechain it to the microphone.
Now when they talk through the microphone the level of the music automatically drops. No need to manually ride the fader.
Of course, there are far better applications, which you will learn about later in this guide.
How to Sidechain Your Compressor
The exact steps will vary depending on your DAW, but it should be relatively simple.
You can watch the entire process in this video:
Step #1: You need a compressor that supports sidechaining. I use Pro Tools and Logic Pro X mostly, and they both have a stock compressors that have a sidechain.
Of course, you can apply this technique in most DAWs, including Ableton, Cubase, Reason and FL Studio 12.
Just check if your stock compressor can do it, and look for a new sidechain compressor if it can’t.
Step #2: Add the compressor to the channel that you want to compress (more on this later).
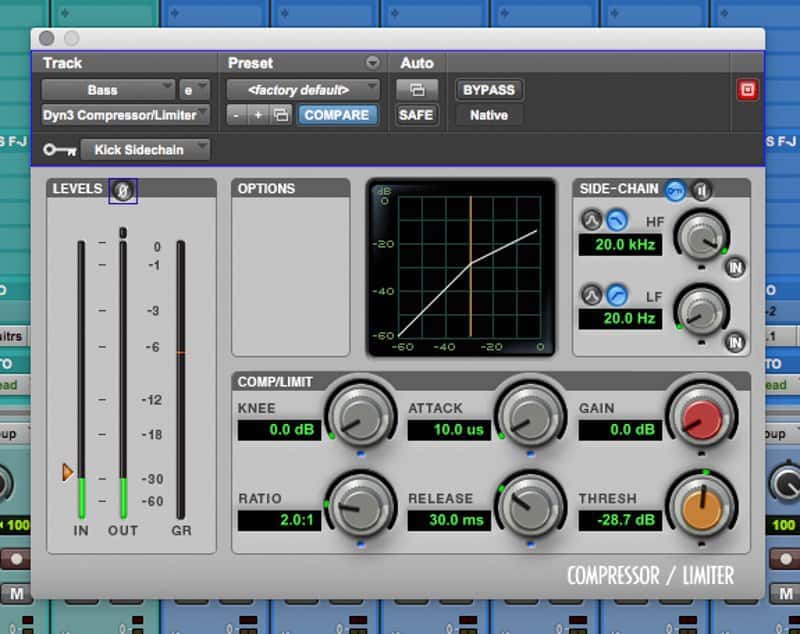
In this example, I want to compress the bass guitar when the kick drum hits. So I apply the compressor to the bass guitar.
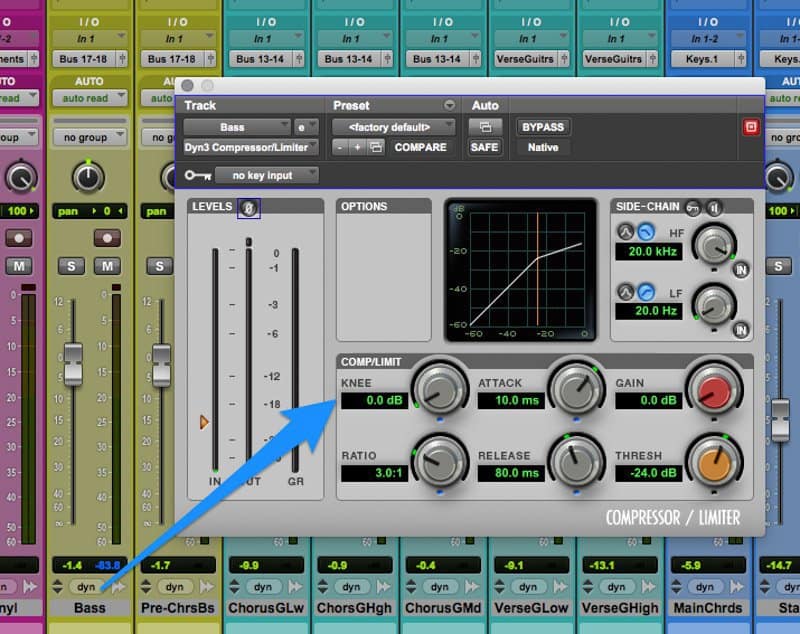
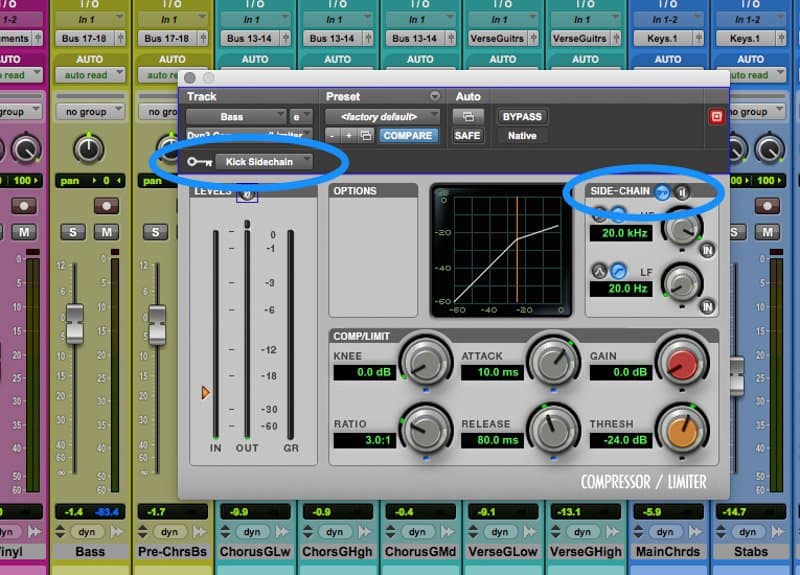
Step #3: Now engage the sidechain on the compressor and select the channel that you want to control the compressor. In this case, it’s the kick drum.
Depending on your DAW, you might have to create a new bus or send to do this. Make sure to label it clearly (e.g. ‘Kick Sidechain’).
Step #4: Everything is set up now, so it’s time to adjust the settings. Start with a ratio of 2:1 and lower the threshold until you have the desired amount of gain reduction. Let’s go for 2-3dB in this example.
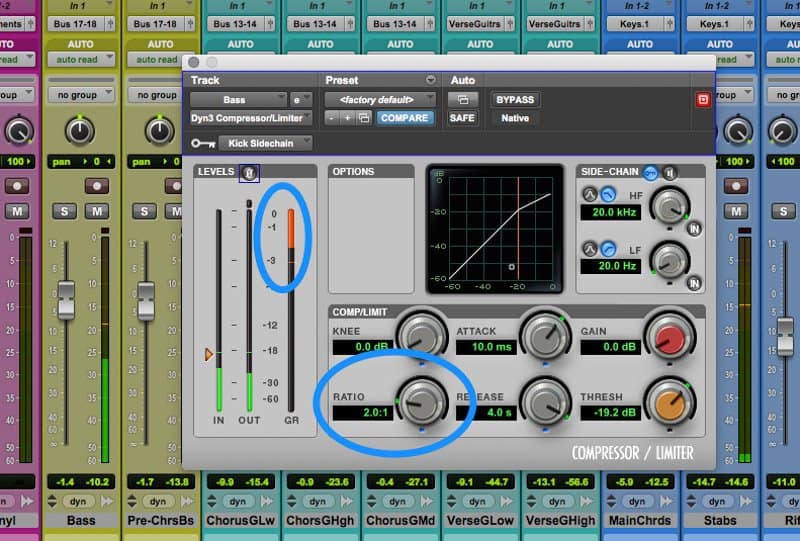
Notice how the compressor ducks every time the kick hits (or whatever else you are using as a sidechain), NOT when the bass hits.
Step #5: Adjust the attack and release time to taste. In the majority of cases, you will want a fast attack (under 2ms)…
But the release time depends on your intention.
Time it to a quarter note for obvious pumping (common in dance music), or make it faster for subtle ducking to make room for the vocals or kick drum. You will learn more about release time in the following section outlining the main use cases.
That’s it! It may seem hard at first, but it’ll become easier and easier the more you practice.
Now let’s check out these 5 tricks for making your mix even better with sidechain compression.
Trick #1: Sidechaining to Create Room for the Vocals
As a mix engineer, using sidechain compression on vocals is the technique that I find myself using the most.
By sidechaining the vocal and compressing guitars, keys, backing vocals – or even the everything EXCEPT the vocals…
You can subtly create more room in the mix for the vocals to cut through.
Add a compressor to whatever is interfering with the vocal. Sidechain the vocal, start with a ratio of 2:1 and adjust the threshold until you see 1-2dB of gain reduction. Apply 1dB of makeup gain.
A super-fast attack time is required for this to work. Start with the attack as fast as it will go. If this sounds odd, or you hear clicking, slow down the attack time until these artifacts disappear.
A fast release time also helps to make this subtle. Start around 30ms and go from there. You want the instruments to return to their level pretty fast after the vocal stops.
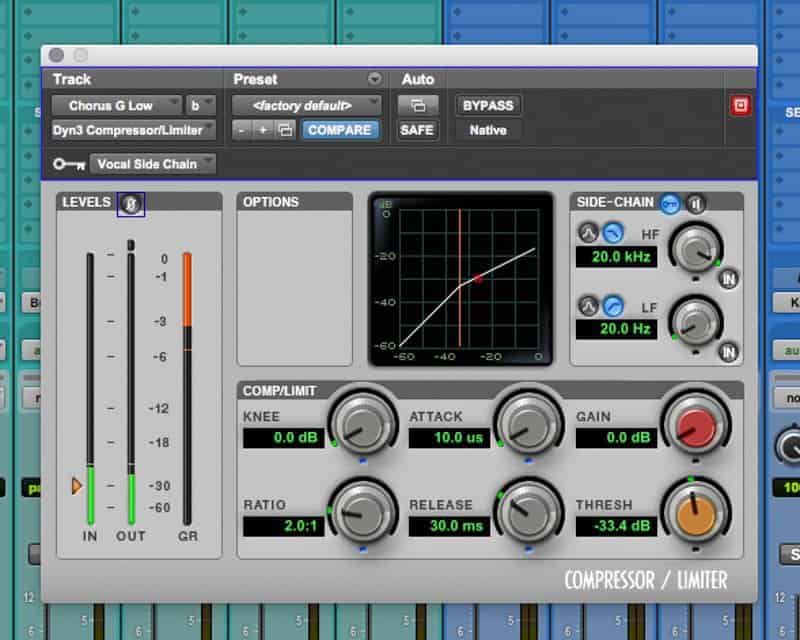
It only needs to be subtle. If you are doing this on an individual channel, you can be more aggressive. Try applying 3-5dB of gain reduction.
Trick #2: Sidechain the vocal… to the whole mix??
The other option is to create a new stereo aux/group channel and call it ‘All Instruments’. Change your outputs so that everything except the lead vocal is going through this channel.
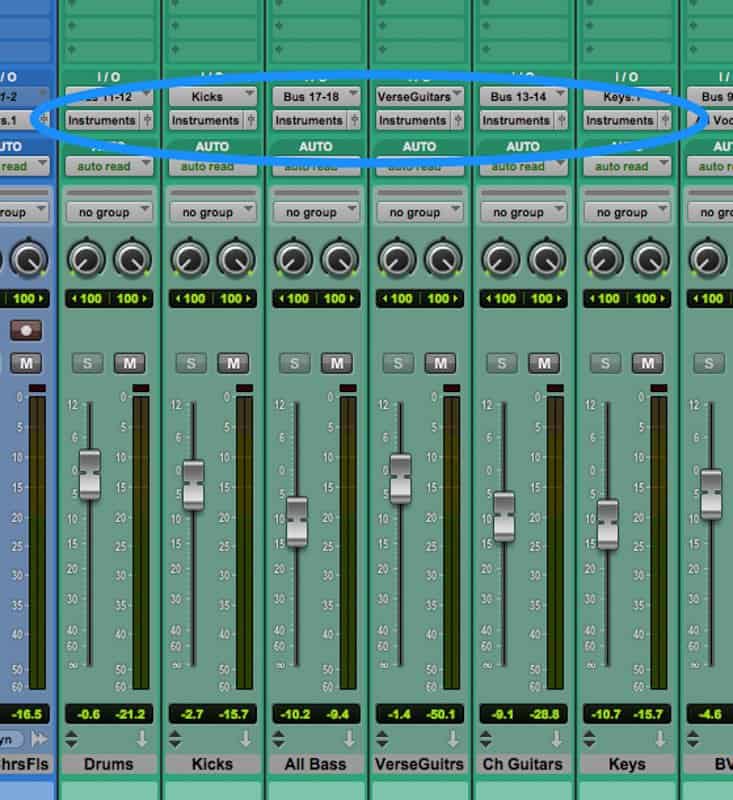
Load up a compressor and repeat the process. This time, though, keep it subtle (below 2dB gain reduction).
For the advanced mixers out there, you can take this one step further. If you have a multiband compressor that permits it (like the Waves C6), sidechain a band across 800Hz-6kHz to the vocal. Now you can create room for the vocal without ducking the lows or highs.
Trick #3: Sidechain Your Bass to Create Room for the Kick
In many genres, the bass part takes priority over the kick part.
Unless you have a dance track or hip-hop track where the kick is the main focus in the low end, you will have to make compromises with the tone of the kick.
As the bass part is taking up a lot of the low end, you have to cut the low end and add more ‘click’ and ‘beater’ to the kick to help it cut through – and leave room for the bass.
However, you can use sidechain compression along with EQ to improve the balance between the kick and bass.
If the kick part is getting buried, try adding a compressor to the bass part and sidechain it to the kick.
Again, aim for subtle compression with 1-3dB of gain reduction, and a fast attack and release. There shouldn’t be any audible pumping.
Trick #4: Create This Classic EDM Sound
There are a few ways to create that typical electron-house dance sound. Artists like Daft Punk and Eric Prydz pioneered this technique, but modern producers like deadmau5 use it too.
Notice the pumping synths in this track, every time the kick drum hits:
The basis of this trick is that the synths duck when the kick drum hits, and slowly come back up in volume. This creates a rhythmic pumping effect.
You can even go as far to compress everything except the kick. The entire track pumps every time the kick drum hits.
As this is a creative effect, and NOT a subtle mix trick – you can be much more aggressive.
How to Create The Pumping Effect
Create a new stereo aux/effects channel and route everything you want to compress to this channel by changing the outputs. Send all of the synths, or just the bass synth, or just the pad synth… or everything.
Use a low threshold so every kick drum hit triggers the compressor, and adjust the ratio until 5dB of gain reduction is applied. This is just a starting point – you can adjust the threshold and ratio to make the effect more prominent by applying more gain reduction.
Use a fast attack below 2ms, and apply as much makeup gain as necessary to balance the mix again.
Now, the release time is where the magic happens. This is where you control the rhythm and timing of the effect.
The effect is best timed to a quarter note. This means the kick hits on beats 1 & 3, but the sidechained compressor stops clamping down on beats 2 & 4. This creates the typical syncopated rhythm that is associated with this sidechaining technique.
You can figure this out with the following equation:
60,000/BPM = one quarter note in milliseconds.
If the BPM of the track is 120, then a quarter note is 500ms (60,000/120=500).
If the BPM of the track is 200, then a quarter note is 300ms (60,000/200=300).
You can also use this calculator.
Depending on the feel of the track, you might need to double or half that figure. For example, if the track BPM is 120, but the track is mostly in half-time, then 1000ms might work best (500ms*2).
This is just a starting point. Tweak from there until you like the feel. There is no right answer, and this is completely subjective.
Although this technique has been abused in house music, try applying it to other genres as an interesting creative effect.
Trick #5: Ignore the Low End with Your Compressor
Another technique for the more advanced mixers. This is an interesting way to use sidechain compression that is quite different from the previous examples.
Many EQs come with a built in frequency sidechain.
When engaged, you can force the compressor to stop monitoring certain frequencies.
For example, I could engage the high-pass filter on the sidechain, and the compressor will now ignore the low frequencies.
It will still compress the low frequencies when it’s engaged, but it can no longer be triggered by low frequencies.
This is particularly useful on your mix buss (or master fader)…
Low frequencies carry more power and amplitude than high frequencies. So, if you add a compressor to your mix buss, it will often be triggered by a sudden peak in the low end.
Sometimes this can cause noticeable pumping.
The main parts (such as vocals, guitar, and keys) might be perfectly under control. But then a loud bass note causes the compressor to clamp down hard. Suddenly, everything gets noticeably compressed – and this can sound unnatural.
To avoid this, use a multiband compressor to compress and control the low end independently. Then, on your main mix buss compressor, engage the frequency sidechain and add a high-pass filter at 100Hz.
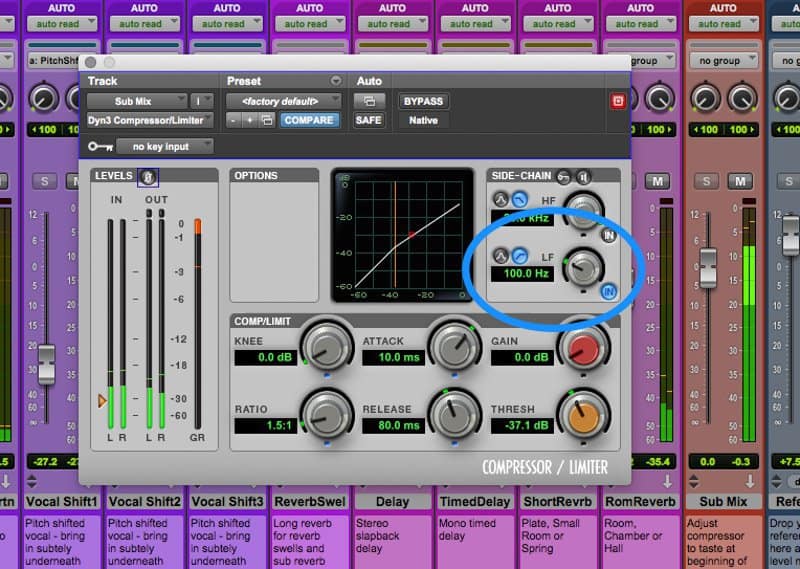
It is possible to achieve the same effect if you don’t have a compressor that has a built-in frequency sidechain. But, in general, it’s an annoying process to employ unless you can do it quickly with your go-to compressor.
If you want to dig deeper into music production and learn what it actually takes to make mixes that sound pro… And you’re an intermediate or advanced producer… Be sure to check out the free masterclass: Enjoy!Next Steps


