What if I told you there was a simple technique to mix both FASTER and BETTER?
One that you could implement in less than five minutes?
Today, you’ll be learning how to use reference tracks to make mixing 10x easier.
I’m guessing you’re here because you want to make your mixes sound professional. We put together a brief training that covers a totally new approach to music production. Until now, everyone has been teaching production totally backward. Just click below to watch.Get industry-quality every time (steal this framework)
But if you just want to learn all about Reference Tracks specifically, keep reading.
Using Reference Tracks to Make Mixing 10x Easier
What is a Reference Track?
A reference track is simple: it’s a professionally mixed song that you compare your mix to as you go along.
Imagine this.
You are a painter, trying to capture a beautiful countryside view.

You hike for miles and miles until you find the perfect view. After gazing out at it for a few minutes, you head back to your artist studio. You then try to paint what you saw from memory.
How accurate do you think that painting is?
Now imagine you took a camera with you. You take a photograph of exactly what you’re wanting to paint, hike back to your studio, and use your photo as a reference.
Between the two options… THAT will be the accurate painting.
That’s exactly what referencing is. It’s comparing your mix as you go to a professionally mixed track.
Without a reference track, it’s like you’re “mixing blind.”

You never want to mix from memory. Your mixes will end up sounding pretty good in your own speakers, but will fall apart anywhere else.
Comparing every aspect of your mix to a reference track – the low end, the mids, the snare volume, the vocal reverb, and so on – will increase the quality of your mixes tenfold.
Why Should I Reference? Will My Mixes Really Sound Any Better?
In a word:
YES.
In several words:
Using reference tracks while you mix may be one of the most important things you can do to improve the quality of your song.

For one, it makes mixing easier. You no longer have to sit and guess whether or not the snare is loud enough, or the vocals are bright enough, or the low end sits well.
You can know the answer immediately by comparing your mix to a few reference tracks.
One of the biggest problems in music production is the psychological killer known as Decision Fatigue. Basically, every decision you make uses up a portion of the brain’s energy source, Glucose. The more decisions you have to make, the more exhausted your brain becomes. That means that the longer you work, the harder the work becomes. And the harder the work becomes, the worse the quality is.
Using reference tracks is a fantastic way to avoid decisions fatigue, meaning you can mix better, longer.
Speaking of which, using reference tracks is also a great way to mix faster.
With less deliberating on each mixing decision, you can make up your mind much faster. This will shave hours off of your mixing process.
So you’ll finish your mixes faster. But you’ll also make better, higher quality mixes.
Your mixes will become more translatable. That means that they’ll sound better in all speakers.
One of our biggest frustrations is to finish a mix that we love, then listen to it in our car. All of a sudden, it sounds terrible.
But professionally mixed tracks are supposed to sound good in all speakers. So the closer you can get to the sound of a pro mix, the better your mix will sound in crappy speakers.
Finally, mixing with references is a great way to accelerate your mixing skills. When you’re able to compare yourself to “the greats” in real time, you can improve much faster.
Think if a 16-year-old basketball player could compare every one of her shots to Michael Jordan. Don’t you think she’d improve twice as fast as all of her teammates?

The same is true for reference tracks. You are comparing every one of your moves in real time to amazing, professional mixes. With that kind of instant feedback, you’ll learn to make better mixes twice as fast.
So if you’re a beginner or intermediate mixer, using reference tracks should be at the top of your priority list.
But Won’t Reference Tracks Make Me Less Creative?
I understand where you’re coming from. But the answer is simple:
Absolutely not.
The point of referencing isn’t to EXACTLY match EVERY aspect of the reference track. The point is to have a guide that you can use to set you on the right path.
Mixing is both a science and an art. There’s logic and creativity inside every finished project.

You have to use your logical side to create the foundation of the mix. Making sure everything is balanced isn’t a creative decision – it’s a task that needs to be completed.
Once your mix is balanced, you can make all of the creative decisions you want. Reference tracks be damned.
I can say all this from experience: I used to be a reference track denier.

I argued with my friends who told me that reference tracks were important. I told them that I didn’t want to be “tied down,” that I wanted my mixes to be “fully mine.” I was extremely stubborn!
But finally I caved and started using references with each mix.
And my mixes got TEN TIMES BETTER.
Not only that, but people still compliment me on my “sound.” So even though I used references for my mix, I remained just as creative as before.
Take it from a convert. It’s worth trying out.
Okay, So Reference Tracks Are Great… But How Do I Actually USE Them?
First, you’ll need to find your references… But we’ll talk about that in a sec.
Step 1: Import Your References into your DAW
When you’ve decided on which reference tracks you want, you need to import them into your DAW.
I usually do this by using a service called Loopback to connect my Spotify to my DAW.
Loopback allows you to change the routing of your computer’s audio. All you need to do is create a new “Virtual Device” and select whatever your DAW uses for an input when you’re mixing. For me, it’s my Universal Audio interface.
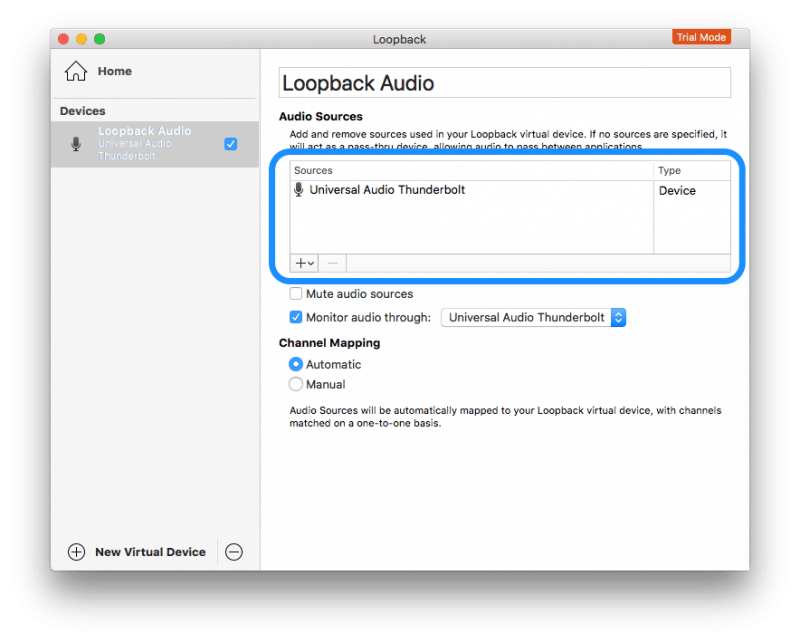
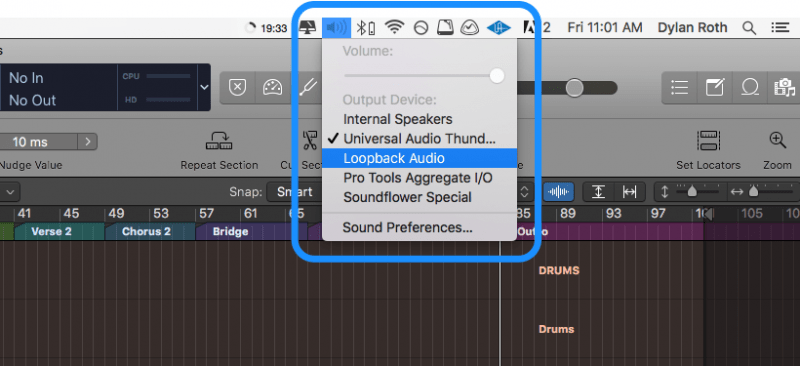
Once that’s done, select “Loopback Audio” as your computer’s audio output.
Then go into your DAW and select “Loopback Audio” for your audio input.
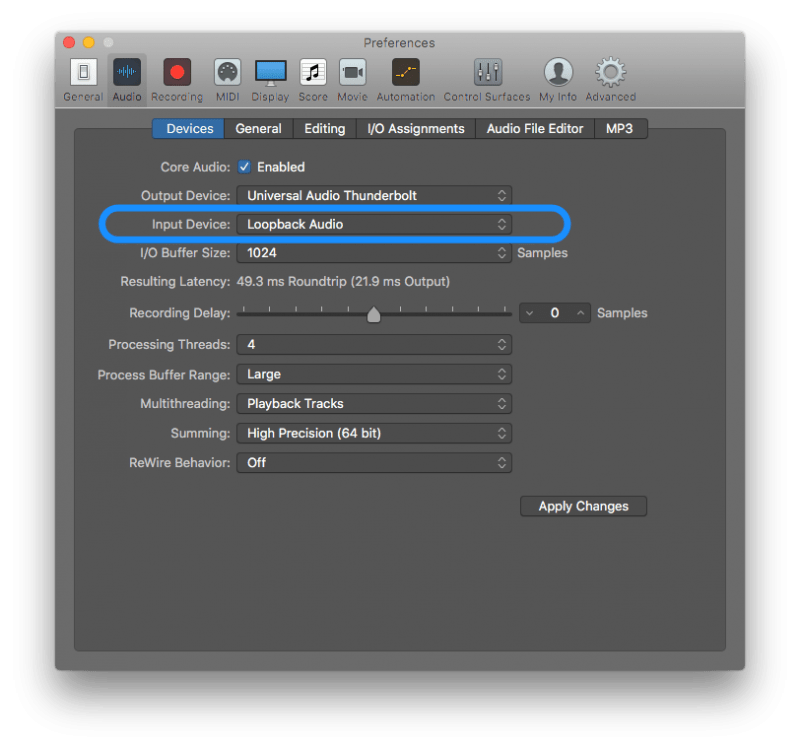 That’s it! Now just create a new stereo track, hit record, and play the song on Spotify. It will record the song directly into your DAW with no lost fidelity.

A quick tip: you don’t have to BUY Loopback (as it’s pretty dang expensive). Their free trial allows you to use it for 20 minutes at a time. That’s plenty of time to record a few reference tracks to your DAW.
Step 2: “Line Up” Your References
You can set up your reference tracks in two different ways.
You can put each on their own track, and align THEIR loudest chorus with YOUR loudest chorus. Then you can just solo the reference to listen to while you’re mixing.
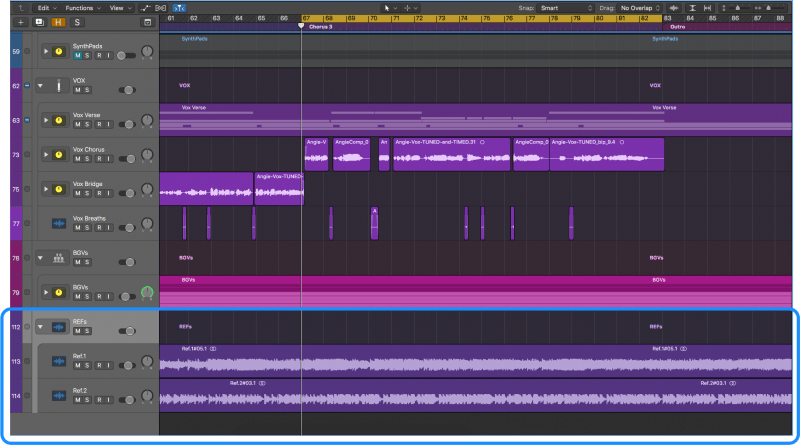
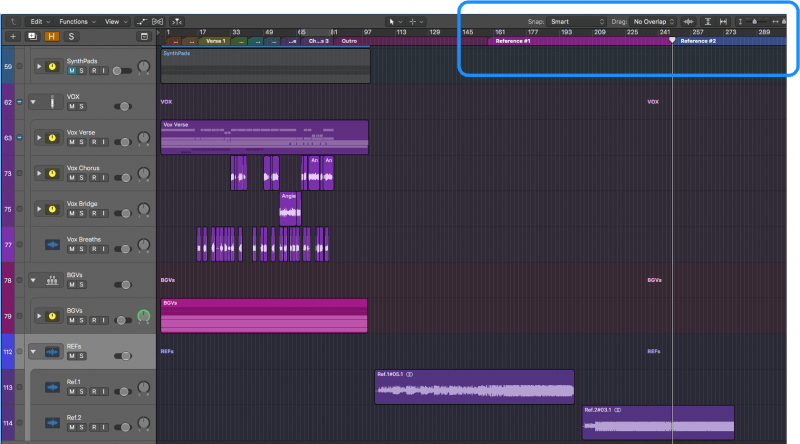
You can also put the references farther into the session and give them their own marker. Most DAWs have keyboard shortcuts that let you jump between markers, meaning you can be listening to the reference track immediately when need be.
Step 3: Change Up Your Routing
To use your references right, you want to make sure that you’re not accidentally processing your references with anything on your mixbus.
To avoid this, we’re going to make our own fake mixbus to route our tracks to.
It’s very simple. Rather than routing your tracks to the stereo output…
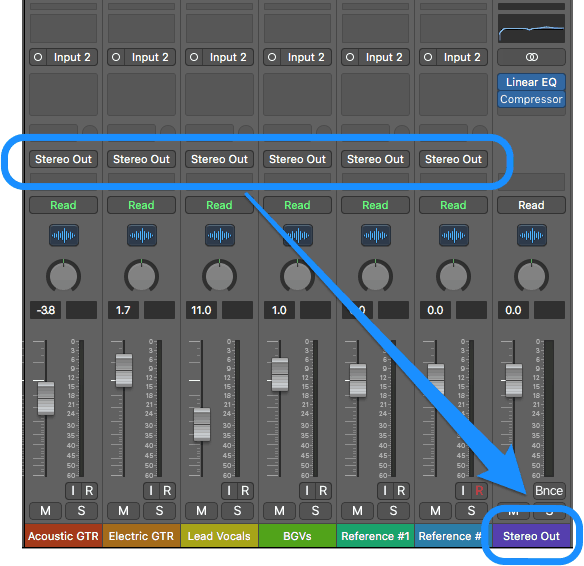
You’ll route all of them to the same bus. We’ll name this new bus “Mixbus.”
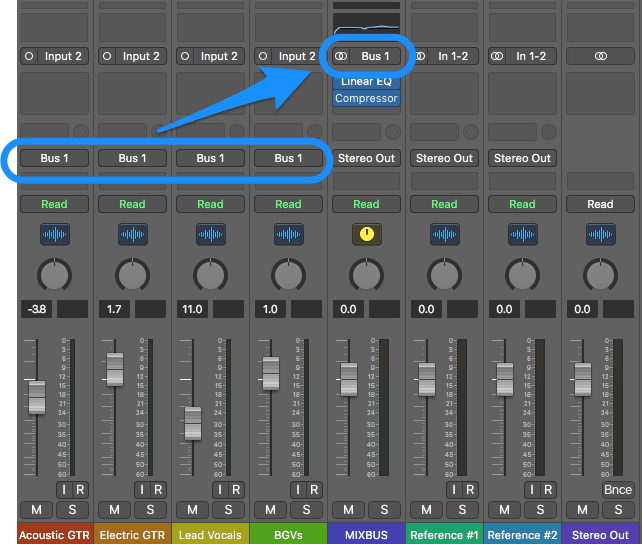
You’ll route your new “fake” mixbus to your DAW’s stereo output, just like your references. This allows your references to bypass any mixbus processing you have on your mix.
Step 4: Volume Match
Once the reference tracks are set up the way you want, you need to match their volume to the volume of your mix. Otherwise, your ears won’t hear the differences between each mix accurately.
Your reference tracks have all been mastered, so they’re most likely louder than your current mix.
You can gain stage your reference tracks by ear, or you can go for a more exact measurement by using a VU meter or an LUFS meter.
I personally use an LUFS meter because it can show you what the average volume is over several seconds. By looping my loudest chorus, I can take an average level of my song, then an average level of my reference, then simply turn the reference down by the difference.
It’s a little more exact than just using my ears and my best judgement.
Step 5: Use Your References!
Once your references are level matched, it’s time to actually use them.
Whenever I start mixing for the day, I listen to my reference tracks to “calibrate” my ears. Then I set a timer for 30 minutes. Every time that timer goes off, I pause what I’m doing and listen to my references. I’ll always ask myself this question: Is what I’m doing matching my guide?
If I’m doing detailed changes, like trying to get the volume of the snare juuuuust right, I’ll just flick back and forth between my references and my mix.
The best way to use your references is to compare them to specific areas of your mix.
How loud is the low end?
How bright are the vocals?
How compressed are the drums?
And so on.
I make sure to check four different areas: volume, tone, compression, and “space” (or reverb, delay, and panning).
It may seem like a lot at first, but the more you practice referencing, the faster you’ll be able to do it.
As you discover differences in your mix and your references, tweak your mix to match. You’ll find that a few dozen tiny tweaks will make a massive difference in the quality of your mix.
So How Do I Find My References?
Simple: Be on the lookout for them all the time.

I’ve made playlists on Spotify for my references – one for each genre. Whenever I’m listening to music and I find a mix that really impresses me, I’ll add it to a reference playlist.
You want to use reference tracks that are the same genre and instrumentation as your own. Otherwise you could be making mix decisions that sound great on your reference, but sound totally wrong on your own.
Finding two to three references that really fit the “feel” that you’re going for is really important.
You also can use references for specific instruments. I’ll often have two references that have the sound I’m shooting for, and a third reference that I use specifically for vocals. This third reference doesn’t have to match the sound of your song. It just has to have the vocal sound that you want for your mix.
You can use this technique for any individual instrument. I’ve used it with vocals, bass, drums, and guitars.
BONUS TIP: Mixing Low End with References
Mixing the low end can be especially finicky, even with references.
If you’re needing a little extra focus, try using this technique.
It’s a simple technique to really highlight the low end of your mix.
First put a low pass filter (or a reference plugin like ISOL8) on your stereo output. Set it to around 200Hz.
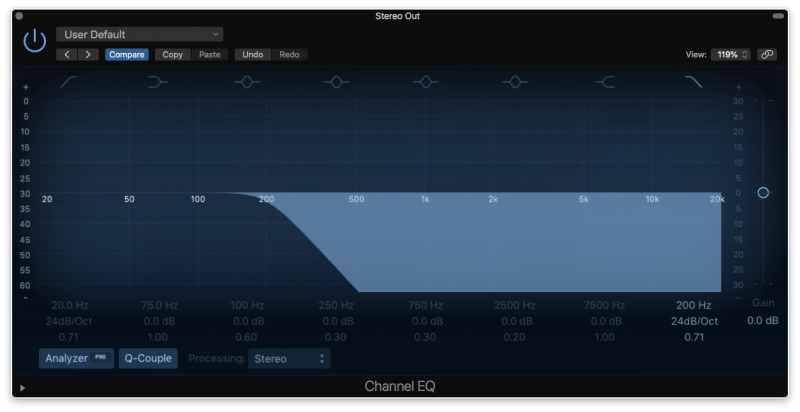
Now you’re only hearing the low end on both your mix and your references. This is great if you’re trying to work out the tone of your low end.
For a little extra umph, put a VU meter after the EQ. You can use this to make sure that the low end of your mix and your reference are around the same level. If not, turn your bass and kick up or down a few dB’s.
CONCLUSION: Reference Tracks
Using reference tracks can make mixing 10x easier. It’s worth investing the time in what could be one of the most important mixing (and learning) tools you’ll ever use.
I know I’m glad I did!
Next Steps
If you want to dig deeper into music production and learn what it actually takes to make mixes that sound pro…
And you’re an intermediate or advanced producer…
Be sure to check out the free masterclass:
Enjoy!


