Do you want your drum recordings to sound professional, but you aren’t sure where to start?
Recording drums can seem tricky at first. But you can get great-sounding drums in just 5 simple steps.
By the end of this article, you’ll know everything you need to to record radio ready drums.
I’m guessing you’re here because you want to make your mixes sound professional. We put together a brief training that covers a totally new approach to music production. Until now, everyone has been teaching production totally backward. Just click below to watch.Get industry-quality every time (steal this framework)
But if you just want to learn about recording drums specifically, keep reading.
What Do I Need to Record Drums?
That’s obviously the most important question to ask before you start.
Drum sets are the most complicated instrument to record. Instead of just one instrument, you’re miking up half a dozen!

Unless you’re using a special technique, each drum in your set needs a microphone. Some of them are even miked up twice.
That’s not to say miking a drum set is hard. It’s just more complicated.
So here’s what you need to record your own drums at home:
Drum Microphones (Preferably 8 or More)
There are some incredible drum mics that’ll help you get the sound you want.
The amount of mics you need to record a drum set varies wildly based on how big your drum set is.
For the sake of this guide, we’re going to assume you have a snare, kick, high tom, low tom, high hat, ride cymbal, and crash cymbal.
With that many drums, you’ll likely need eight mics at least. I’ll give a quick recommendation for what mics to use with each.
Snare Drum:
(or a comparable dynamic mic)
Kick Drum:
and/or Electro-Voice RE20
(or a comparable low-end dynamic mic)
Toms:
or Shure SM57
(or a comparable dynamic mic)
Overheads:
A pair of Rode M5s
(or a comparable pair of small-diaphragm condenser mics)
Room:
Depends on the tone you want.
Use 1–2 large-diaphragm condensers for a hi-fi room sound. Use any mic you have lying around for a “vibey” room sound.
Keep in mind that these are just recommendations. Don’t feel like you have to have the fanciest gear to get started!
Mic Stands and Cables
This is a given. You’ve got to have a way to hold the mics and a way to connect them to your DAW!
Usually you can use regular boom mic stands. Nothing fancy is needed.
Miking something low to the ground (like the kick drum or the underside of the snare)?
I’d recommend grabbing an extra-small mic stand like the Gator Kick Drum Mic Stand. That’ll save some real estate around the drum set as well as a lot of headaches when it comes to setting up.
No fancy mic cables are needed either. Just make sure what you’re using is long enough to reach your audio interface.
An 8 Input (or More) Audio Interface
In order to record eight mics, you need to have an audio interface that can record eight mics.
Many DIY musicians start with an audio interface with only one or two mic inputs. That won’t be enough to record drums.
If you’re looking for a budget option, check out the Focusrite Scarlett 18i20.
If you’re looking for a quality option, check out the Universal Audio Apollo 8p.
Like I said earlier, don’t worry if you don’t have a super expensive interface!
If you have an interface with eight mic inputs, then just get started. Worry about the quality after you’ve mastered the practice.
Bonus: A Tuning Key
An out-of-tune drum set is never going to sound good on a recording. Before you even start setting up your mics, take as much time as you need to get your set sounding great.
If you need a refresher on tuning drums, check out the video below:
Extra points if you replace your old drum heads. Heads wear out naturally over time.
If you’re playing and practicing regularly, replace them every six months or so.
Remember: no amount of quality mics will fix an old, out-of-tune head!
Bonus: A Good Room
Just as important as an in-tune drum set is an in-tune room. The way your room sounds will drastically change how your drums sound.
Recording in a crappy room will affect the quality of the drum recording.
What do I mean by “crappy room”? Well, it’s hard to pin down.
Here are some key elements of rooms to avoid while recording drums.
- Small rooms. Drums produce tons of sonic energy. In a small room, there’s nowhere for that energy to disperse. If the room is too small, your drums can end up sounding really muddy or harsh. Avoid recording in a closet or a tiny bonus room.
- Massive rooms. I’m talking about gyms, auditoriums, and so on. These can have large amounts of uncontrollable reverb. The mics will pick up all that reverb, making it difficult to get a punchy, upfront sound. (Unless you want the sound of the auditorium in your drums. Then go for it.)
- Square rooms. Rooms of any size with an equal width, height, and length are a nightmare for acoustics. Why? …Physics. *shrug*
- Rooms with lots of windows. Windows allow bass frequencies to flow through them. It can cause an instrument in the room to sound weak. They’re also highly reflective for high frequencies. So that same instrument could sound abrasive and harsh, too.
- Rooms with lots of reflective surfaces. Do you remember what your bedroom sounded like before you moved all of your furniture in? It was probably “lively,” making it difficult to understand what people were saying. Avoid rooms like that, where there’s mostly four parallel walls and nothing else. All those reflections will end up in the recording.
- Rooms that are “too dead”. On the opposite side are rooms that don’t have enough reflections. If you’ve tried recording an instrument in a soundproof practice room, you’ll know what I mean. You want the reflections in the room to be controlled but not sound unnaturally quiet. This is another reason why you don’t want to record in a closet surrounded by tons of clothes.
- Rooms with too much noise. Your mics are very sensitive. If you’re recording in a bedroom by the highway, don’t. Also, make sure to turn off your AC and any other fans when you start recording. The mics will pick up the hiss.
So what should you look for in a good room?
- Lots of angles and not a ton of parallel surfaces. If you can find a room that’s weirdly shaped, that’s probably going to help a lot. Sonic energy tends to get trapped between parallel surfaces, bouncing back and forth without dispersing. Adding furniture to a room with parallel surfaces will help solve this a little.
- Medium-sized. Something with a good room sound but not too much room sound. Think somewhere between a living room and a small club.
- Stuff that will absorb some of the excess sound energy. You’ll want some equipment that’ll soak up noise you don’t want. We’ll talk about acoustic treatment in the next section.
- Good materials for the walls. If you want a livelier-sounding kit with more reverb, a room with wooden walls and floors is ideal. If you want your kit to sound really tight, you’ll want a room with absorption panels on the walls.
- Quiet. Like I mentioned before, mics are sensitive. They’ll pick up all the stuff that you think is too quiet to notice. The quieter the room, the less background noise will leak into your recordings.
Now all this is easier said than done as a DIY musician. You don’t exactly get your pick of A-list studio rooms in your small home.
Just take the guidelines from above and review the rooms you have available to you.
Try to minimize the bad and maximize the good. Do the best you can.
If your room is bad and you can’t do anything about it, then try your hand at using…
Bonus: Acoustic Treatment
Acoustic treatment is how you control an out-of-control room.
Basically, it’s the stuff you see on the walls in music studios. And there’s a reason they have a ton of it.
Acoustic treatment is used to absorb (or diffuse) sound energy.
Drum sets create A TON of that stuff. Treatment can help your overactive room settle down to a healthy amount.
Stephen Taylor shows you how a little room treatment can make your drum recordings way better:
If you’ve got the money, buy some panels from GIK Acoustics. Their support staff is very knowledgeable and can recommend what you need for your room’s shape.
Need a budget-friendly option? Try hanging acoustic blankets on the walls like the ones from Vocal Booth To Go.
They’re not the best at clearing up the “mud” of a room, but they’re great at making a room sound less bright and harsh.
You could also try to put as much stuff in the room as possible. Sofas, pillows, and thick mattresses do a good job of absorbing some of that sound energy.
You could also put shelves full of books along the walls. This will “diffuse” the sound energy, causing sound waves to bounce off of the books at random angles.
This won’t make your room sound any less “lively,” but it will make it sound less harsh.
A WARNING
You might be tempted to take the advice of your friend from high school and put up egg crate foam on the walls. DO NOT DO THIS.
These absorb a very small and specific part of the sound energy of a room.
They can actually make a room sound worse than before. I know it’s a popular cheap option, but it’s not worth it.
Now that you have everything you need to start, let’s learn how to record our drum set.
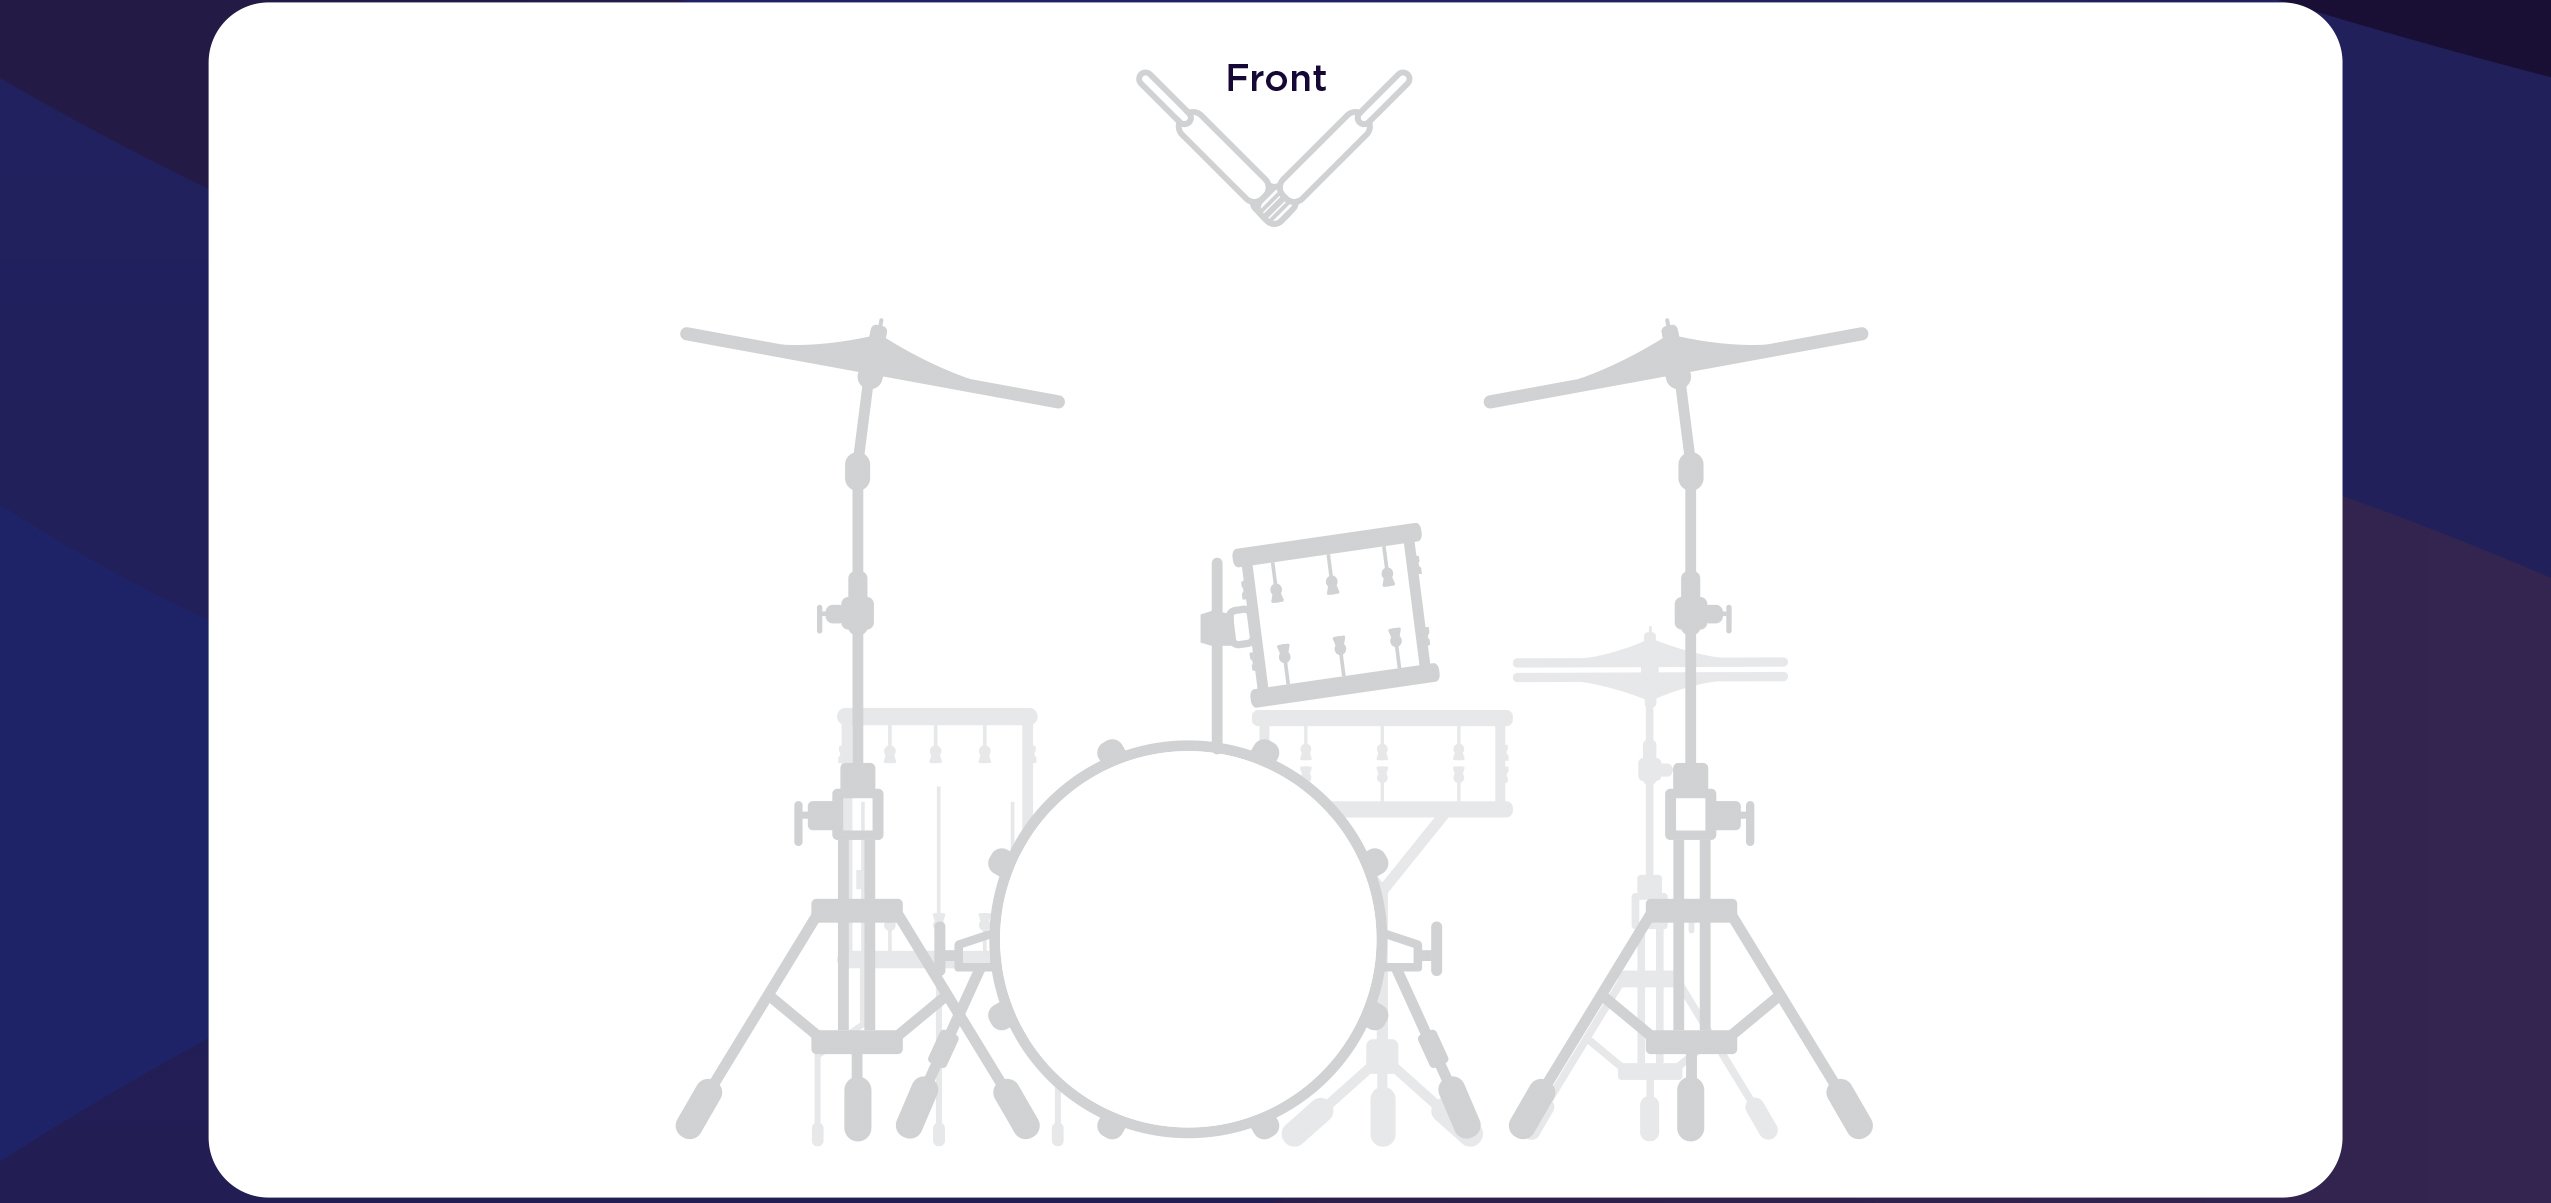
Step 1: Snare Drum
The snare drum has two tonal sources: the crack of the head and the rattle of the snares.
To get the most accurate sound, you’ll want to mic the top head and the bottom head of the snare.
For the top of the snare, place the microphone 1–2 inches above the drumhead, pointing towards the drummer. Then angle the mic 1–2 inches away from the center of the head.
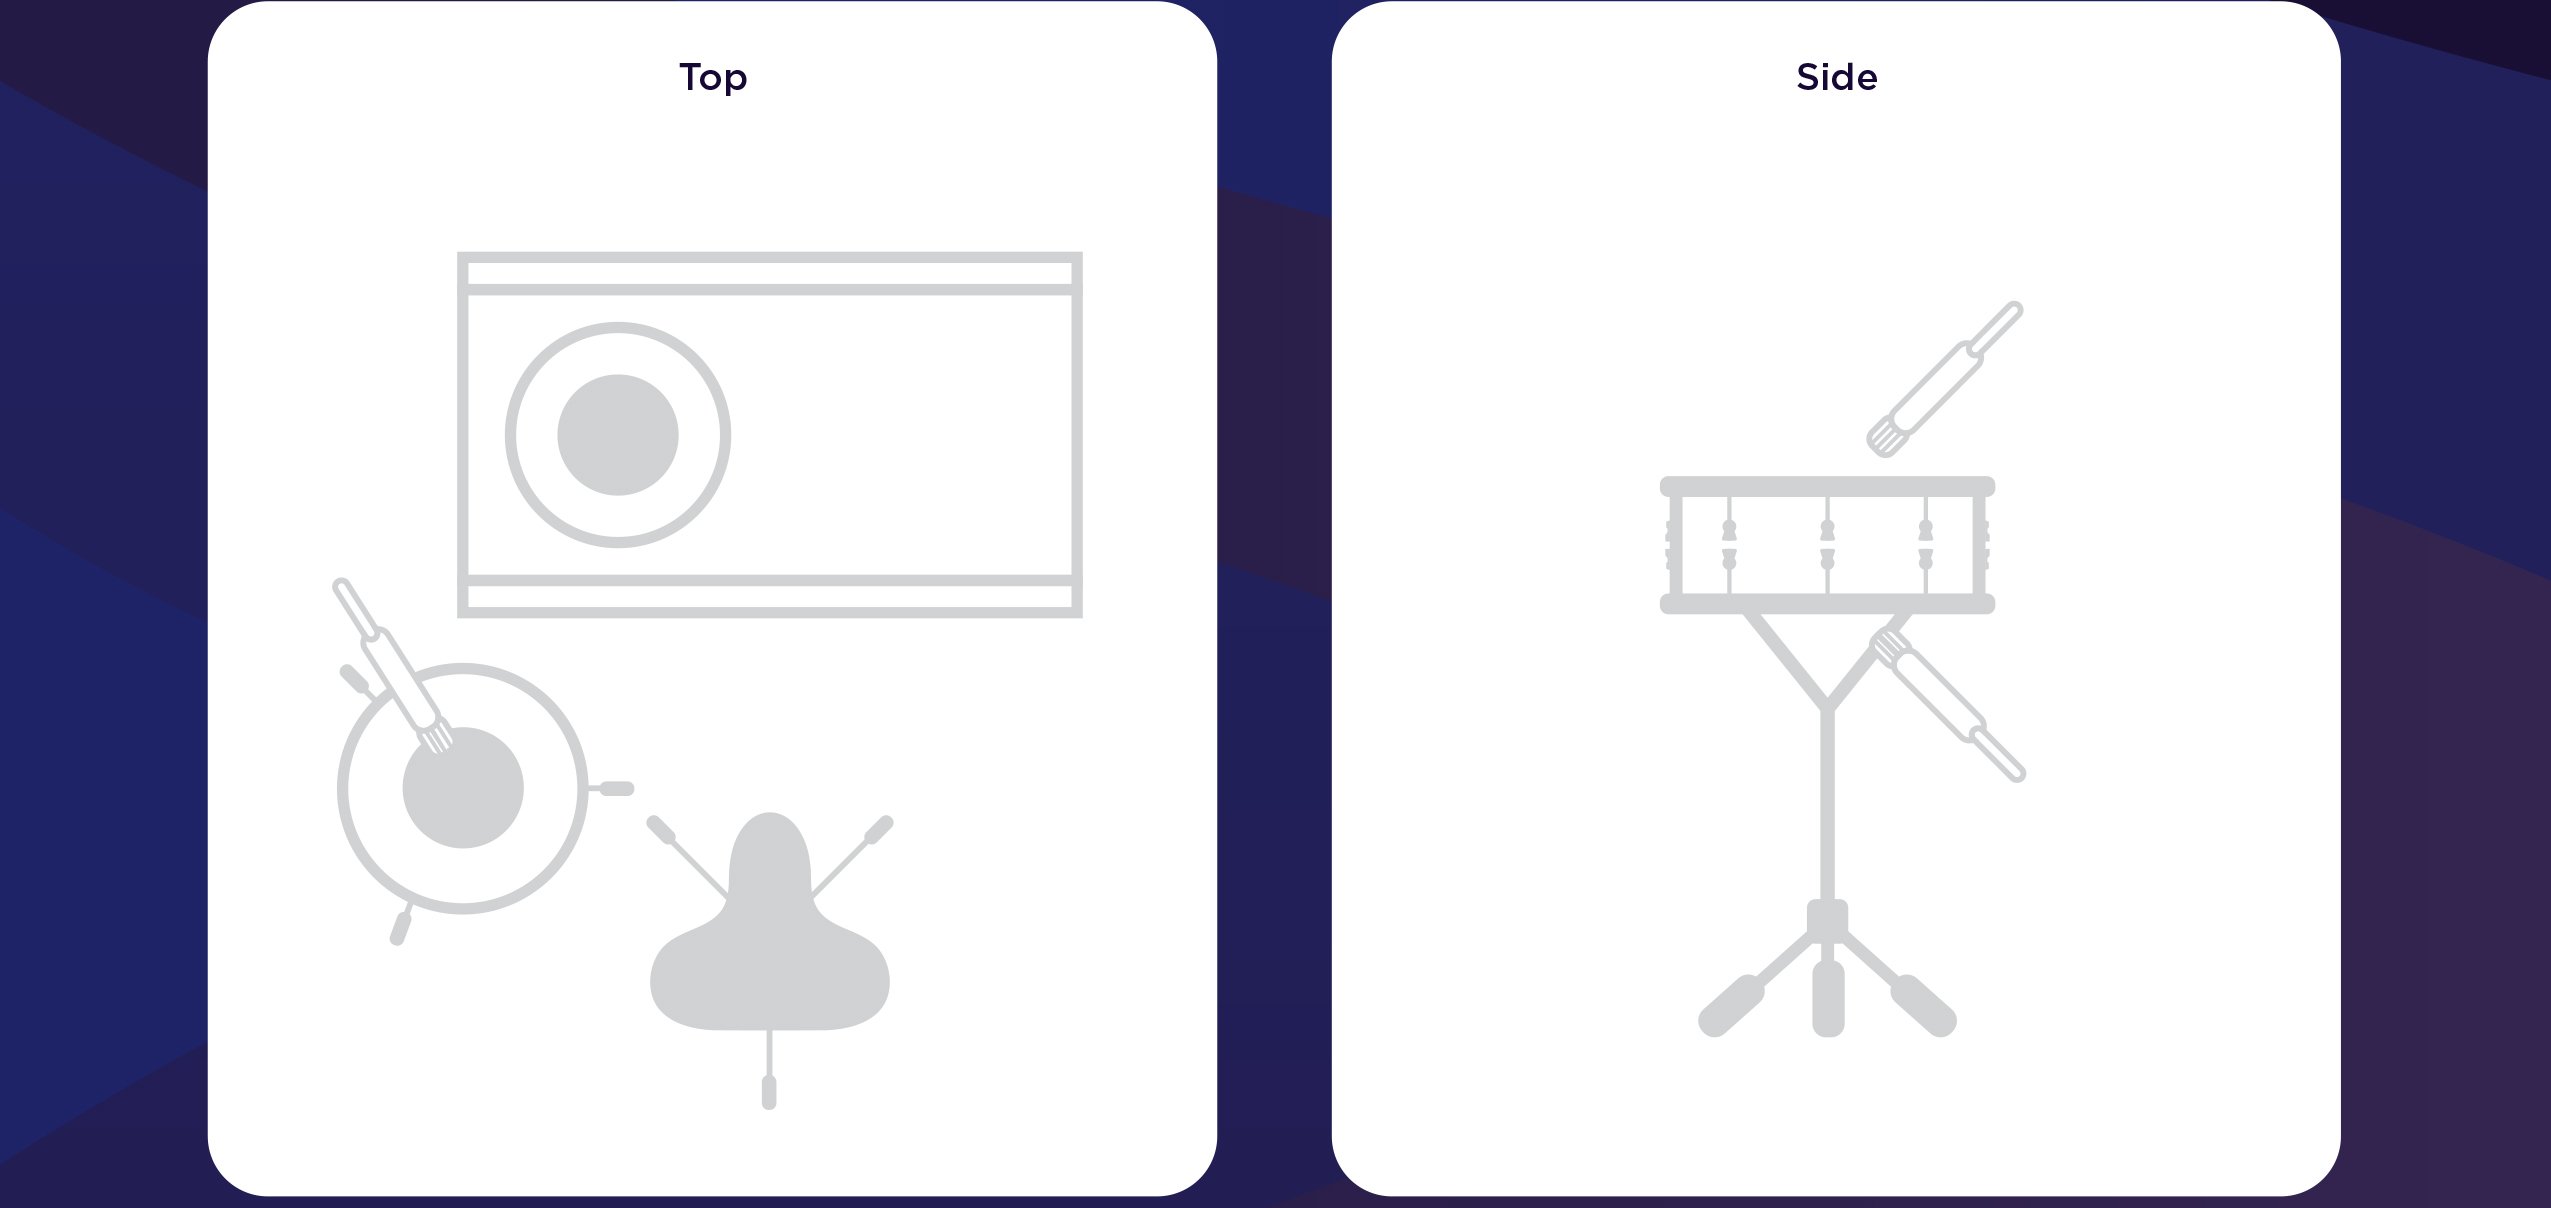
This place is a great balance between the tone of the center of the head and the tone of the edge of the head.
As you move the microphone around, the sound of the snare will change. Try moving it a few inches at a time and recording each spot.
Each snare drum will have a different “sweet spot,” so take the time necessary to find yours.
Plus, by pointing it away from the rest of the drum set, you’ll minimize the bleed from the other drums in the mic.
Once you have the snare head microphone set, go ahead and place the snare bottom microphone.
Try to get the two mics to be placed as similarly as possible. The bottom mic should look like a mirror image of the head mic.
Anytime you record snare top and bottom, you’ll need to check for phase issues.
There’ll probably be some serious phase cancellation between the two microphones.
Phase cancellation occurs when two different mics pick up the same sound from different distances.
Unless the mics follow the 3:1 rule (which we’ll talk about later), the two microphones will be “out of phase.”
That means the sound waves are out of sync with each other. That causes weird tone shifts and cancellations.
Phase problems can often be fixed by hitting the “flip phase” or “flip polarity” button on your audio interface.
This basically inverts the incoming sound wave. Hopefully putting it back in sync with itself.
Once you set up the second microphone for the snare, try pressing the “flip phase” button. You’ll probably hear a pretty big tone shift.
A good rule is whichever option has the most boom and punch in it has the least amount of phase cancellation.
Give it a try and see which option works for you.
Bonus Tip: Fix a Ringy Snare
Sometimes snares sound like they’re “ringing” too much. When you hit the snare, there might be a specific pitch that’s too loud and takes a long time to fade out.
To fix this problem, you can put Moongels on the snare. Or in a pinch, you can throw your wallet or some duct tape on the snare.
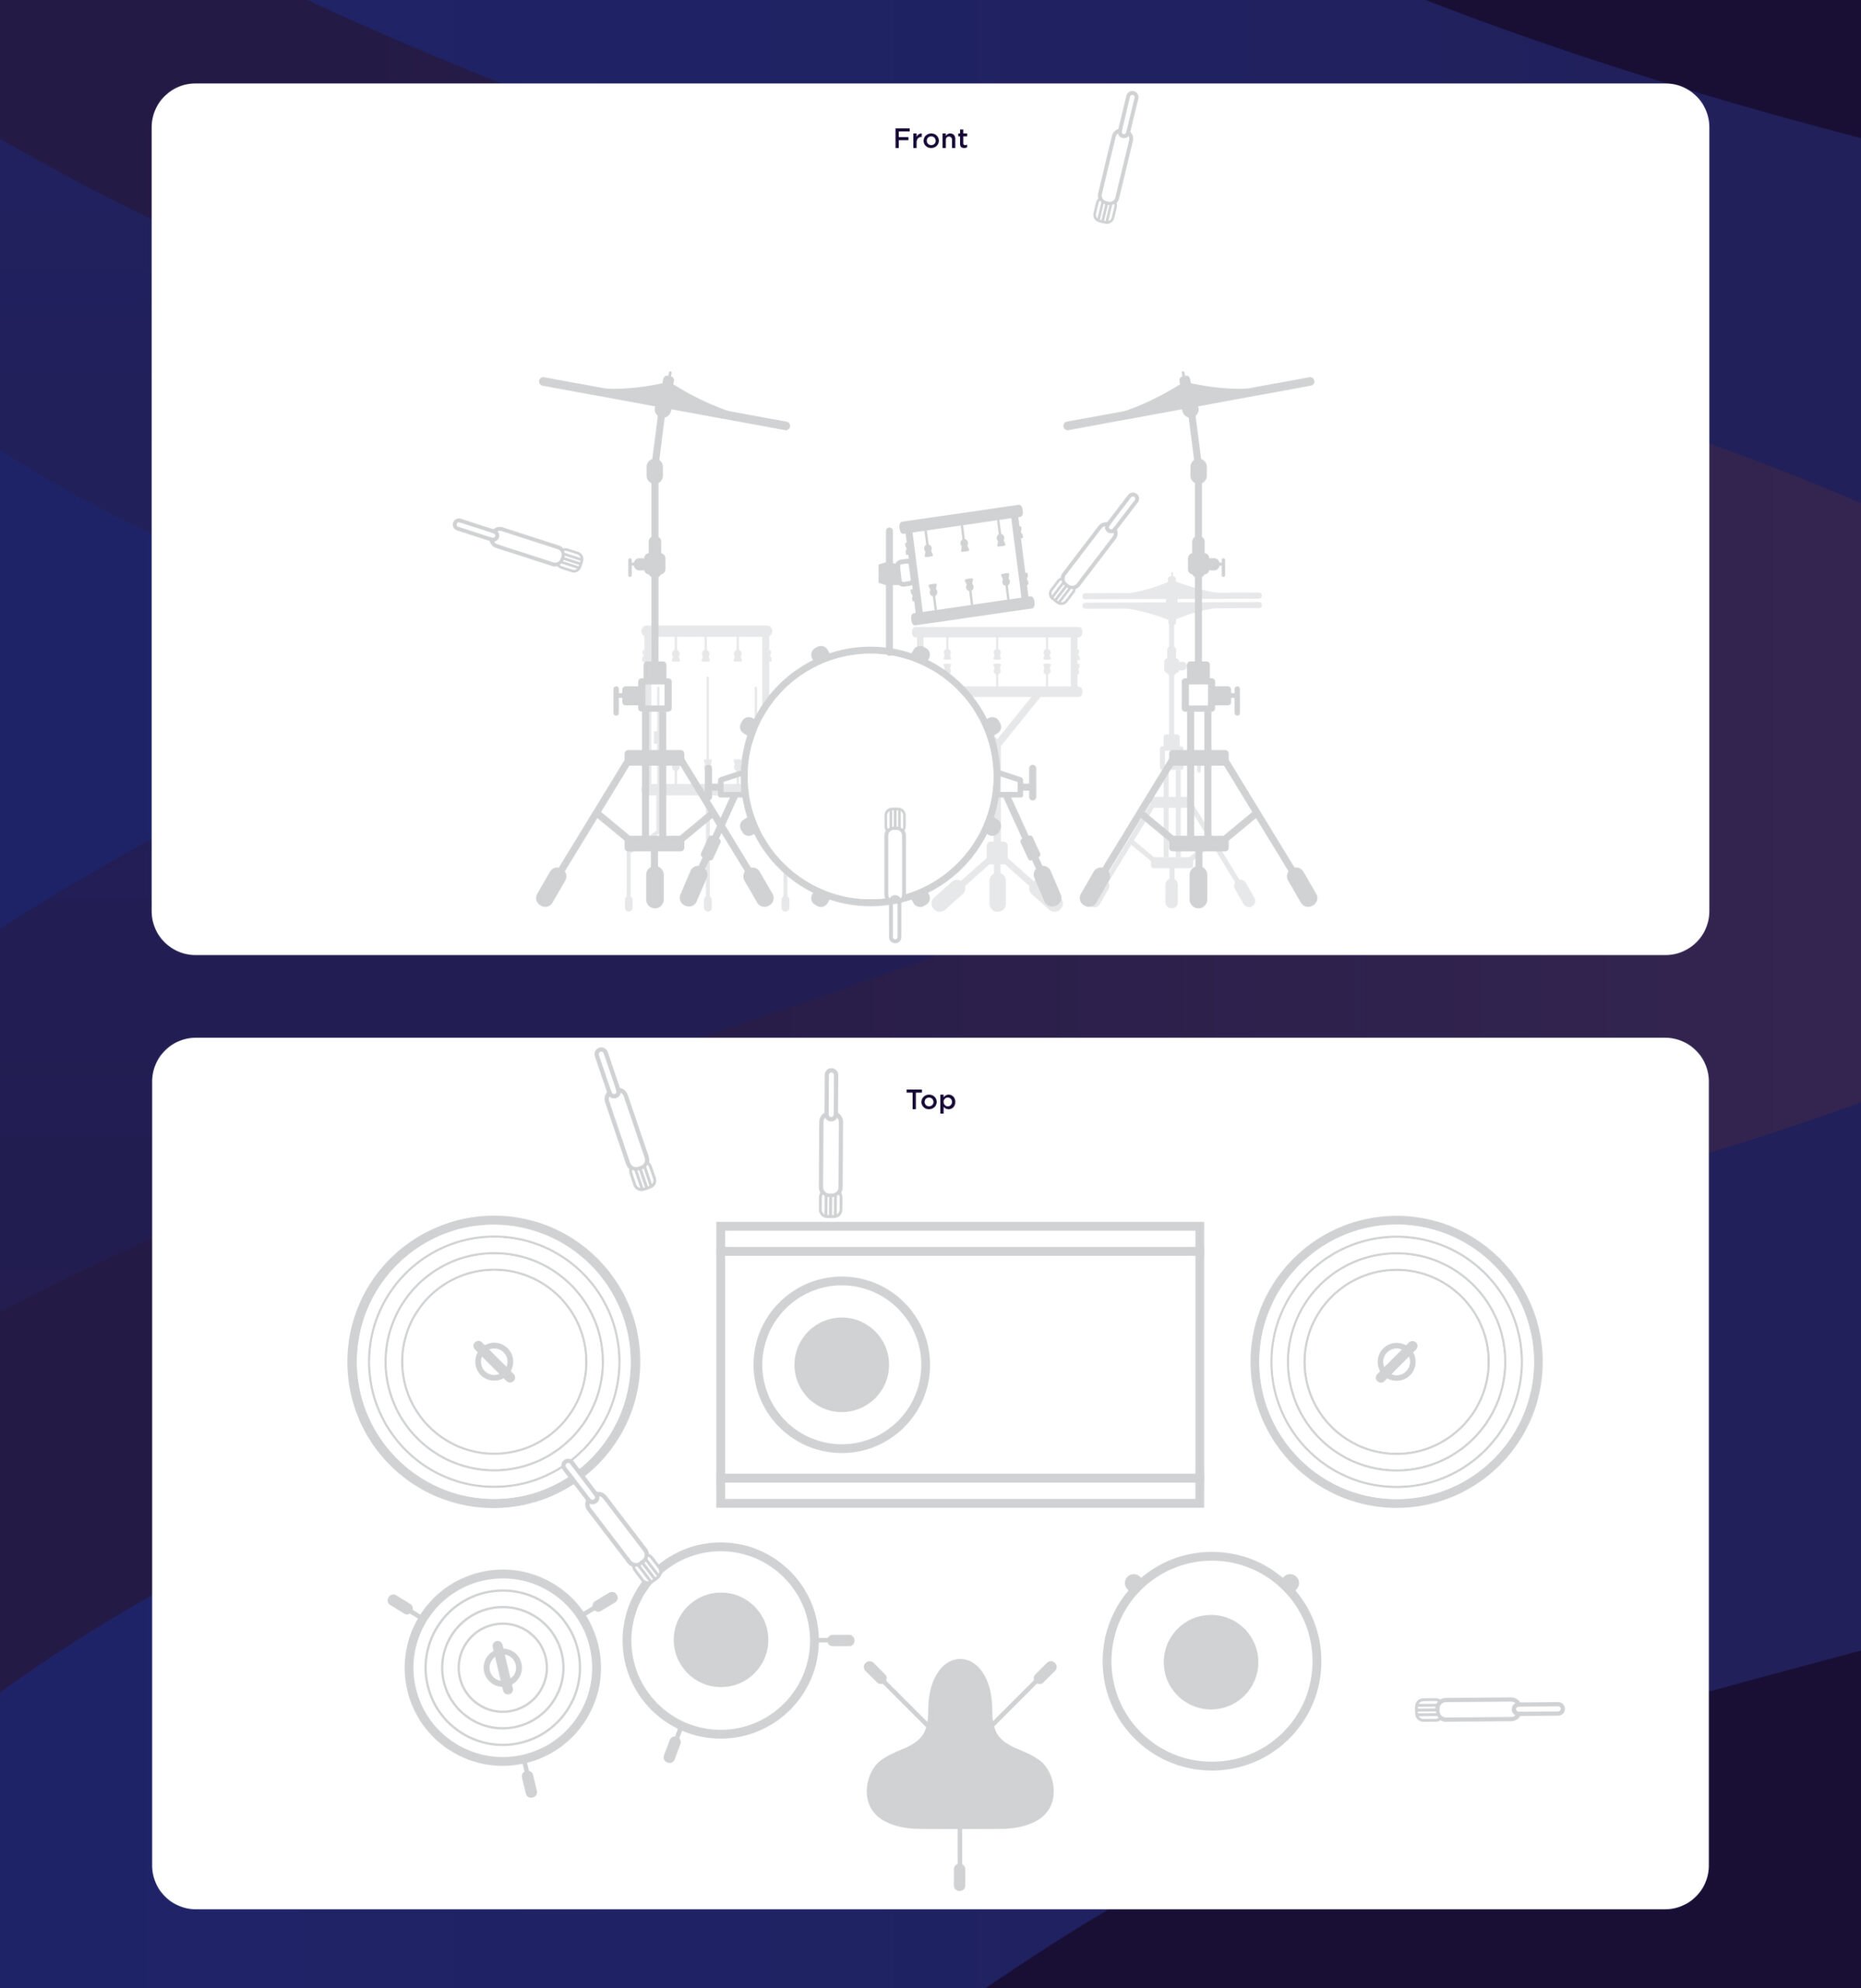
Step 2: Kick Drum
Next up is the kick drum.
Do you have two different low-end dynamic mics (and a hole in your audience-side drumhead)? You can experiment with using multiple mics on this drum as well.
First, set up what we call the “kick out” mic.
Just set the mic low to the ground, pointing directly at the audience-side drumhead. Then scoot it forward until its a few inches away.
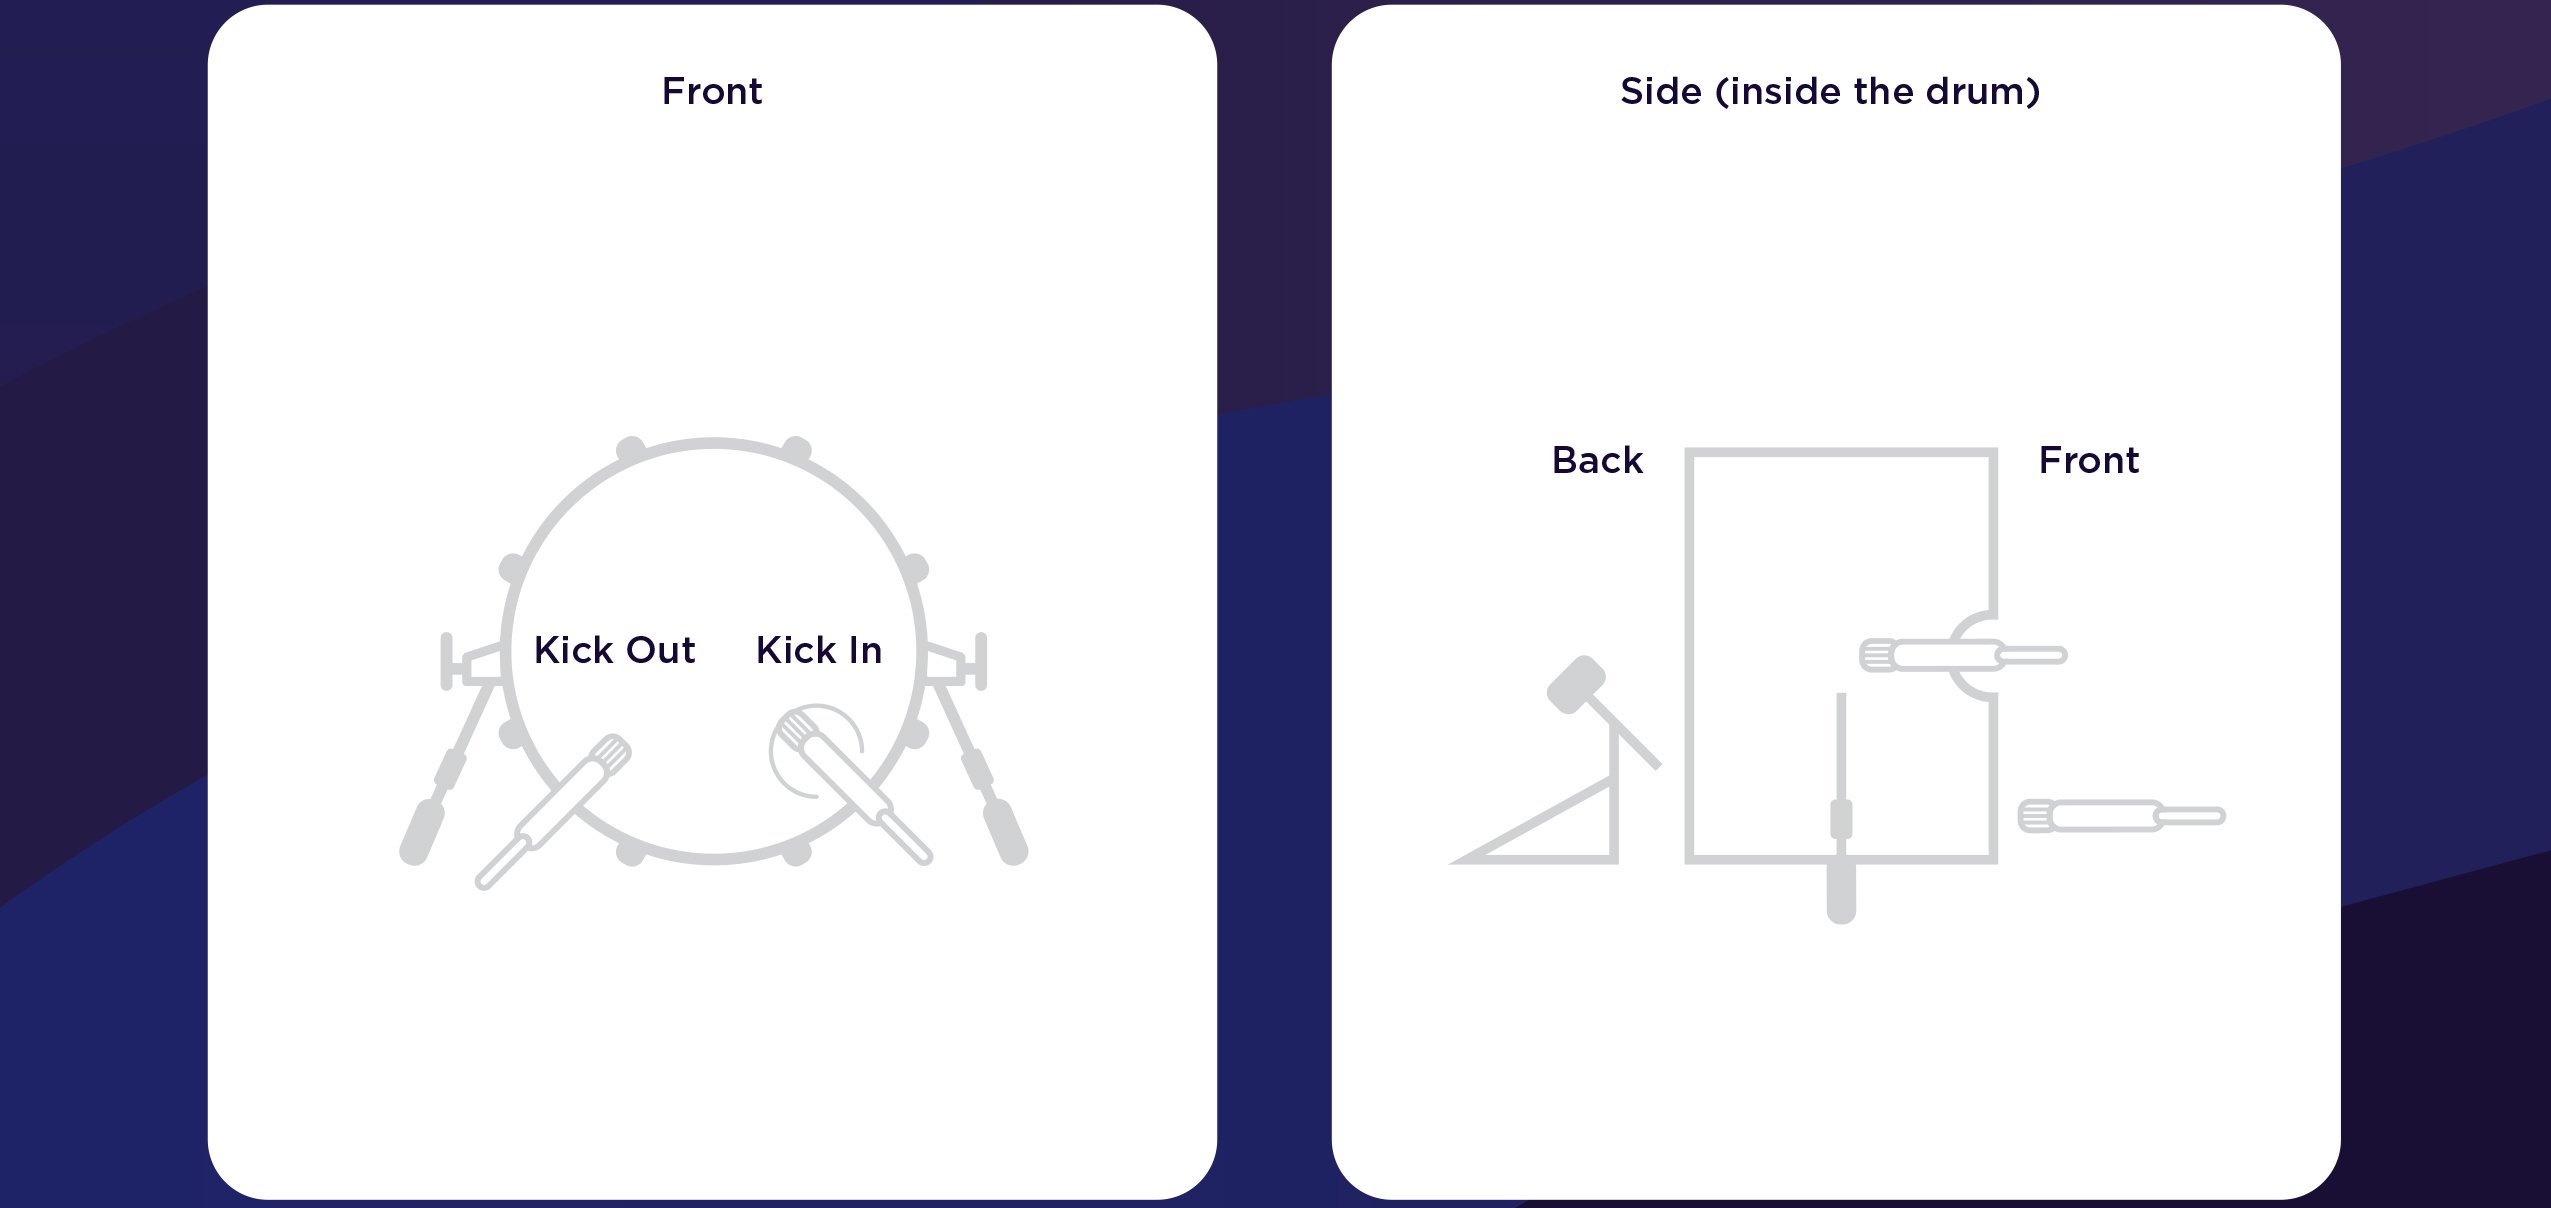
This mic is meant to get the “boom” of the kick. This is where all of the low-end energy comes from.
If you feel like the mic is picking up too much low end, try moving it a few inches away.
This mic benefits from the “proximity effect.” That’s the microphone phenomenon where the closer a mic is to a sound source, the bassier it sounds.
Next, we’ll set up the “kick in” mic.
We’ll take a boom mic stand, and slip another low-end dynamic mic into the circular hole cut in the audience-side skin.
Place the mic a little before the halfway point of the kick.
This mic is meant to get the “click” of the kick, so what you do next depends on your goals.
If you need more top-end presence in your kick to help it stick out, then point the mic at the beater. If you want a more midsy kick drum that’ll blend better, point the mic away from the click.
Bonus Tip: Fix an Overpowering Kick
If your kick sounds too loud or too boomy, try putting a pillow or a comforter inside of it.
Some of my favorite kick sounds came from putting a down feather pillow between the two drum heads.
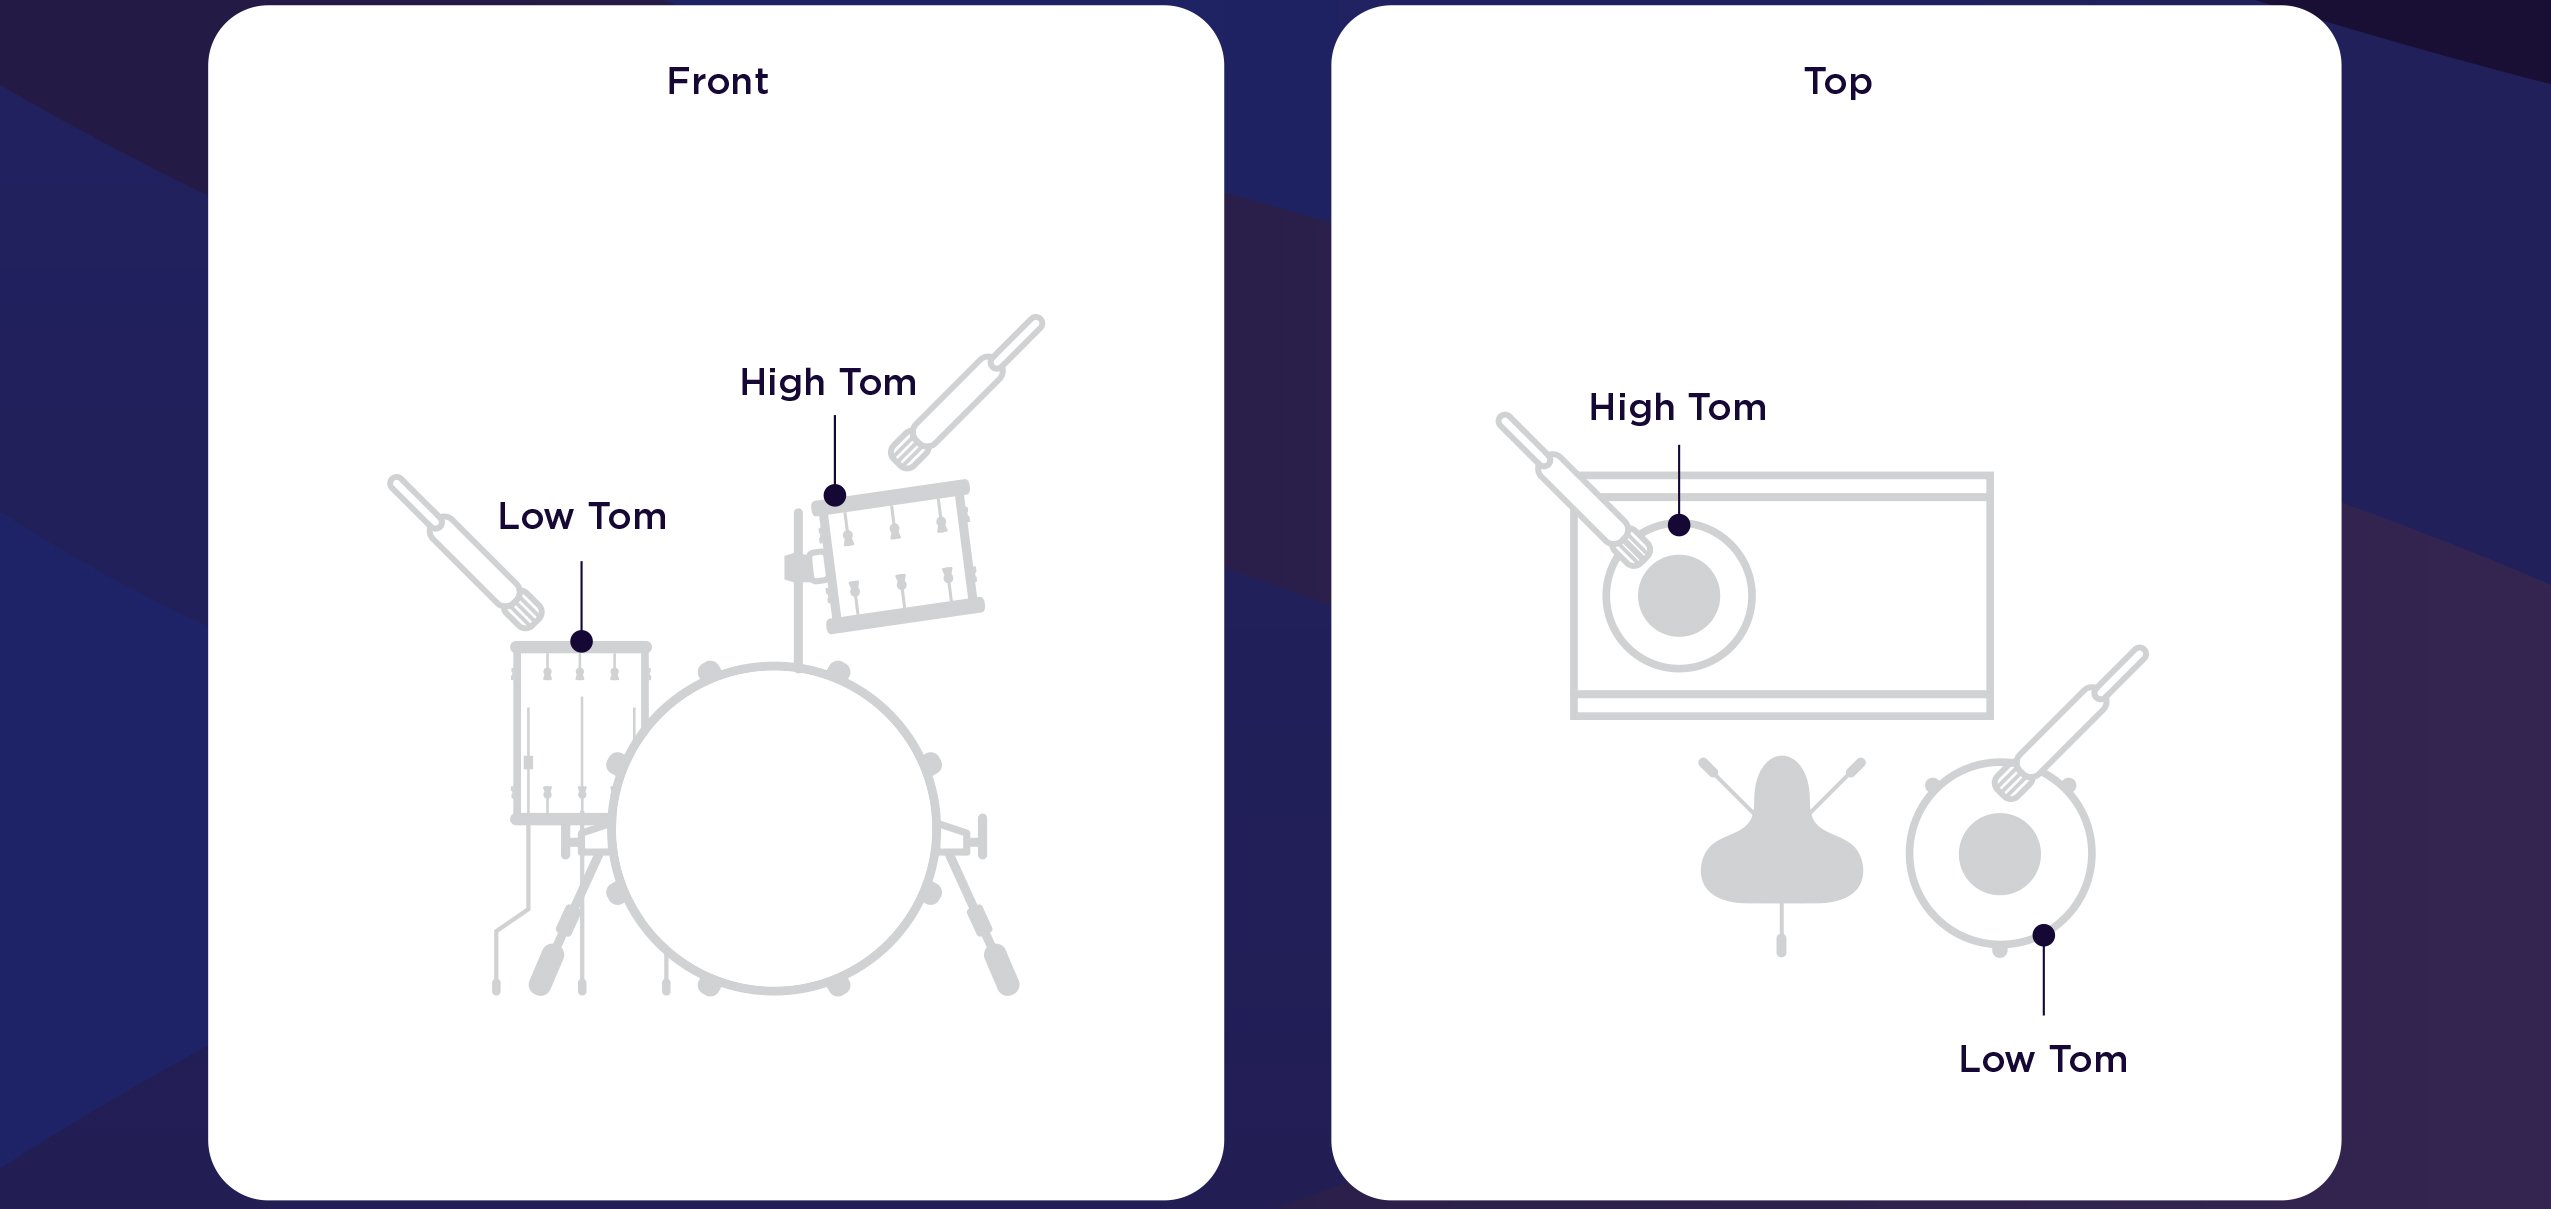
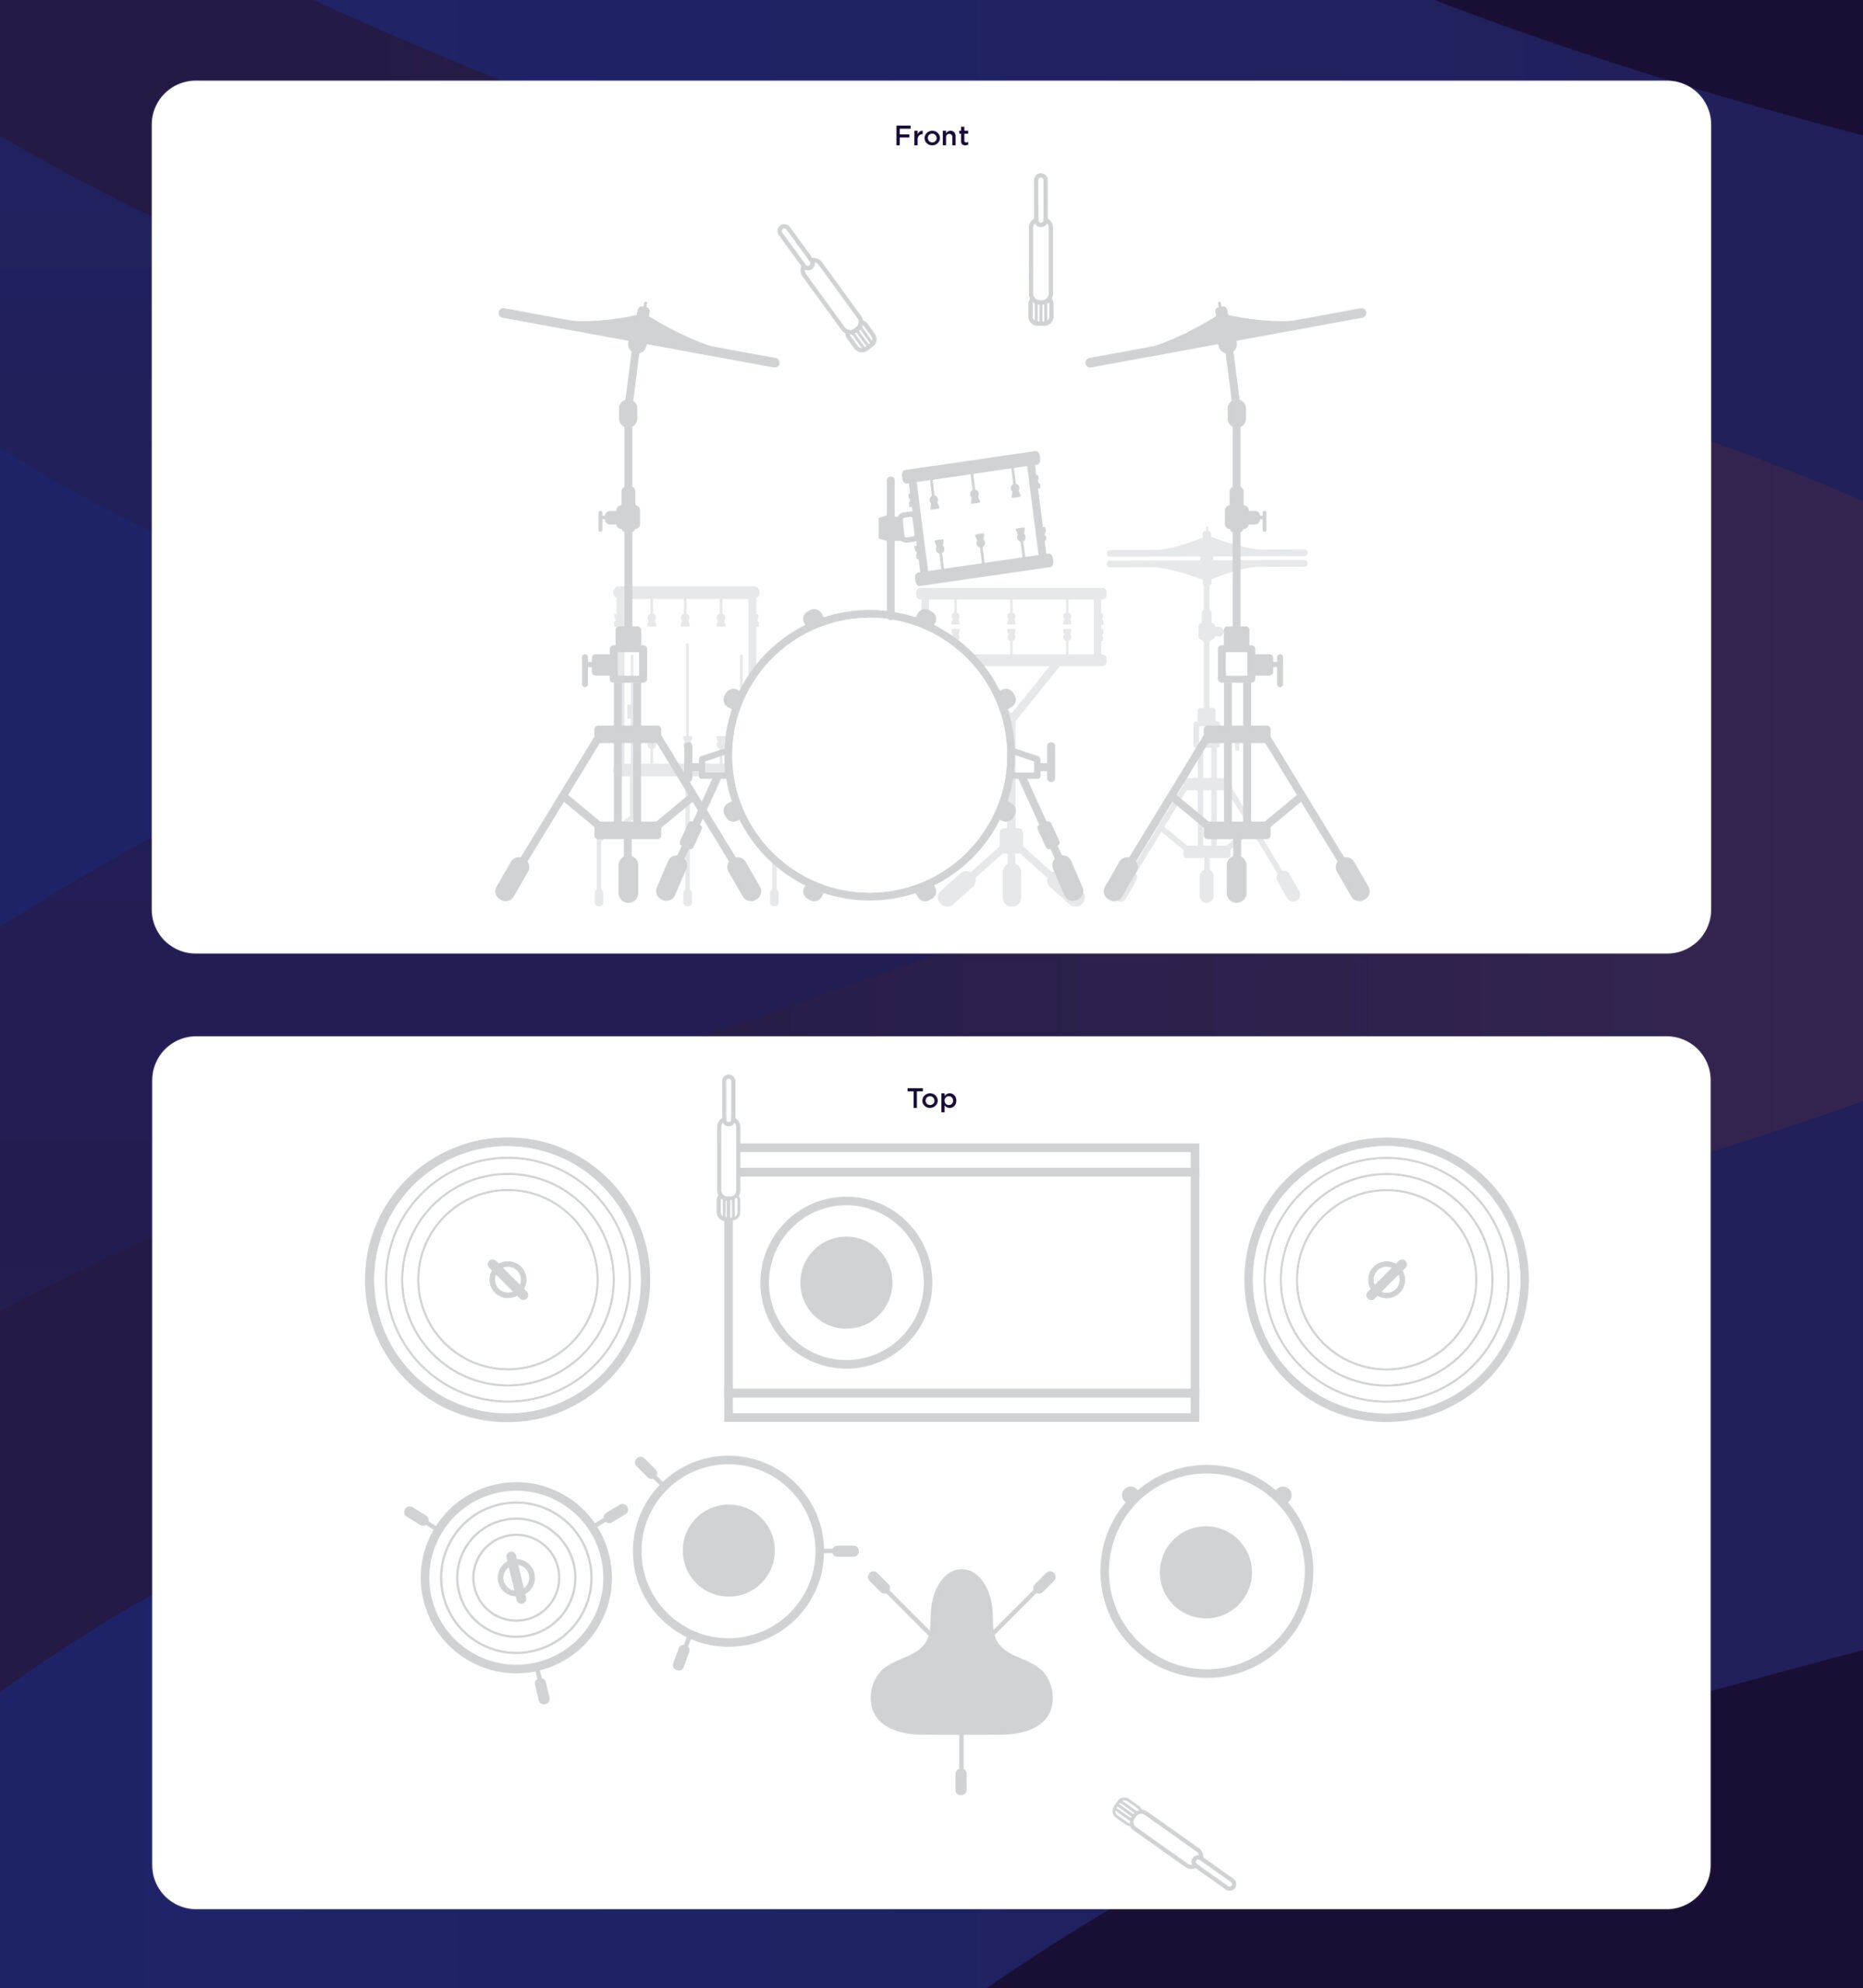
Step 3: Toms
Up next are the toms. These are pretty simple.
Just mic them the same way you miked your snare drumhead.
About 1–2 inches above the drum skin, pointing towards the drummer, angled 1–2 inches away from the center of the head.
No need to mic up the bottom of these drums. Toms have a more consistent tone than snares or kicks.
Miking the bottom won’t improve the tone of the recording by much.
Before we move on, let’s answer an important question. What if I have more toms than I have mics?
There are many drum sets that have more than the average two-tom setup. If you’re concerned about miking your toms, ask yourself this:
What are the most important toms to this song?
Whatever toms are used the most in the song, those should be miked. The others can just be picked up by the overheads.
Speaking of which…
Step 4: Cymbals
The two microphones that record the drum set’s cymbals are called the overheads.
There are tons of different ways to set up your overheads. Let’s focus on a few key points that will help the average DIY musician.
Here are a few important questions:
- What are you trying to accomplish with your overheads? Are you trying to just get the sound of the cymbals, or are you trying to get a more complete sound of the entire kit? The closer you put the microphones to the cymbals, the less room tone will be in them (and vice versa).
- What does the room sound like? If it’s a smaller room (or a crappy room), your overheads should be closer to the kit. If it’s a medium room (or a great-sounding room), you can take them higher to get more of the sound of the entire kit.
- Are you aiming for accuracy or stereo width? Some overhead miking techniques have a wider sound. And others are more accurate to what the human ear hears. Choose accordingly.
Once you’ve answered those questions, you can set up the right miking technique and placement.
Like I said before, there are tons of stereo miking techniques you can do for overheads.
But if you aren’t recording in a professional studio, I’d focus on just two: the spaced pair and the X/Y pair.
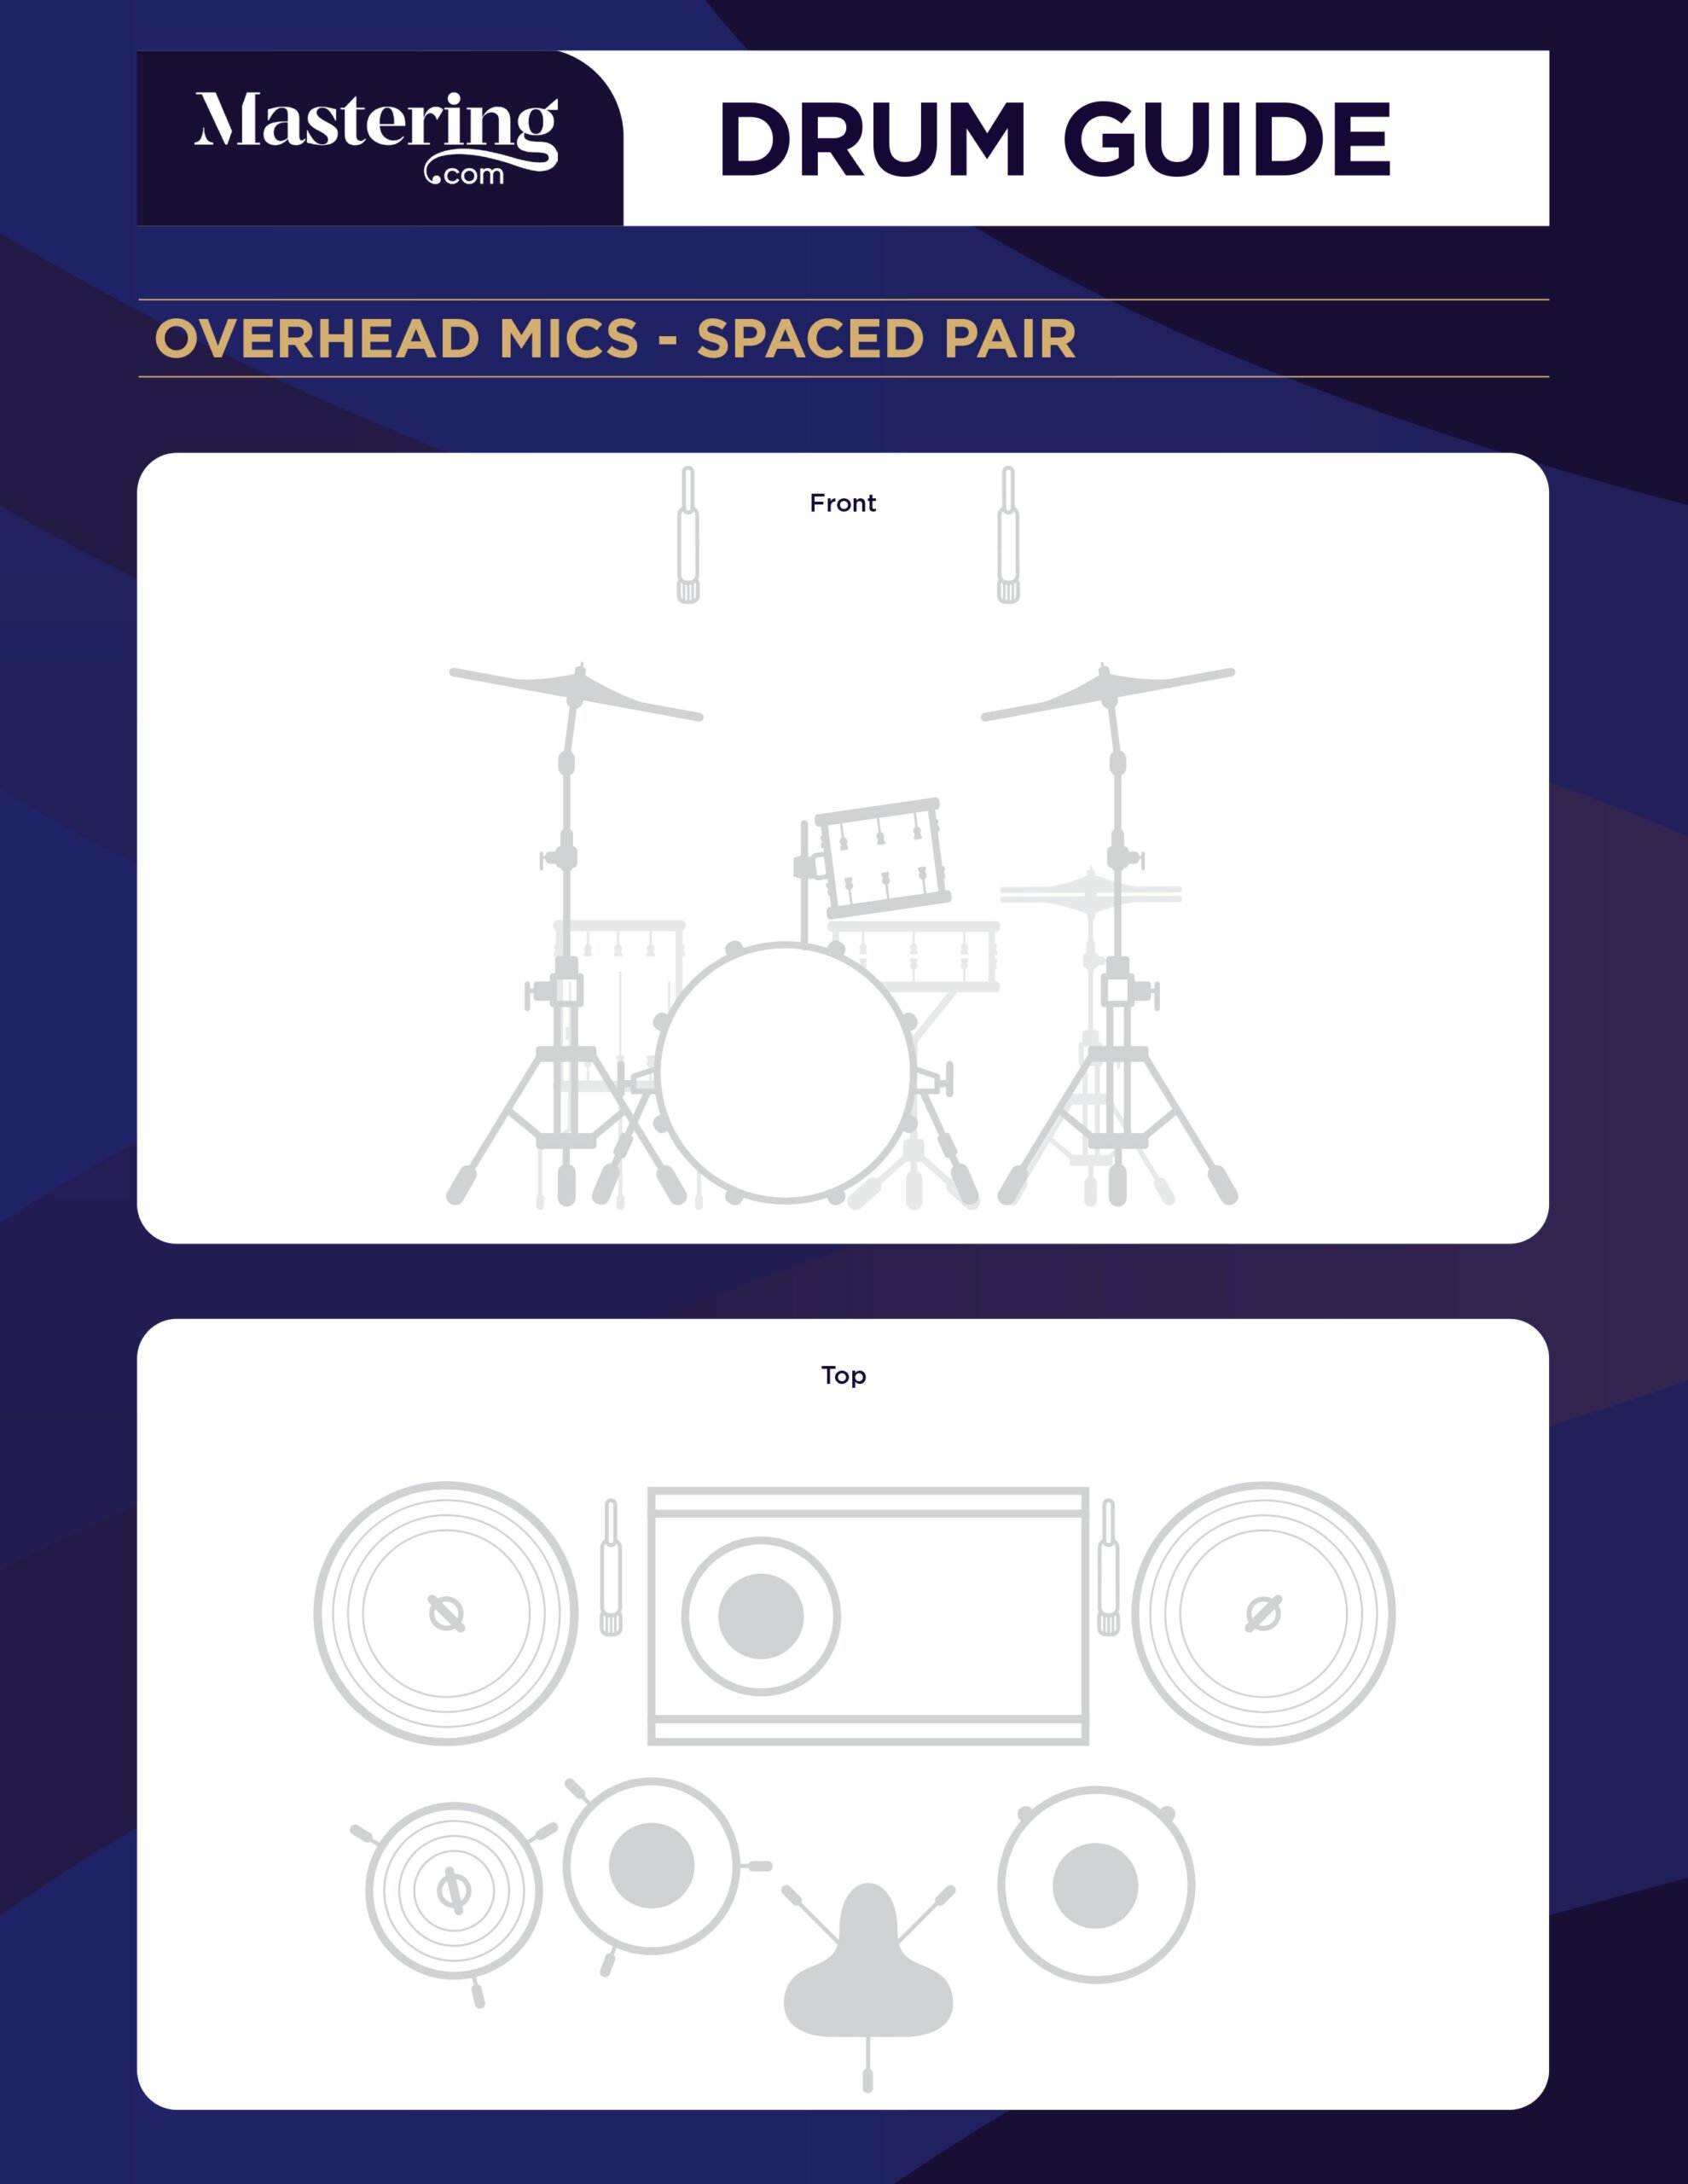
The Spaced Pair
A spaced pair is exactly what it sounds like.
A pair of two microphones are spaced apart from each other. They point straight down at the floor above the cymbals.
The main benefit of the spaced pair technique is that it’s wider than the human ear.
When you pan the left and right microphones into the left and right speakers, respectively, it sounds exciting and larger than life.
However, they’re well known for some serious phasing problems if done incorrectly. You can lose a lot of the sound of the drum set to the phase cancellation of this technique.
To minimize phase issues, you want to make sure both mics are the same distance from the snare.
Grab a mic cable or a long string. Place one end of the cable in the middle of the snare’s head. Pull the cable up until it touches the edge of the left microphone.
Keep the end of the cable on the snare, but move the other end to the right side of the drum set. Wherever the other end of the cable ends up, that’s where the right-hand mic should go.
To see a demonstration, fast forward to 1:30 in this video:
If you’re concerned about the tone loss of using a spaced pair, then I’d try this next miking technique…
The X/Y Pair
This technique won’t make the drum set sound “larger than life,” but it’ll keep you from having any phasing issues. It’s the safest (and most accurate) choice for recording your overheads.
Setting up the X/Y pair is simple.
Place your two microphones directly above the middle of your kick drum. Then angle them so they are making a 90-degree angle with each other.
The microphones should now look like the end of an arrow, pointing straight down above the kick drum.

For more information, check out this video:
Once you’ve got your overheads set up, you’re done! Or you could be.
There’s one more optional mic that can really add some life to your sound…
Step 5: The Room Mic
Do you have an extra 1–2 mics left? (Or maybe don’t mind sacrificing one of the kick, snare, or tom mics.)
A room mic (or two) can add a ton of character and color to the sound of the kit.
The room mic is very simple. It’s just a microphone that picks up the sound of the drum kit in the room.

When mixed in quietly, it adds ambience, depth, and girth to the sound.
One cool part of the room mic is that it doesn’t have to sound great. There are tons of examples of pro engineers using crappy microphones to record the drum room.
As long as you’re mixing it in quietly to the sound, it can add a lot to the pristine sound of the overheads.
As for where to put it, I’d recommend keeping to the 3:1 rule to minimize phase issues.
The 3:1 Rule
The 3:1 rule goes as follows, working with two microphones recording one instrument. It will help you avoid phase issues.
Measure the distance from the instrument to the closest microphone.
Place the second microphone at a distance of a multiple of three from the closest mic’s distance.
Let’s ignore all the jargon and get straight to the point.
Let’s say you have a microphone 1 inch away from an acoustic guitar.
Then your second microphone needs to be set at a distance of 3 inches (1×3), 9 inches (3×3), or 27 inches (9×3), and so on.
It’s all a multiple of three.
So how does this relate to the room mic? Well, the room mic is most similar to the overhead mics, so we’re going to use those as our “close” mic.
First off, we’ll measure the distance from the overheads to the snare. Let’s say that the overheads are 4 feet above the snare.
That means we need to place the room mic either 12 feet (4×3) from the snare or 36 feet (12×3) from the snare.
Since you’re probably recording in a bedroom or living room, 12 feet will work just fine.
So all you have to do is find a place in the room 12 feet from the snare that sounds the best to your ears.
Set up the room mic there. Easy as that!
I like to put the room mic height between the snare and cymbals.
That said, there’s no hard-and-fast rule to this. Put it where it sounds best in your room.
What If I Don’t Have Enough Mics?
Not everyone has all the mics they need to record a full drum set.
So what do you do if you don’t? Let’s get into it.
If you only have 5 mics…
I would leave out the toms and the room mic. Just go with two overhead mics, a snare top mic, snare bottom mic, and kick mic.
Easy as that. You’ll still get a great drum sound.
If you only have 4 mics…
You could use the same technique as above, minus the snare bottom mic.
You could also use a special drum miking technique known as the Glyn Johns method.
Glyn Johns was a famous audio engineer from the ‘60s and ‘70s. He was known for his stripped-down approach to drums.
His most famous band? Led Zeppelin.
That’s right, he recorded Zep’s massive drum sound with only a few microphones.
The Glyn Johns method is made up of one snare mic, one kick mic, and two overheads. But the overhead placement is a bit unusual.
One of the overheads is directly above the cymbals and snare. But the other overhead is a few feet to the right of the low tom.
It almost makes a triangle out of the overheads. You get a much more tom-heavy sound with this technique, even without miking any toms.
Check out the positions below:
If you only have 3 mics…
Try using the Glyn Johns method from above, but leave out the kick mic.
You won’t get as powerful of a sound, but the general sound will be there.
If you only have 2 mics…
This is the ultimate challenge. How do you record something as complicated as a drum set with only two mics?
Try using the Recorderman method.
It’s simple, but you can get a surprisingly full sound with it, considering what you have to work with.
First, put one mic above the cymbals and snare, like for the Glyn Johns method.
Then put the second mic behind the drummer. Set it up over their right shoulder, pointing down at the snare.
Don’t forget to use the 3:1 rule with this.
If you can’t get the two mics to be the same distance from the snare, then one needs to be a multiple of three away from the snare.
Using the Recorderman method won’t get you much in the way of close sounds.
Your kick and snare won’t sound aggressive or punchy. But the sound of the entire kit will be clean and usable.
If you only have 1 mic…
Honestly, I wouldn’t record drums. It’s hard to get much of a usable drum sound with only one mic.
Go rent some mics or some time in a local recording studio. It’ll be worth your while.
Conclusion: Recording Drums
Recording drums can seem overwhelming at first. But don’t let the number of mics involved scare you away.
Everything you need to get a solid drum sound is right here!
But this article has everything you need to record professional sounding drums. By practicing all the steps outlined above, you’ll be recording great drum sounds in no time!
If you want to dig deeper into music production and learn what it actually takes to make mixes that sound pro… And you’re an intermediate or advanced producer… Be sure to check out the free masterclass: Enjoy!Next Steps