Are you struggling to get your mixes sounding bright, wide, and loud? Do you listen to pro mixes and wonder how they get the music jumping out of the speakers?
There’s a common mistake that many producers make when trying to get their music sounding HUGE.
I’ll be revealing the mistake in this blog post. Also, I’ll show you an approach to get your music sounding bigger than ever.
I’m guessing you’re here because you want to make your mixes sound professional. We put together a brief training that covers a totally new approach to music production. Until now, everyone has been teaching production totally backward. Just click below to watch.Get industry-quality every time (steal this framework)
But if you just want to learn all about widening and brightening specifically, keep reading.
The Mistake: Ignoring Contrast
The mistake is trying to make the whole song as bright, wide, and powerful as possible. What happens when you do this…?
If everything is mixed bright, nothing sounds bright.
If everything is mixed wide, nothing sounds wide.
If everything is mixed powerful, nothing sounds powerful.
Our perceptions can be fooled by our frame of reference. Our ears are tuned to the context of what we have just heard. This affects our understanding of tonal balance.
For example, if we listen to a mix with very piercing high frequencies and then to a well-balanced mix, we might perceive the second (well-balanced) mix as sounding dull.
The Solution: Create Context, Then Contrast
We can use this reference frame to our advantage while mixing. Below I’ll discuss a few ways to prime your listener by creating context. From there we can add contrast to make your music jump out of the speakers.
Tip #1: Getting Your Mix Sounding Bright
So if all the channels in your project are bright, then no channel will stick out as sounding particularly bright.
Mixing too many bright channels means you’re also more likely to struggle with harshness. This is because the upper frequencies battle for space in the mix.
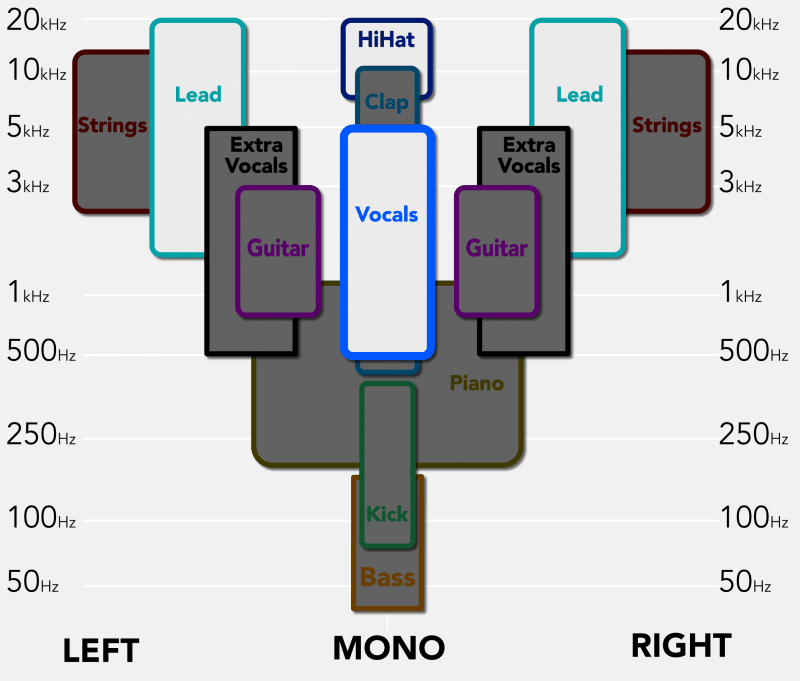
So what’s the process to get the top end of your mix glistening? Think about the channels that you want to stick out in the mix as sounding bright.
For most productions I work on this would be:
- Vocals
- Hi-hats
- Lead/main synth
This might be different for you depending on the instruments and sounds you’ve used. Once I have those channels in mind, I know to minimize the high frequency boosts on the remaining channels.
Let’s say the first verse starts with just a piano for 4 bars and then the vocal comes in.
I would EQ the piano without the high-frequencies boosted to set a reference frame for the listener. Then when the brighter vocals enter with a glistening top end, it gives the vocals a sense of clarity.
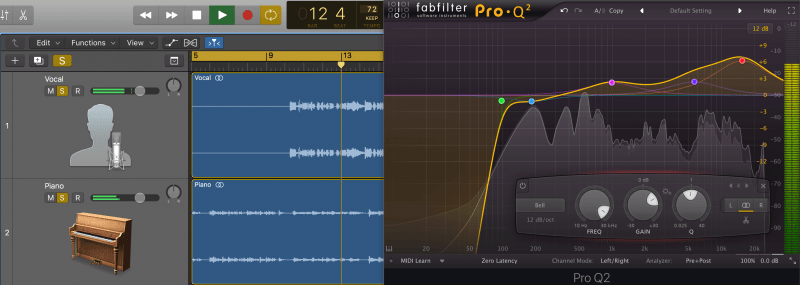
Had I boosted the high-frequencies in the piano, the dramatic entrance of the vocals would be diminished. Without the contrast, the vocals wouldn’t be perceived as particularly bright.
NOTE: Check out Slate Digital’s Fresh Air plugin to add some brightness to your mix:
How bright is bright enough?
There’s a fine line between a sparkling top end and a harsh sounding mix. You don’t want to push it so far that the mix is unbearable to hear. Luckily there’s a solution.
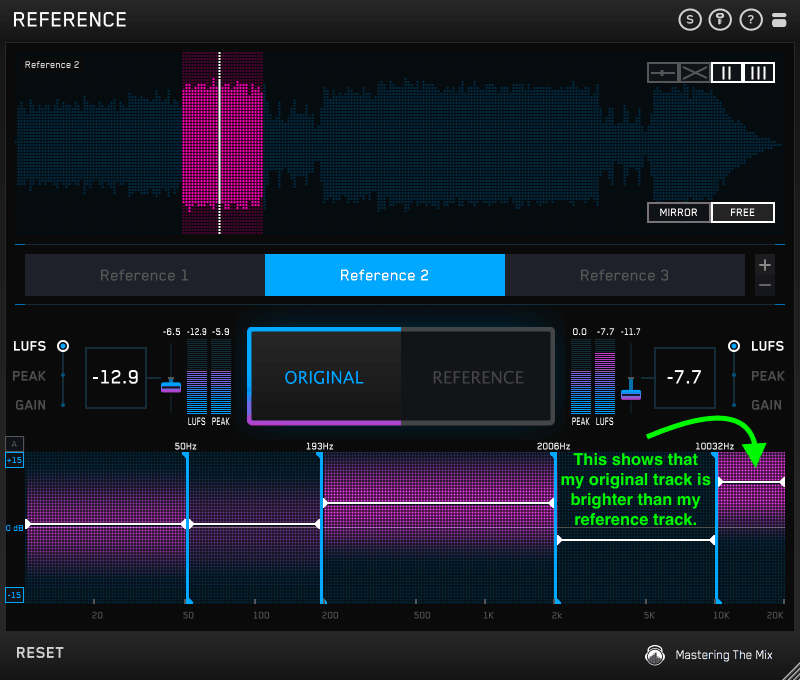
Using reference tracks can help you mix your music to sound more like a professional release. One of the goals when referencing could be to get your vocal sounding as bright as your reference track.
Try using the REFERENCE plugin, created by Mastering The Mix. It gives you extra tools to gather actionable information from your reference tracks to help guide your mixing decisions.
It also allows you to instantly and accurately level match all the reference tracks to your production. This gives a fairer comparison.
UPDATE: You might also want to check out OekSound’s Soothe 2 plugin:
Tip #2: Getting Your Mix Sounding Wide
Again, if all the channels in your project are wide, then no channel will stick out as sounding particularly wide.
I’ve studied a lot of professional releases in my blog series, Decoding The Mix. In these posts, I look at professional mixes and what we can learn from them. I uncovered a technique that I saw occurring in almost every mix.
These pro mixers were shooting for a more mono and less wide sound during the verse. Then they pushed some channels super wide during the chorus.
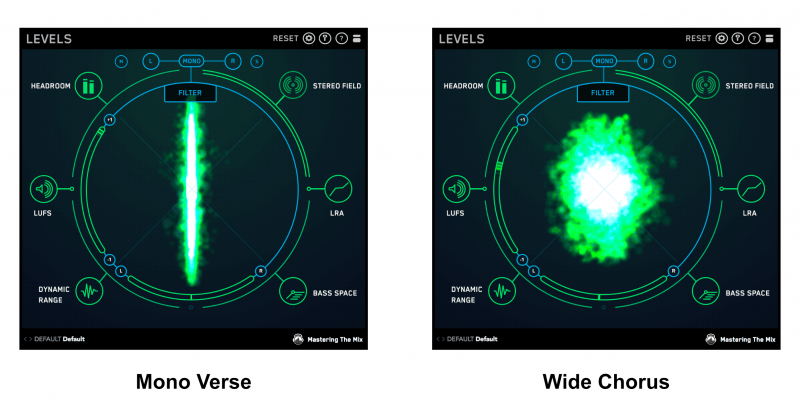
Most of the time we set the panning or stereo width to a certain position and leave it there. But these engineers got the chorus to sound absolutely explosive with this simple priming technique.
They give the listener a narrow mix during the verse then dramatically contrasted that with a wide chorus.
There’s nothing wrong with using some subtle panning during the verse. This can really enhance the clarity of the mix.
But to create the effect of the chorus jumping out of the speakers, make sure it is noticeably wider than the verse.
Which channels should I mix wide?
Stereo placement is a deep subject…
But in a nutshell, try to keep your focused elements fairly central. Things like the kick, snare, bass, and vocals.
You can add wider effects to these but try and keep the dry signal mono or near mono.

Things like synths, backing vocals, percussion, and guitars sound great when pushed out wide. This also helps separate them from the vocals and lead, which also occupy similar frequencies.
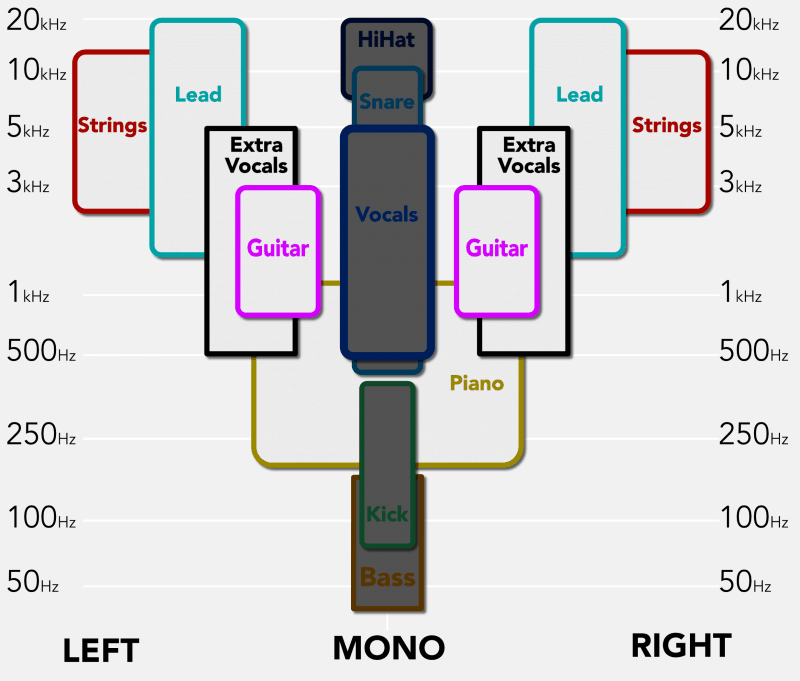
Avoid mixing low frequencies to be wide, as this can cause phase cancellation.
It makes your bass sound weak when the left and right channels are summed to mono. Mono playback is common in clubs, stores, and many cell phones and laptops.
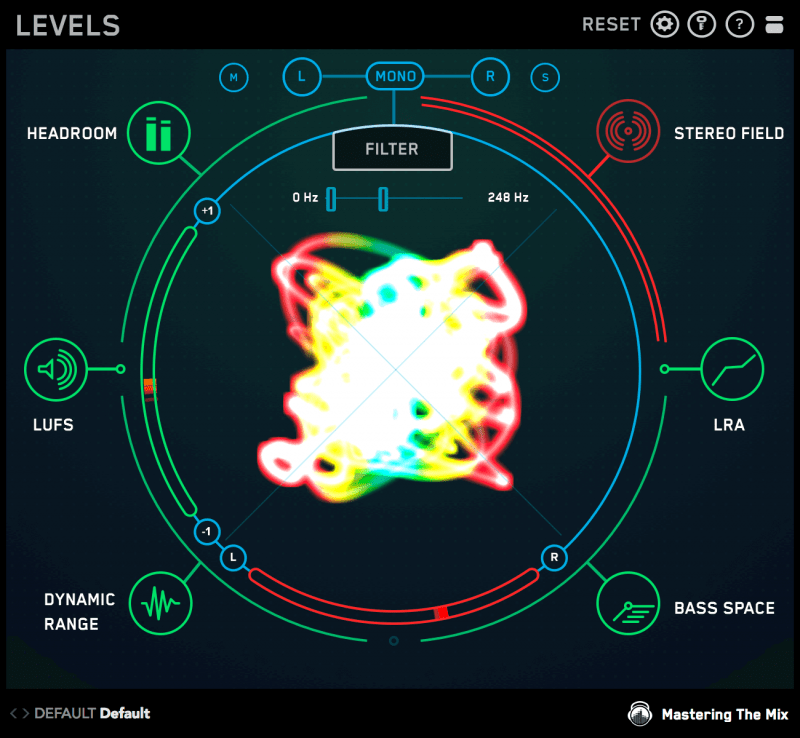
Try using LEVELS by Mastering The Mix to check the stereo placement of various frequencies in your mix. The Stereo Field section has a filter that lets you isolate the frequencies you want to analyze. If the high-cut filter is set to 250 Hz or less, the wider frequencies will glow red. This indicates that you should try to mix those frequencies more centrally or even mono.
Tip #3: Getting Your Mix Sounding Powerful
As you may have guessed, to make your mix sound powerful, you need to prime your listener and create contrast.
Let’s say that you want your chorus or drop to have an impact when it enters. Let’s say you’ve already got the brightness and width contrasts nailed… What else can you do?
When it comes to creating an impact, nothing works quite as well as dynamics.
It’s a simple formula that’s often overlooked. To get your drop or chorus hitting hard, it should enter louder than the build-up or verse.
Try to plan for this during the songwriting and production process. Then you can hit the ground running when you get to mixing your track.
You can do this by ear, but if you feel like it’s not quite working yet, there is a useful formula that can help. For this, we will be using an LUFS meter, which is the most accurate way to determine the loudness of audio.
LUFS is a calculation that’s based on how the human ear perceives loudness. This is different from the meters that you see in you DAW mixer which display the exact peak level of the audio.
Though loudness is technically less accurate than peak volume, it does a much better job of matching how the human ear hears music in the real world. So in a way, it’s actually more accurate.
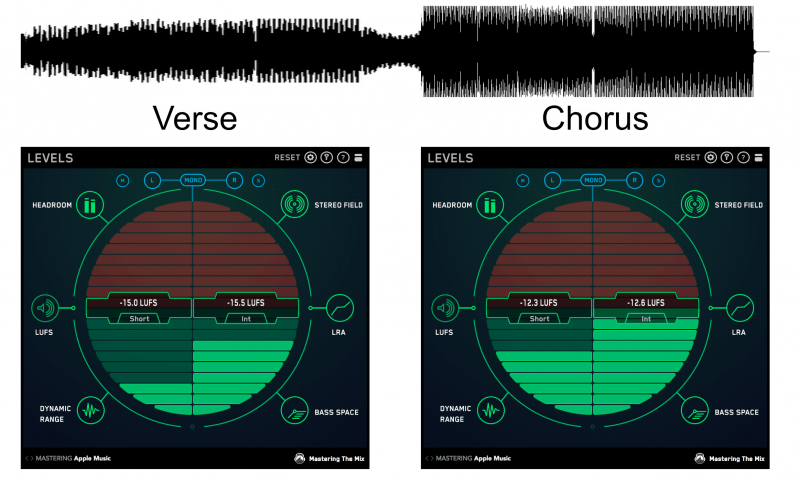
Fire up a reliable LUFS meter on your output. I’ll be using LEVELS.
- Loop your build up and check the Short Term (st LUFS) reading.
- Make a note of the reading.
- Now do the same for the chorus.
How do the readings differ?
If the chorus is 1–2 LU louder, that would cause a moderate impact. 3–6 LU would be a significant difference in loudness. And 7+ might give your listeners quite a shock.
This can also uncover if you’ve mistakenly mixed your chorus quieter than your build up.
You might have a few compressors working too hard in your mix. This reduces the volume of key channels during the chorus or drop.
The last thing you and your listeners want is an unsatisfying chorus that feels anticlimactic. So to avoid disappointment, make sure your chorus enters with an impact.
Should I automate the master channel?
I have a lot of clients who ask me this. It is doable but can sound a bit forced.
I’d recommend automating the channels individually within the mix. It creates the most natural transition from the build-up to drop.
If I feel the chorus needs to be increased by more than 2 dB, I’ll suggest that the artist adjusts this in the mix to get the best results.
If I feel it can be done in the master, I find the most effective and transparent way is to automate the gain of the limiter. I’ll set the chorus to the loudness that I want it to be then reduce the gain on the limiter during the verse and build up.
Loudness Range
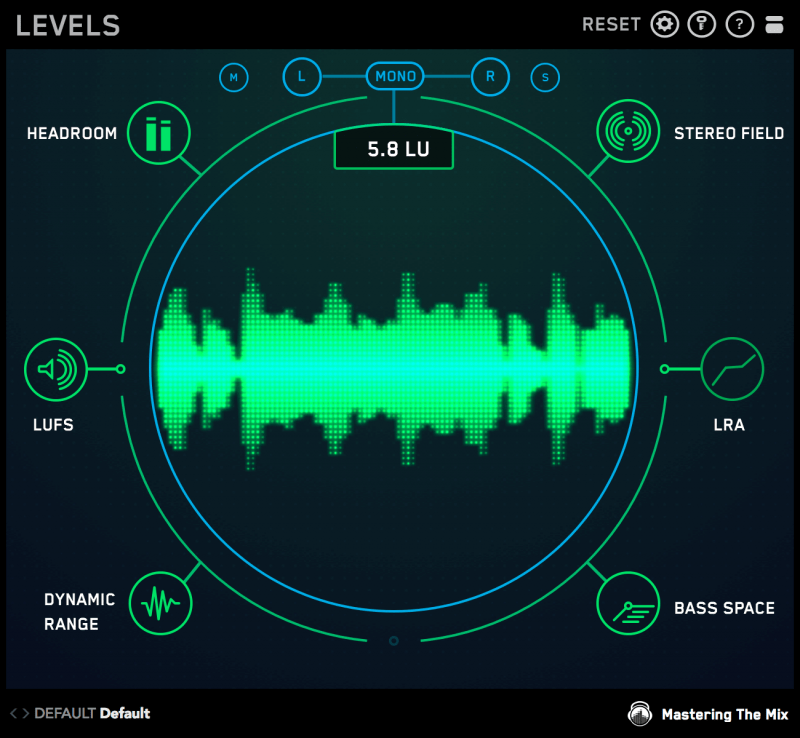
There is a specific measurement that tells you the dynamic difference between sections of your track. It’s called the loudness range.
Loudness range (measured in loudness units) will give you an idea of the difference in perceived volume between the sections of your track (intro, verse, chorus, etc.).
The greater the difference in perceived volume, the higher the loudness range number will be.

If the loudness of the various sections in your track are very similar or equal, the loudness range will be smaller.

A loudness range of 6 LU or above shows that a track has a considerable difference in loudness between the various sections. This might tell you that the chorus comes in with an impact.
Tracks with a loudness range below 4 LU could be considered rather static in volume. This can lead to an unexciting entrance of the chorus or drop.
I recommend aiming for a loudness range above 5 LU. This is if you want to create a track with tension, release, and an epic chorus that explodes out of the verse.
But this suggestion can be taken with a pinch of salt! If you want a track with consistent energy throughout, of course you would end up with a lower loudness range.
Loudness range isn’t like true peaks, where most people can agree that clipping doesn’t sound good. Loudness range is subjective and totally depends on the material you’re working on.
Summary
- Set your listener’s frame of reference, then deliver contrast for maximum effect.
- If everything is mixed bright, nothing sounds bright.
- Using reference tracks can help you mix your music to sound more like a professional release.
- Give the listener a reference frame of quite a narrow mix during the verse. Then dramatically contrast that with a wide chorus.
- To get your drop or chorus hitting hard, it should enter louder than the build-up or verse.
- The greater the difference in loudness between the sections of your track, the higher the loudness range will be.
Next Steps
If you want to dig deeper into music production and learn what it actually takes to make mixes that sound pro…
And you’re an intermediate or advanced producer…
Be sure to check out the free masterclass:
Enjoy!