


When I first started mixing, depth was the thing experienced engineers always talked about that I could never quite grasp. After training thousands of mixing engineers, I’ve seen the same misunderstandings about depth show up again and again. They leave people frustrated mid mix, and the end result is often a track that feels like it’s pressed up against the glass. To understand why it’s so hard to execute, you first have to stop thinking of a mix as a flat, two-dimensional snapshot of your audio.
Today we’re going to break down the first of four principles we use to create depth in a mix. First, a quick reset on what we mean by “depth.” In the way we teach it here at our audio school, a mix isn’t a flat snapshot of every track playing at once. It’s a three dimensional space, and every sound has to hold its place in that space across all three dimensions at once. That’s the point of our logo, the tesseract (as seen on our home page at Mastering.com). It’s a reminder that the second you stop thinking in dimensions and start thinking on a flat line, your mix collapses into a picture instead of a place you can step into.
When you get it right, the payoff is a mix that feels defined, wide, and immersive. Every layer still has room to breathe, you can feel proximity and clearly defined edges of your sounds, and you can hear everything because each sound has a real position in that three dimensional space.
In that space, every sound has to coexist across all three dimensions at once. Height is primarily controlled by frequency, low end anchors the bottom, and highs lift toward the top of the cube. Width is the overall stereo balance of the mix. It’s how far left and right it feels, shaped by panning. Depth is the relational proximity between sounds, how near or far each track feels compared to the others. This creates the front-to-back dimension.
Most engineers get the hang of height and width pretty early on. Depth is the one that trips everyone up, every single time.
Height usually falls into place because production does a lot of the heavy lifting for you. The producer’s sound choices usually already cover the spectrum, so your mix naturally fills the top and bottom of the space. With enough low end to anchor the cube and enough high end to lift it, the height dimension starts to feel right, especially when you’re familiar with working inside a genre’s normal expectations. While enhancements can be made to the height dimension in the mix, for the most part production choices lock in how high the mix can actually feel.
Width is even more straightforward. One decision gets you most of the way there, pan elements left or right, the balance spreads, and the stereo image opens up fast.
Depth is a different beast. You can’t just dial it in with a single move, and that’s why it’s the one that refuses to click for so many engineers. Depth comes from four levers working together, and if even one of them disagrees, the illusion collapses.
What I eventually figured out is that I’d been shooting myself in the foot. I’d make one move to push a sound back, then make another that dragged it right back forward, and my decisions would just fight each other until the whole illusion fell apart. Depth isn’t one parameter you dial in, it’s four working together, and the moment they disagree, you get that pressed up against the glass feeling.
Those four principles of depth are volume, frequencies, transients, and reflections. Over the next few weeks I’m going to break down all four but today we start with the one that sets the starting point for everything else… volume.
Before we touch any of the four principles of depth, we need one rule on the table: depth only exists in contrast. Something can only feel “back” if something else feels “front.” Something can only feel dull if something else feels bright. And this only starts to matter once you’re actually mixing, blending two or more sounds into one cohesive picture. If a single track is playing by itself, turning it down doesn’t make it “farther away,” it just makes it quieter. So remember, depth is built with contrast.
With that in mind, volume is the first lever because it’s the simplest to use and has the strongest effect on the perceived distance of a sound. In the real world, distance and loudness are tied together, roughly described by the inverse-square law: as you double the distance, the level drops a lot. Your ear has been learning that relationship your whole life. So before you touch a single plugin, the balance you set between tracks is already telling the listener what’s close, what’s mid, and what’s far.
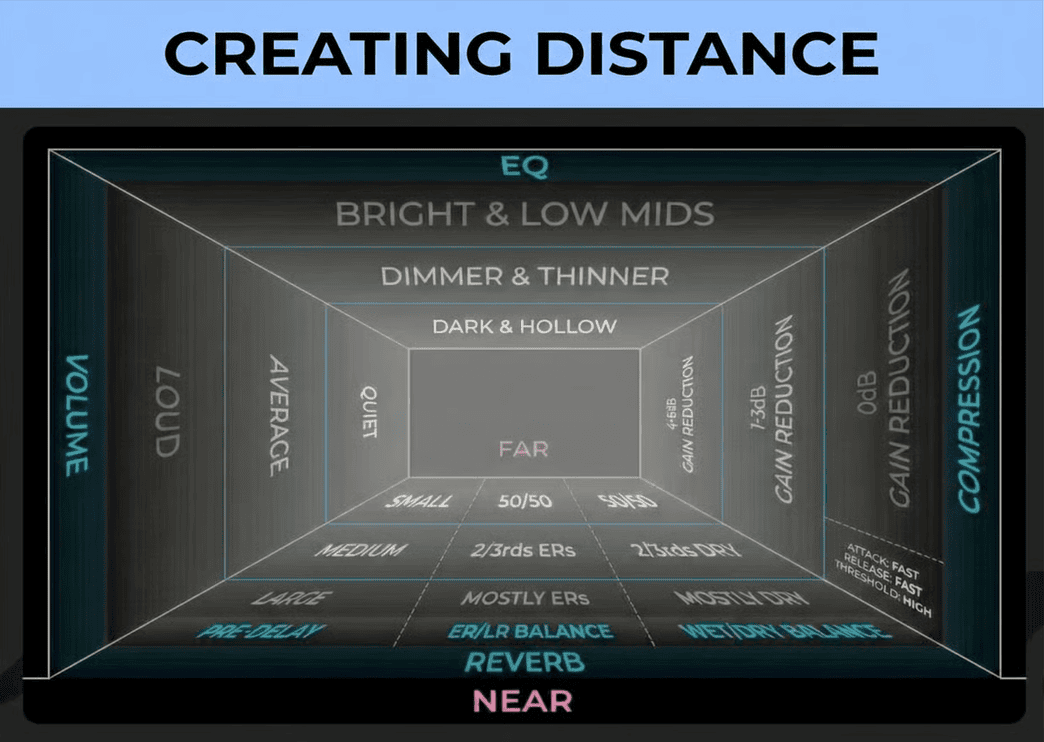
Look at the volume column on that map first. Loud in the front, average in the middle, quiet in the back. That single decision becomes the anchor for everything that follows.
Now notice how the other columns line up with it. As sounds move back, the EQ gets darker, the reverb gets wetter, and the compression works harder. None of those moves are the trick by themselves. They’re there to support the distance that volume already established.
That’s the whole game. Depth holds together when every choice agrees on where a sound lives, and it falls apart the moment your moves contradict each other.
This was the exact mistake I kept making. First I’d pull a sound’s fader down to push it into the back of the mix. Then I’d reach for EQ and brighten it to make it feel “clearer.” The problem is that brightness reads as close. So now volume is telling the listener that the sound is far away, while EQ is telling them it’s right up front. Those signals fight each other, and instead of creating depth, they create confusion. The sound ends up suspended in an unnatural spot, quiet but sharp, hard to place, because that’s not how distance works in the real world. I wasn’t missing a plugin. I was making two moves that contradicted each other.
Start with volume, and for the first pass use only volume. Before you touch EQ, reverb, or compression, run the mix with faders alone.
First, decide what belongs up front by choosing the focal point of your mix. In almost every style, there’s one element the listener should lock onto. In vocal driven music, that’s usually the vocal. When you pick that focal point, you set that as the nearest point in the mix.
Then build the rest of the depth field around it. Start with the bass and main groove and keep them loud, clear, and present. After that, decide what belongs in the back and pull those elements down until they truly feel behind everything else.
From there, work through the entire session and place every sound somewhere between those two extremes. Use level only. This is how you establish a baseline of depth before you make any other moves.
Then stop and listen. A lot of what you were about to “fix” with EQ, compression or reverb is often just a sound sitting at the wrong distance. When volume is sitting nicely, the other three principles finally have something solid to build on. Then you can use the other levers with more intention, to reinforce the initial distance you already set with your fader.
Get volume right first and you stop fighting your own mix decisions. Every move after that supports one clear decision instead of contradicting it. Next week we’ll take on frequencies and how they pull a sound forward or push it back. For now, run a “faders only” pass on whatever session you have open and hear how much of your depth problem was really a volume problem all along.
If you want to learn more about the 4 principles of depth, you can watch this YouTube video where Damian (mentor at Mastering.com) breaks it down.