Noise gates are incredible tools for cleaning up your mix. But if you don’t know how to use them, they can turn your song into a choppy mess.
Using these 12 noise gate tips will help you avoid the pitfalls and make your mixes sound like a pro made them.
I’m guessing you’re here because you want to make your mixes sound professional. We put together a brief training that covers a totally new approach to music production. Until now, everyone has been teaching production totally backward. Just click below to watch.Get industry-quality every time (steal this framework)
But if you just want to learn about Noise Gates specifically, keep reading.
12 Tips to Noise Gating That Sounds Totally Natural
What Is a Noise Gate?
A noise gate is a tool for cleaning up recordings that have background noise you don’t want in them.
Think of it like a bouncer at a club.

Before you can go in, the bouncer has to let you through. Once the bouncer opens the door for you, you’re good to go! But before that you have to stand outside.
A noise gate does exactly the same thing. It either keeps the sound out or lets it through.
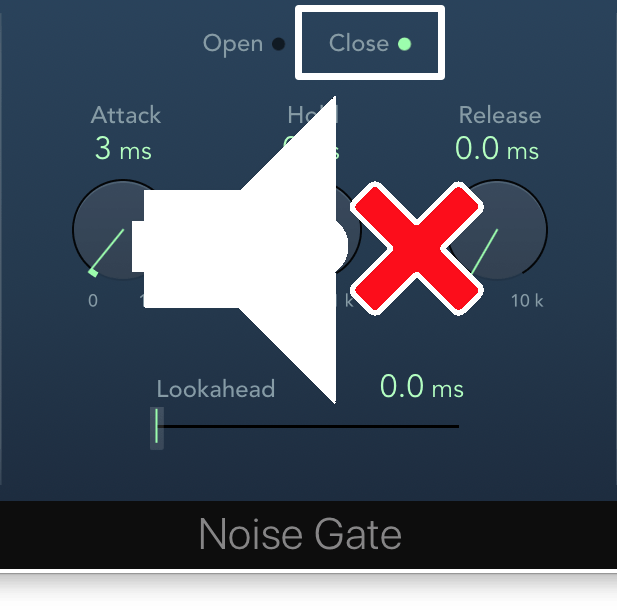
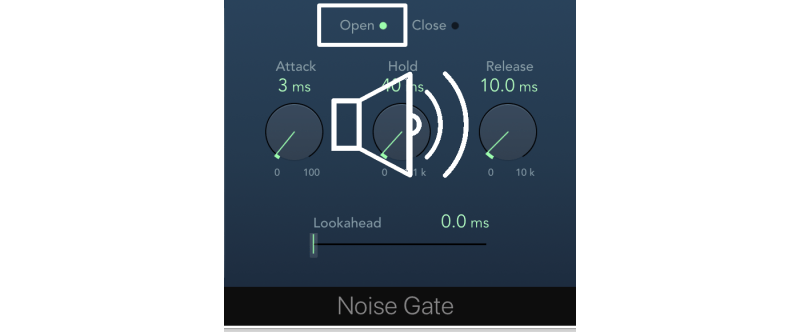
When a noise gate is closed, you won’t hear anything.
Once a noise gate opens, the sound can go through, and you’ll hear it loud and clear.
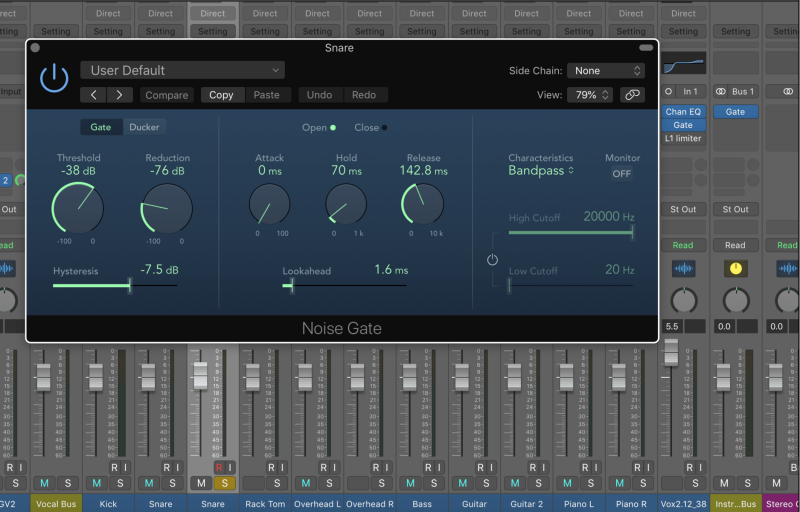
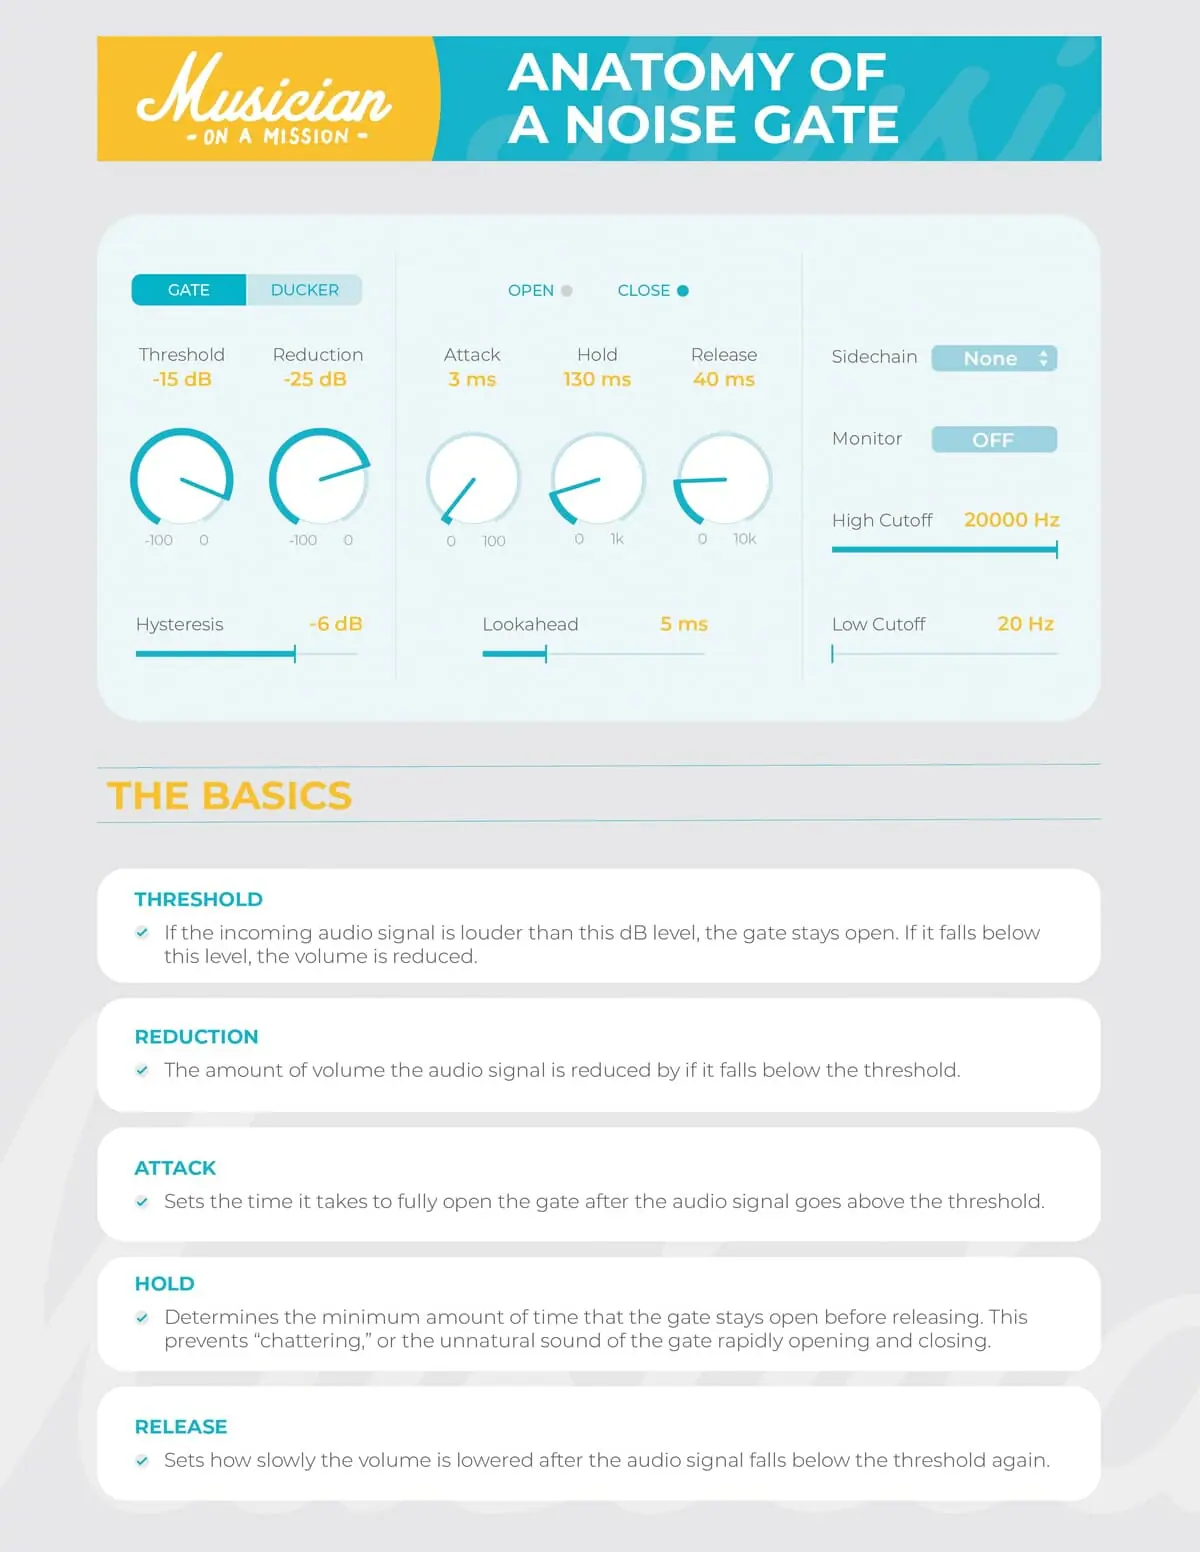
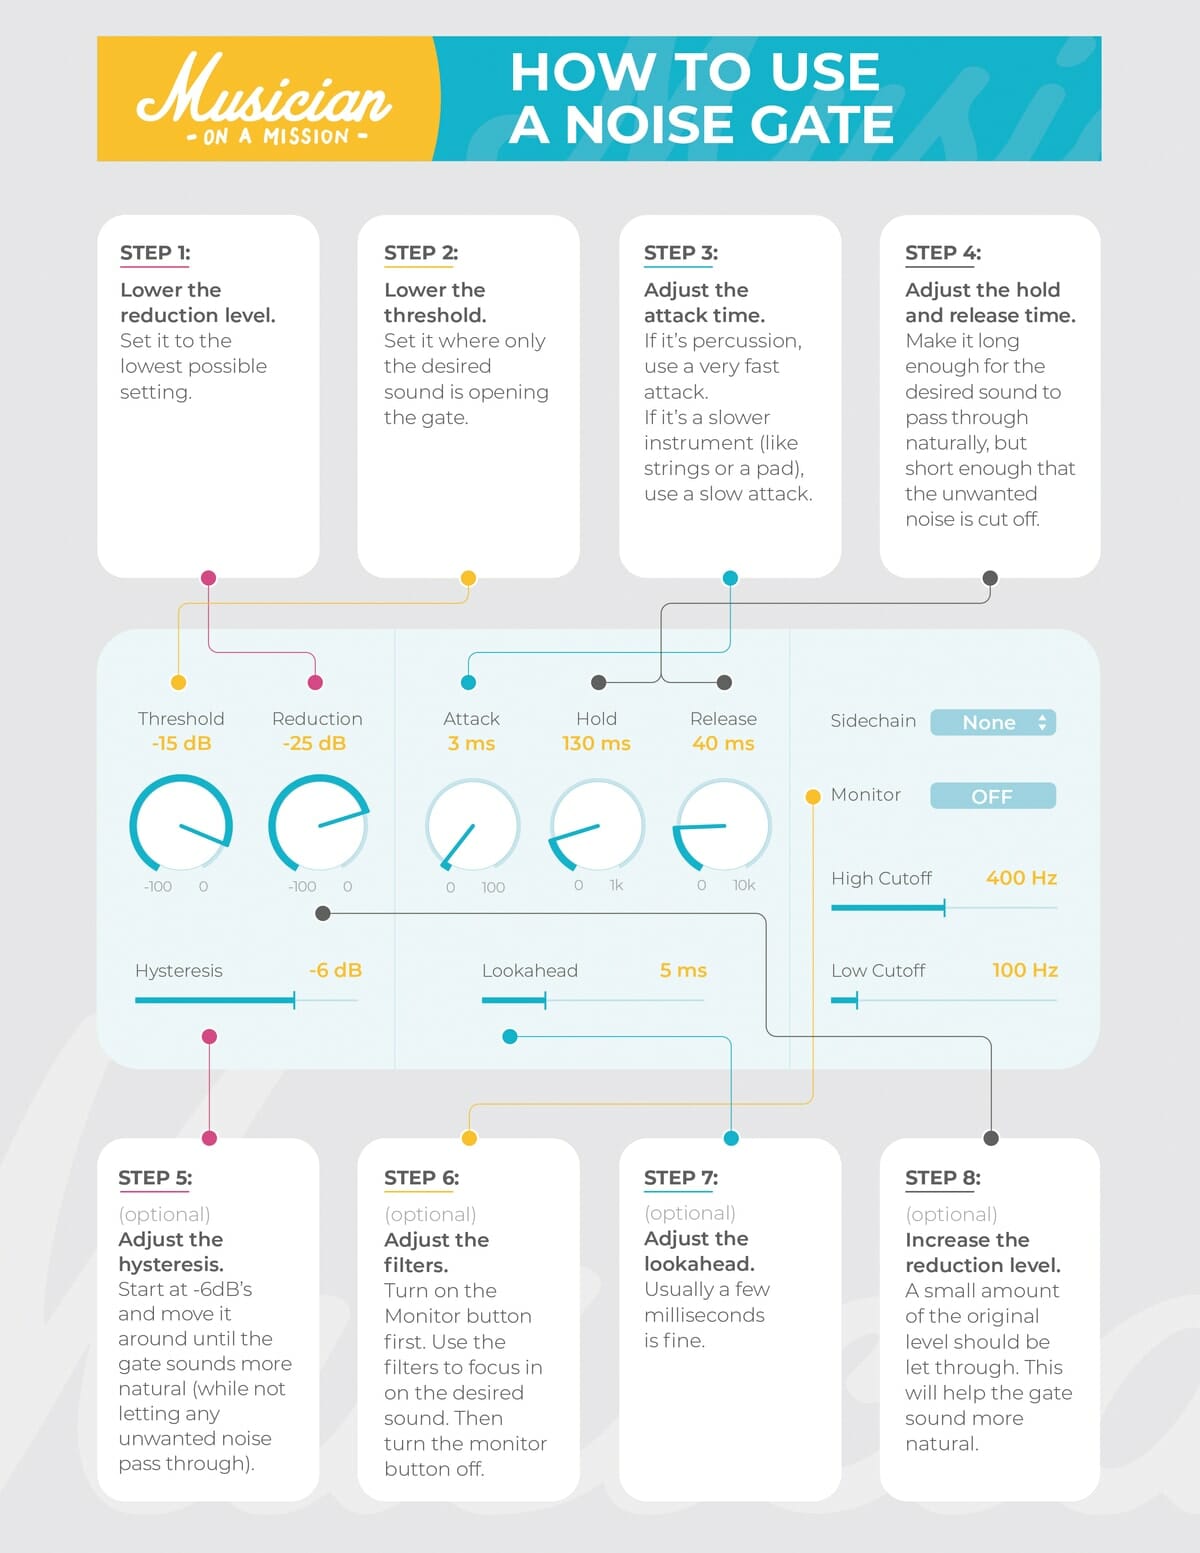
We’ll be going through all of the important settings, but this diagram show’s you all the different parts of a noise gate:
Tip #1: Knowing When You Need a Noise Gate
Knowing when to use a noise gate is just as important as knowing how to use one.
Not every track needs to be gated. So you should be able to tell when one does.
Noise gates are helpful when you want to get rid of background noise in between musical phrases.
Let’s check out some of the most common uses of gates.
Drum Tracks

When you record drums, you’re almost always going to get “bleed” from the other drums. This means the mic you’re using to record the snare’s probably going to record the kick as well.
Check out this snare track for example:
When the drummer isn’t hitting the snare, you can hear the other drums in the background. By putting a noise gate on the snare track, we can get rid of a bunch of that background noise.
So a lot of the time, you’ll want to gate your drum tracks. Try gating your kick, snare, and toms.
You won’t want to gate your overhead mics though.
Overheads are meant to get a big picture recording of the entire drum kit. Gating them will make your kit sound pretty weird.
Vocals

A lot of mixers gate the vocals as well.
If there’s background noise in your vocal recording, a noise gate can help get rid of that. For example, you can use a gate to get rid of excess room noise between vocal parts.
Pay attention to the background noise in this recording:
A bit distracting right? Every time they stop singing, you can hear the metronome in the background.
But if we put a gate on the track, we can clean it up.
Much better! This technique is really helpful in keeping your mix from sounding muddy.
But noise gates can’t get rid of all background noise. If a car is honking during the vocal phrase, you won’t be able to get rid of it.
Tip #2: Setting the Threshold
The threshold of a noise gate is a lot like the threshold of a compressor. It decides how loud the track needs to be for the gate to turn on.
But unlike a compressor, which turns loud sounds down, a gate lets loud sounds through.
Once a track reaches the same volume as the threshold, you’ll be able to hear it. The volume of anything below the threshold will be turned way down.
An easy way to figure out how you should set the threshold is to just check your meters.
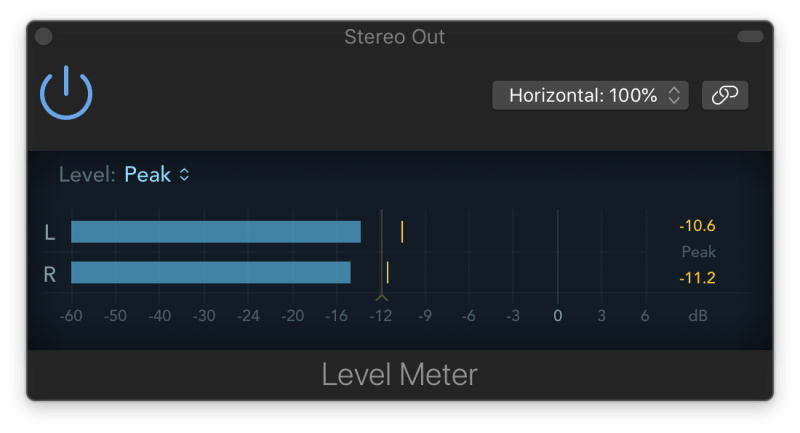
See how loud the background noise you’re trying to get rid of is.
Let’s look at this snare track. The snare is sitting around −11 dB, but the bleed from the kick drum is around −19 dB.
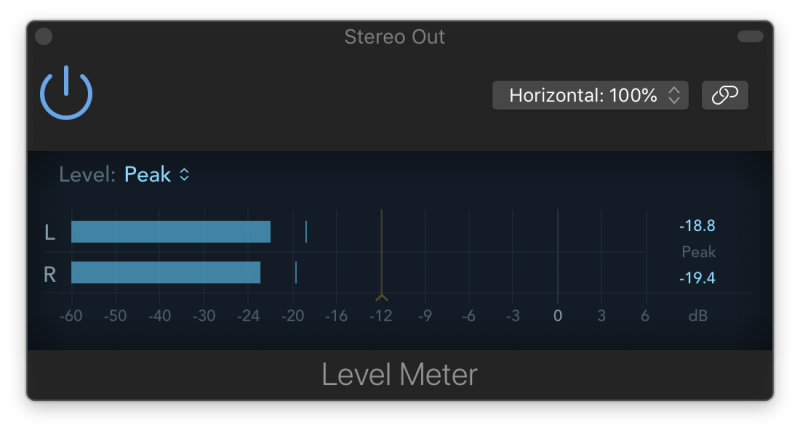
If we set the threshold at −18 dB, we’ll cut out the unwanted kick noise without affecting the snare.

Tip #3: Setting the Reduction
Now that we’ve got our threshold, we need to decide how much to turn the kick bleed down.
The reduction decides how quiet anything below the threshold is.
When the gate is open, the reduction doesn’t do anything. It’s only once the gate closes that the reduction turns the sound down.
The lower you set the reduction, the quieter the background noise will be.
How low you set the reduction is kind of a taste thing, so experiment with what sounds most natural to you.
When getting rid of mic bleed in drums, I try to set the reduction so there’s still a little bleed.

I feel like leaving some noise in the drum tracks helps round out the full kit in the mix. But that’s just a personal preference, so if you’d rather cut out the background drums entirely, go for it.
Tip #4: Fast or Slow Attack?
We can’t just call it a day after setting the threshold and reduction. We also need to decide how long it should take the gate to open up.
Once the volume passes the threshold, the attack tells the gate how quickly to open.

A really fast attack will open up right away, while a slow attack will open up gradually, fading the sound in.
Usually, a fast attack is your best bet when using a noise gate.
You don’t want the beginning of a drum hit or vocal line to get cut off. So make sure your attack is fast enough that your recording isn’t getting clipped.
Start with something under 5 ms and adjust from there.
Tip #5: Setting the Hold
The hold does what it says. It holds the gate open for a while.
Think of it like the top of a hill on a roller coaster.

Before the ride drops, sometimes it’ll hold you at the top of the hill for a few more seconds.
The hold holds the gate open for a little longer. Once the volume of the track dips back under the threshold, the hold will make sure it doesn’t fade out right away.

This is super helpful in making sure your noise gates sound realistic.
The tail end of a snare hit might dip below the threshold, but it would sound unnatural if the gate cut it off. So adding a little bit of hold should make sure the entire snare hit is intact.
I usually start with a hold of about 100ms and adjust from there.
If you’re getting too much background noise, dial the hold back a bit.
Tip #6: Setting the Release
After the hold comes the release.

If the hold is the top of the hill on a roller coaster, the release is the drop.

The release is how long it takes for the sound to fade out.
This is another way to make sure your gate sounds natural.
If the track went from full volume to silent in an instant, it’d sound really choppy. That makes it obvious you’re using a noise gate.
Which is why you need a nice release.
The release gradually fades the sound out, so your listeners don’t even notice it’s happening.
But you don’t want your release to be so long that the gate never closes. Start with a release time of 300ms and see how it sounds.
Make it longer if the fade out sounds too sudden and shorter if you’re getting unwanted noise.
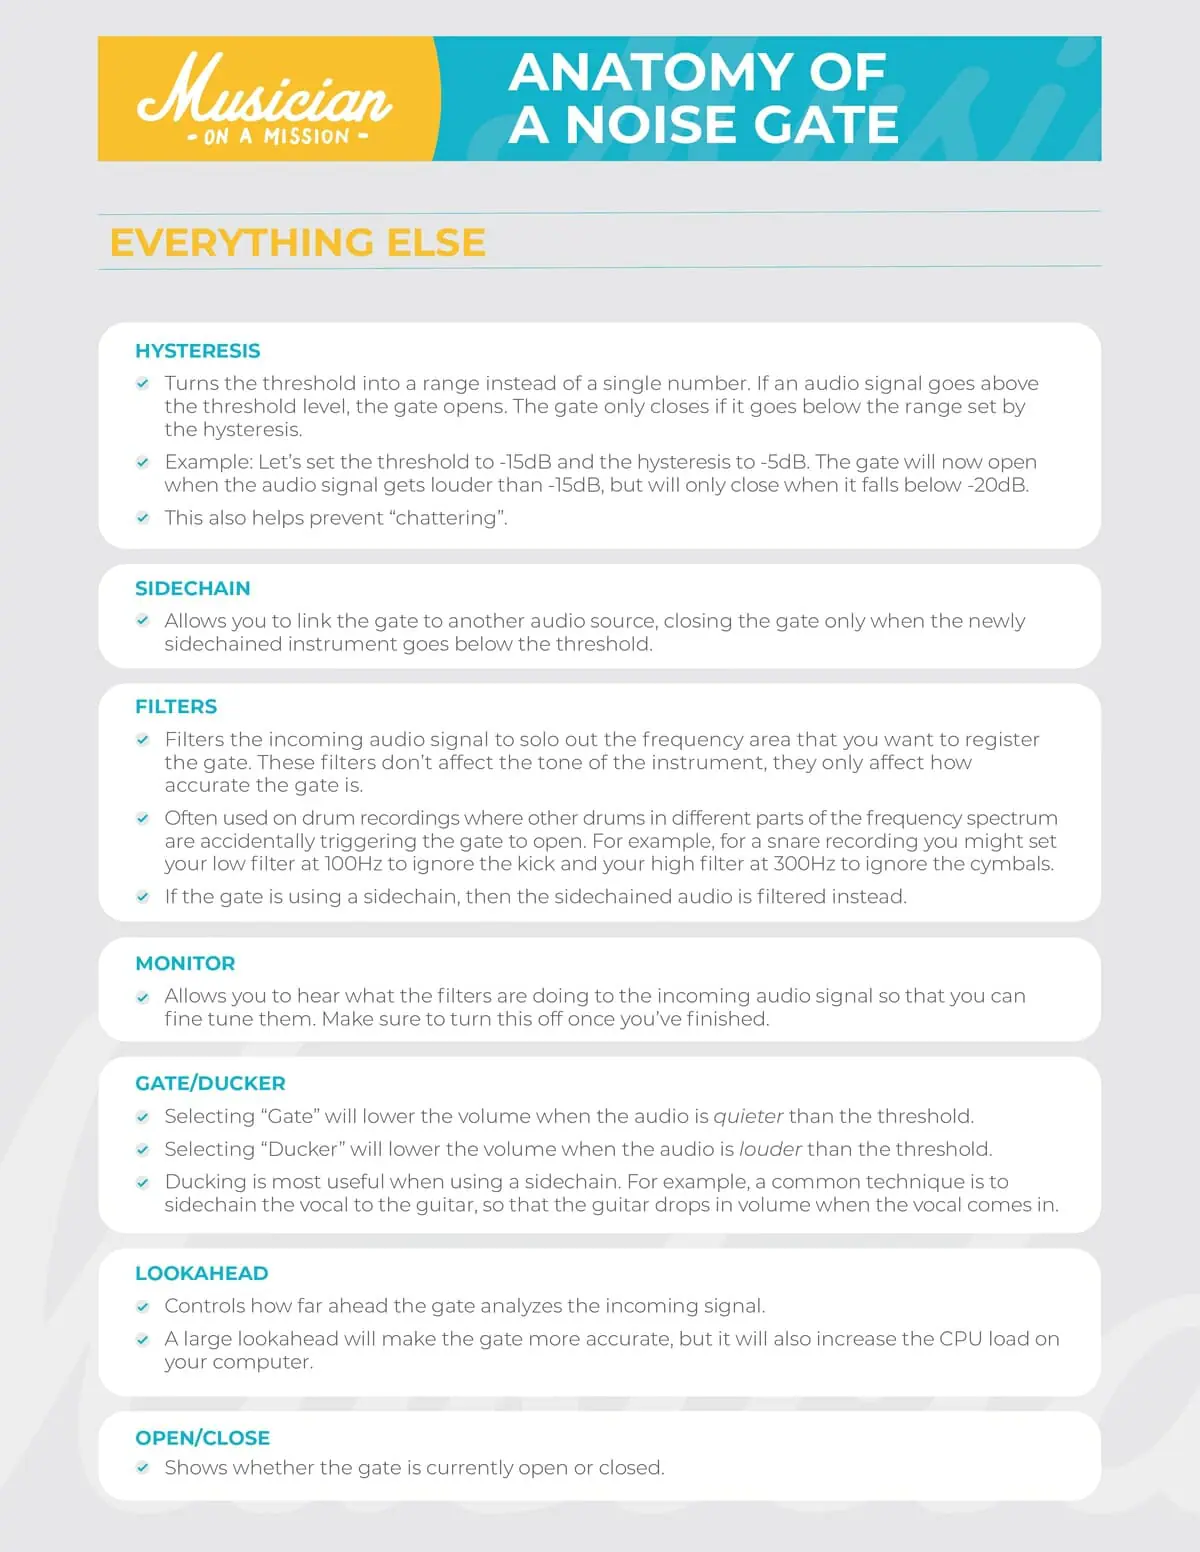
Tip #7: Setting the Hysteresis

Hysteresis is a cool but often misunderstood tool.
Don’t let the fancy name intimidate you, hysteresis is really simple.
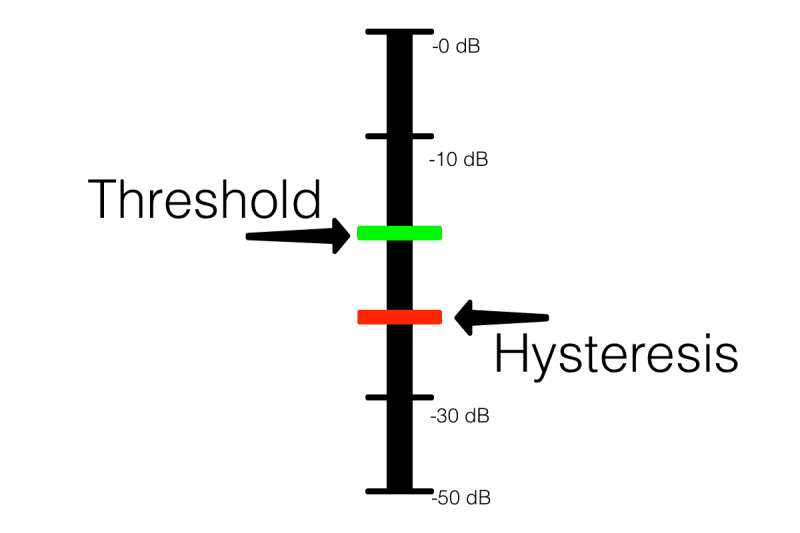
By default, a noise gate will open when the volume level goes ABOVE the threshold and close when it dips BELOW the threshold.
Hysteresis lets you pick a different volume level for the gate to close at. Almost like setting a second threshold.
Instead of closing when the volume dips below the threshold, the noise gate will close when it’s quieter than the hysteresis.
Hysteresis is how many dB below the threshold the volume needs to be before the gate closes.
Let’s say you’re working with a vocal track and the threshold is set to −20 dB. But occasionally the vocal dips down to −22 dB.
You need to keep the vocal phrase intact, but changing the threshold will let extra noise in. This is where hysteresis comes in.
By setting the hysteresis to −3 dB, the gate won’t close until the track dips −3 dB below the threshold (−23 dB).
To be clear, the threshold still decides how loud the track needs to be for the gate to open. But once the gate is open, the hysteresis decides when it’ll close.
This is another great way to preserve the tail ends of sounds.
I recommend starting with a hysteresis of −6dB and tweaking from there.
Tip #8: Setting the Side-chain
Side-chaining is a neat trick. Side-chaining makes it so that a noise gate on one instrument can be triggered by a completely different instrument.

When this other track gets louder than the threshold, the gate opens up.
You can use this for some cool rhythmic effects.
Let’s say our gate is on the bass guitar, but we’ve side-chained it to the kick. This’ll help us lock the bass in with the kick.
The bass will be quiet until the drummer hits the kick. Now the bass will sound really punchy and be perfectly timed with the kick.
Tip #9: Try Ducking
When you’re trying to control an extra loud instrument, try using the “ducking” setting instead.
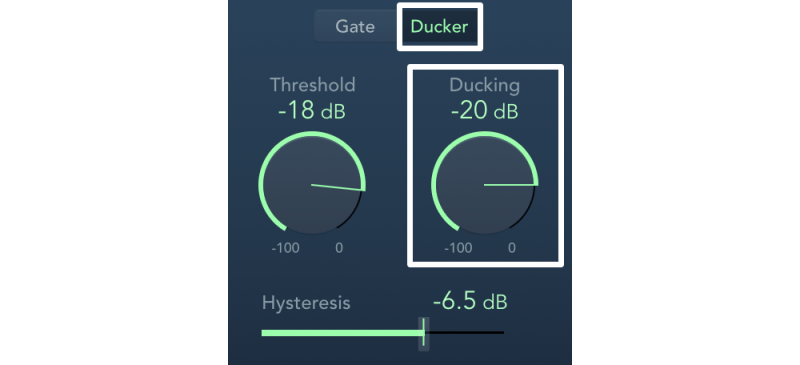
Ducking is the exact opposite of gating – instead of turning the volume of a track UP when it reaches the threshold, it actually turns the volume DOWN.
Ducking can be really useful when it’s paired with side-chaining. With a side-chain, a ducked instrument will get quiet whenever the other instrument goes above the threshold.
So let’s go back to our kick and bass example. If I decided to use a ducker on the bass instead of a gate, then my bass will be nice and loud throughout the song… except when the kick comes in.
Then my bass will get a few dB’s quieter. This is great for creating space in a mix for two competing instruments, like the kick and the bass, or the vocals and the guitars.
It’s a terrific way to help your vocals and lead instruments cut through a busy mix.
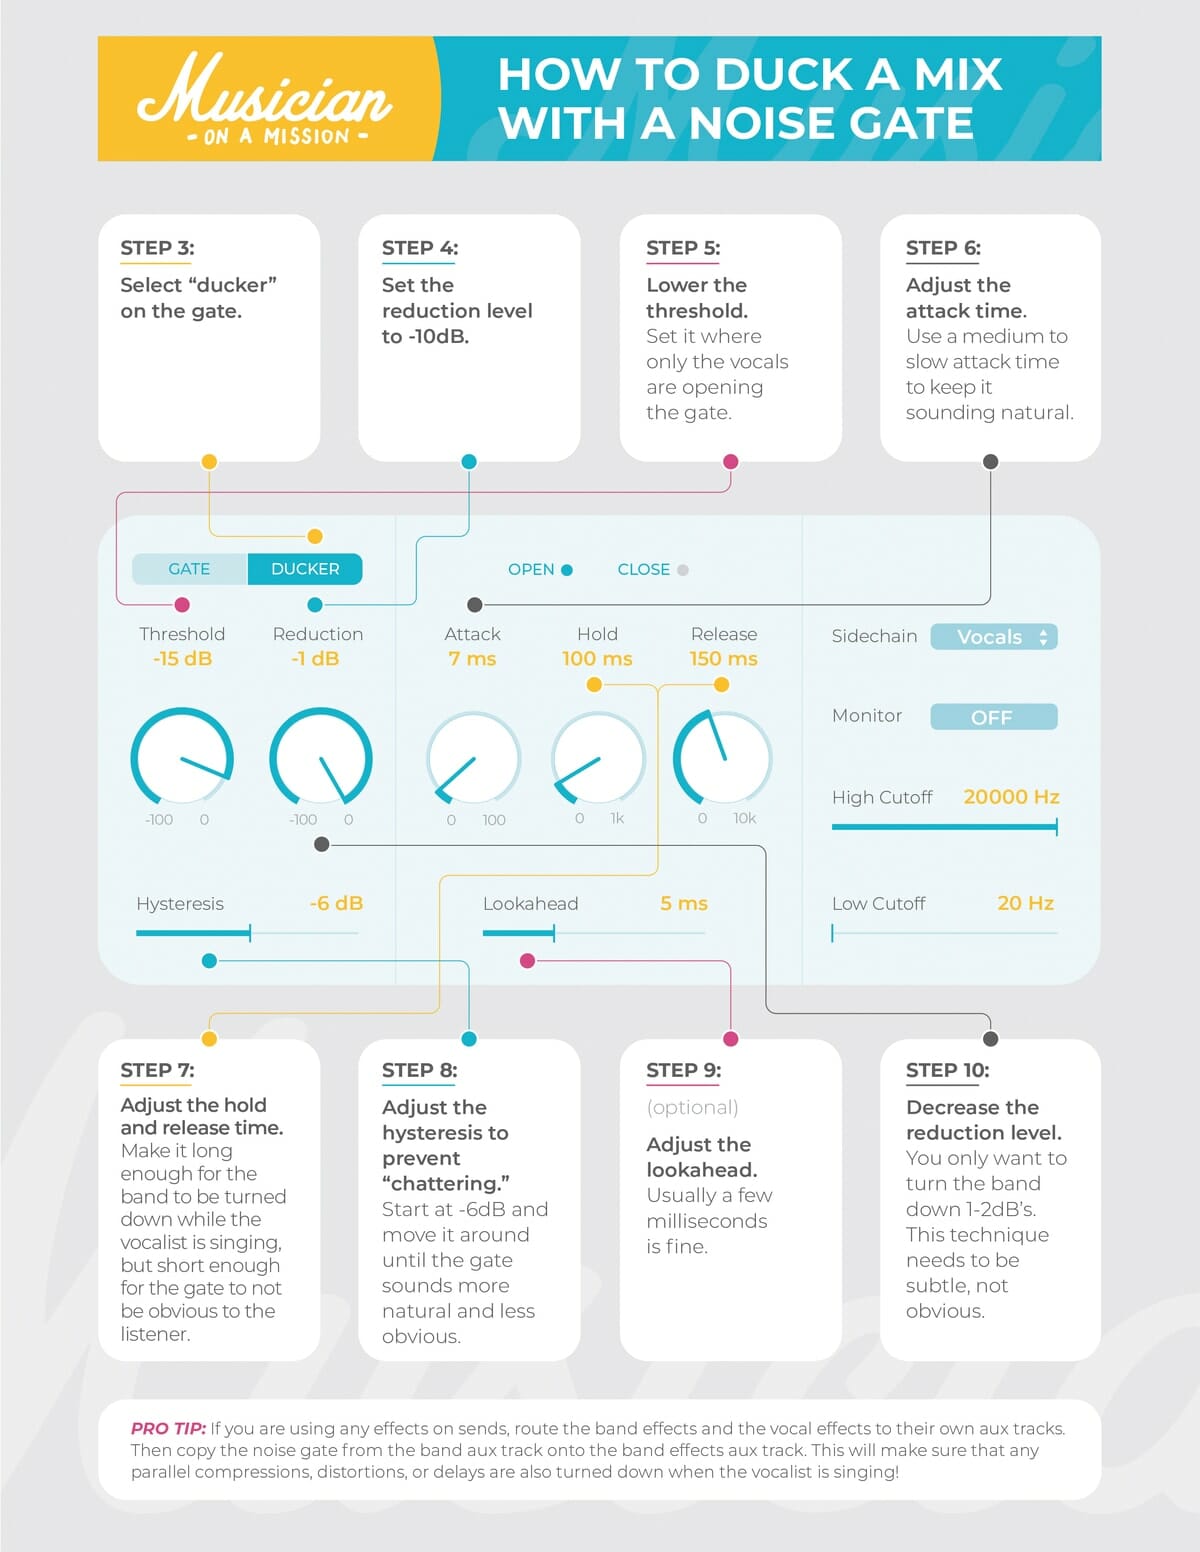
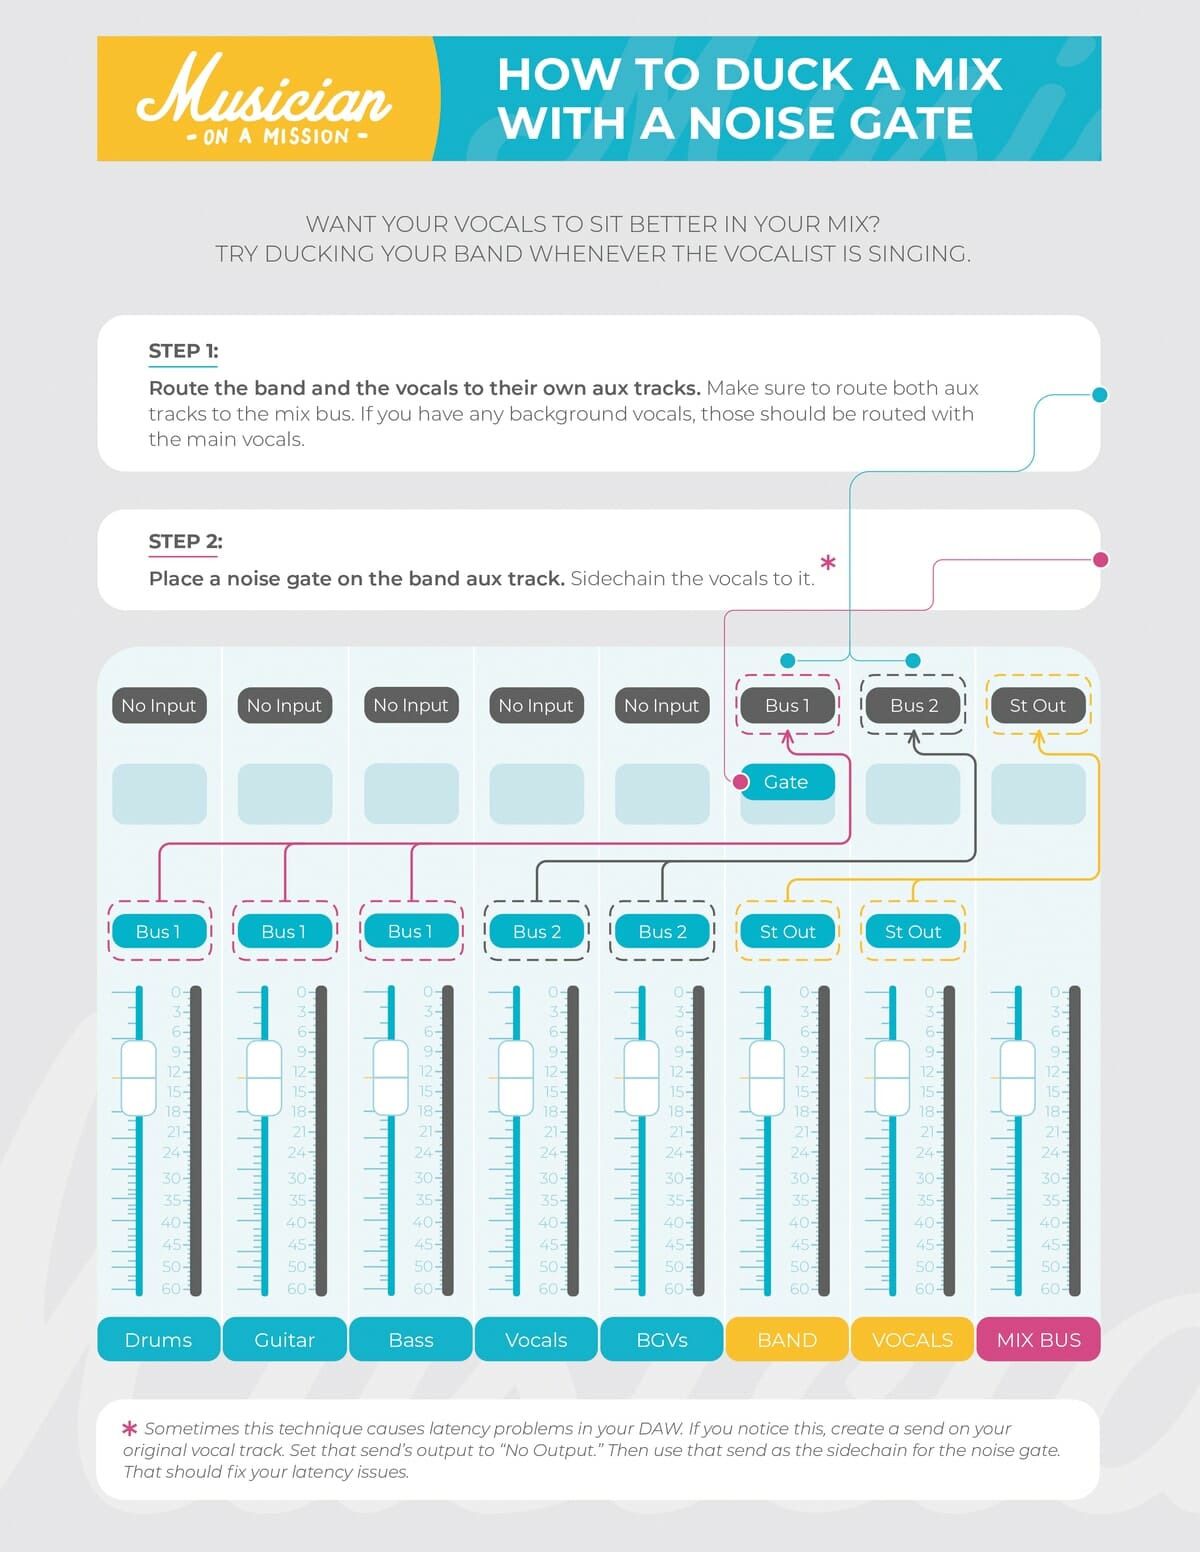
Bonus Tip: Ducking a Mix
Here’s an extra tip that’ll help your vocals stand out. If you’ve got a busy mix and your vocals aren’t quite cutting through, give this technique a shot!
Tip #10: Setting the Filters
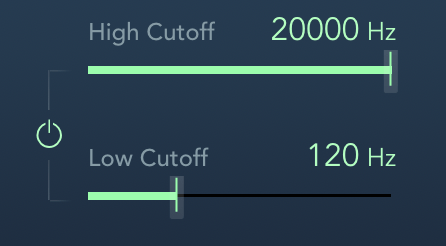
Filters work a little bit differently in a gate. Instead of getting rid of frequency content, filters tell the gate to ignore certain frequency content.
So anything you filter out of the gate won’t make the gate open.
If the kick drum is still bleeding through in your snare track, filters can help. By adding a high pass filter, you’re telling the gate not to open when the kick comes in.
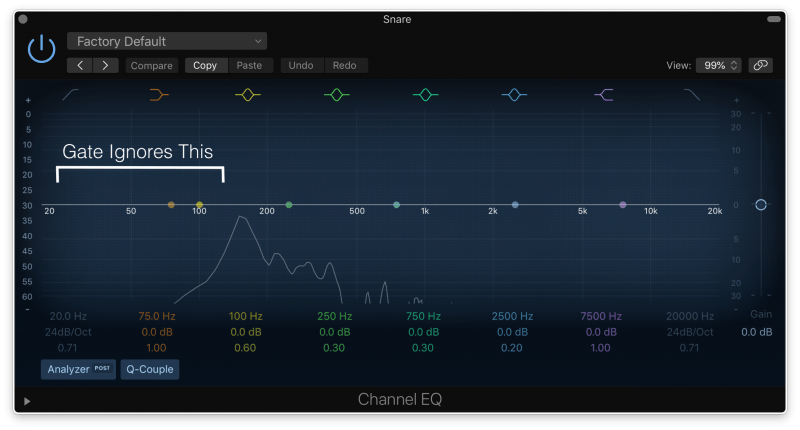
It’ll still open when the snare is there, but the kick won’t be heard anymore.
It’s important to know that filters on a noise gate don’t affect the tone of the instrument. It’s only affecting how accurate the noise gate is, not how the instrument sounds.
Tip #11: Setting the Lookahead

This is a nifty little tool unique to digital noise gates. It does exactly what it says: it looks ahead to see how loud the instrument is going to be later.
This means the gate can know ahead of time that it’ll need to open up. Then it’s less likely to chop off the beginning of a sound.
It’s helpful when working with vocals and drums. You’ll probably only need a few milliseconds heads-up though, so don’t think you need to set a huge look ahead time.
The only downside is that it adds more stress on your CPU. So you probably don’t want a bunch of different gates that are all using look ahead.
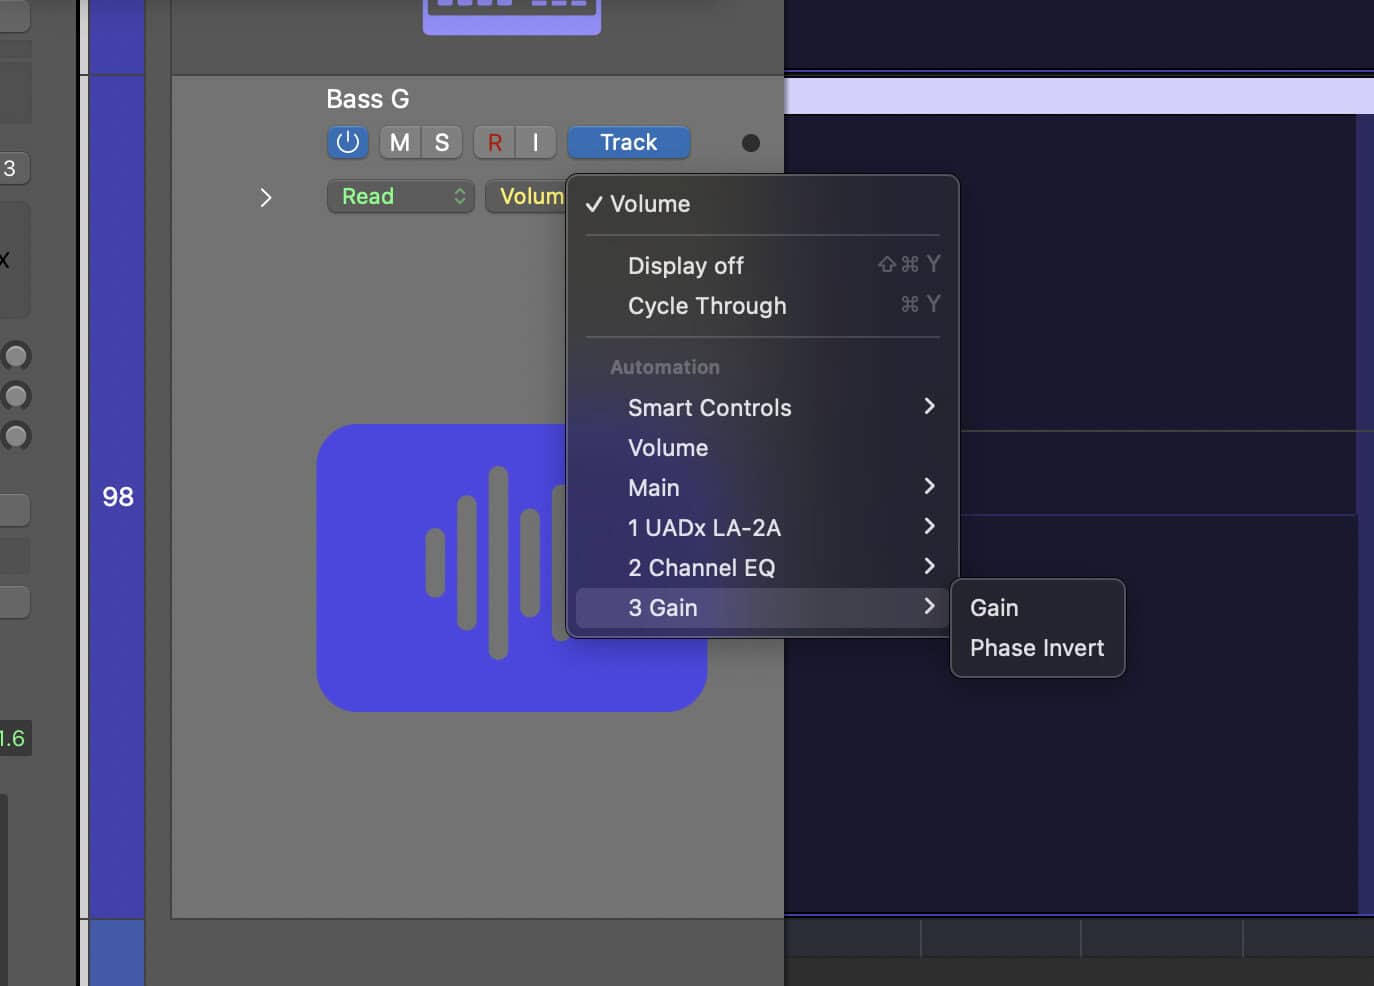
Tip #12: Gain Automating Before the Gate
Sometimes setting a gate can be tricky.
You might have a vocal track that’s loud during some sections but quiet in others. So it might work perfectly during the choruses but cut off phrases in the verse.
To get around this, try automating the gain of the track before it hits your noise gate.
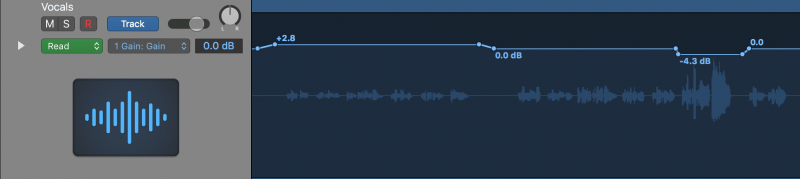
Slap a gain or trim plugin on your track. During the verses you’ll want to automate the gain up.
You could also automate the chorus down. But for something focal like a vocal track, you probably won’t want to turn it down too much.
Once the volume is pretty consistent throughout the song, you should be able to set your gate more easily!
CONCLUSION: Noise Gates
With these 13 tips, you should have everything you need to use noise gates in your mixes.
Before you go, make sure to save this image to your desktop. It’s a breakdown of everything you need to know to use a Noise Gate. Pull it up while you’re mixing to make sure you don’t miss anything!
If you want to dig deeper into music production and learn what it actually takes to make mixes that sound pro… And you’re an intermediate or advanced producer… Be sure to check out the free masterclass: Enjoy!Next Steps