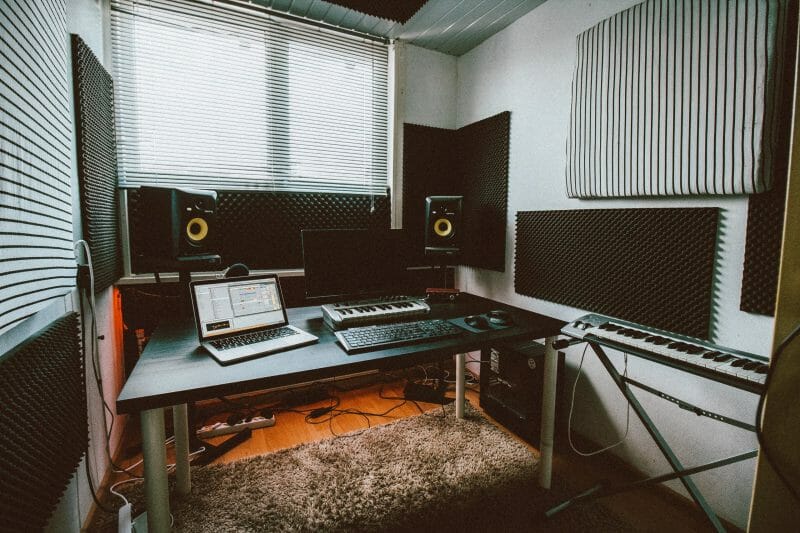
No matter how good a song is, the room you’re in can destroy it. If you record or mix music, you need acoustic panels.
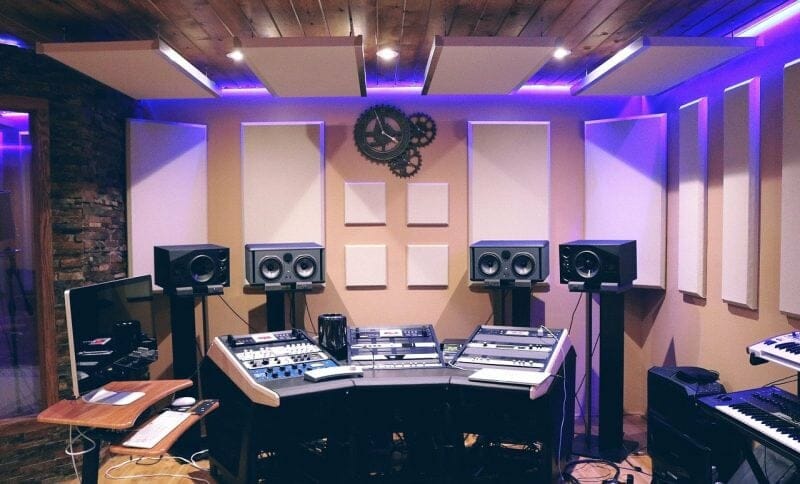
That’s why studios all over the world hang acoustic panels on their walls.
But premium panels cost a lot of money. DIY panels can get the same results at a fraction of the cost.
So if you want pro results without spending a fortune, you’re in the right place.
I’m guessing you’re here because you want to make your mixes sound professional. Well, you don’t need expensive gear or software to do that – you just need the right knowledge. We put together a brief training that covers a totally new approach to music production. Until now, everyone has been teaching production totally backward. Just click below to watch. Get industry-quality every time (steal this framework)
But if you just want to learn about DIY acoustic panels specifically, keep reading.
Why Are Acoustic Panels Important?
Acoustic panels are a key part of any studio because they reduce room noise.
You might not notice it in everyday life, but rooms make a lot of noise. It can make your recordings sound amateurish and ruin the balance of your mixes.
A bad room will spell disaster for your songs.
Room noise makes some frequencies way too loud and others too quiet. So while your mixes may sound good in that room, they’ll end up sounding wrong everywhere else.
That’s where acoustic panels come in. Acoustic panels absorb problem frequencies and unwanted reverb.
So do you want to focus on making music instead of fixing rough recordings? Then you may want to get some acoustic panels for your room!
NOTE: Here’s a great video on Acoustics terminology:
Important Note: Bass Frequencies
Acoustic panels are great at containing high and midrange frequencies. But they aren’t as good at absorbing low ones.
Controlling the bass frequencies in your room is super important. In many cases, it’s more necessary than absorbing high frequencies.
Consider making some DIY bass traps as well.
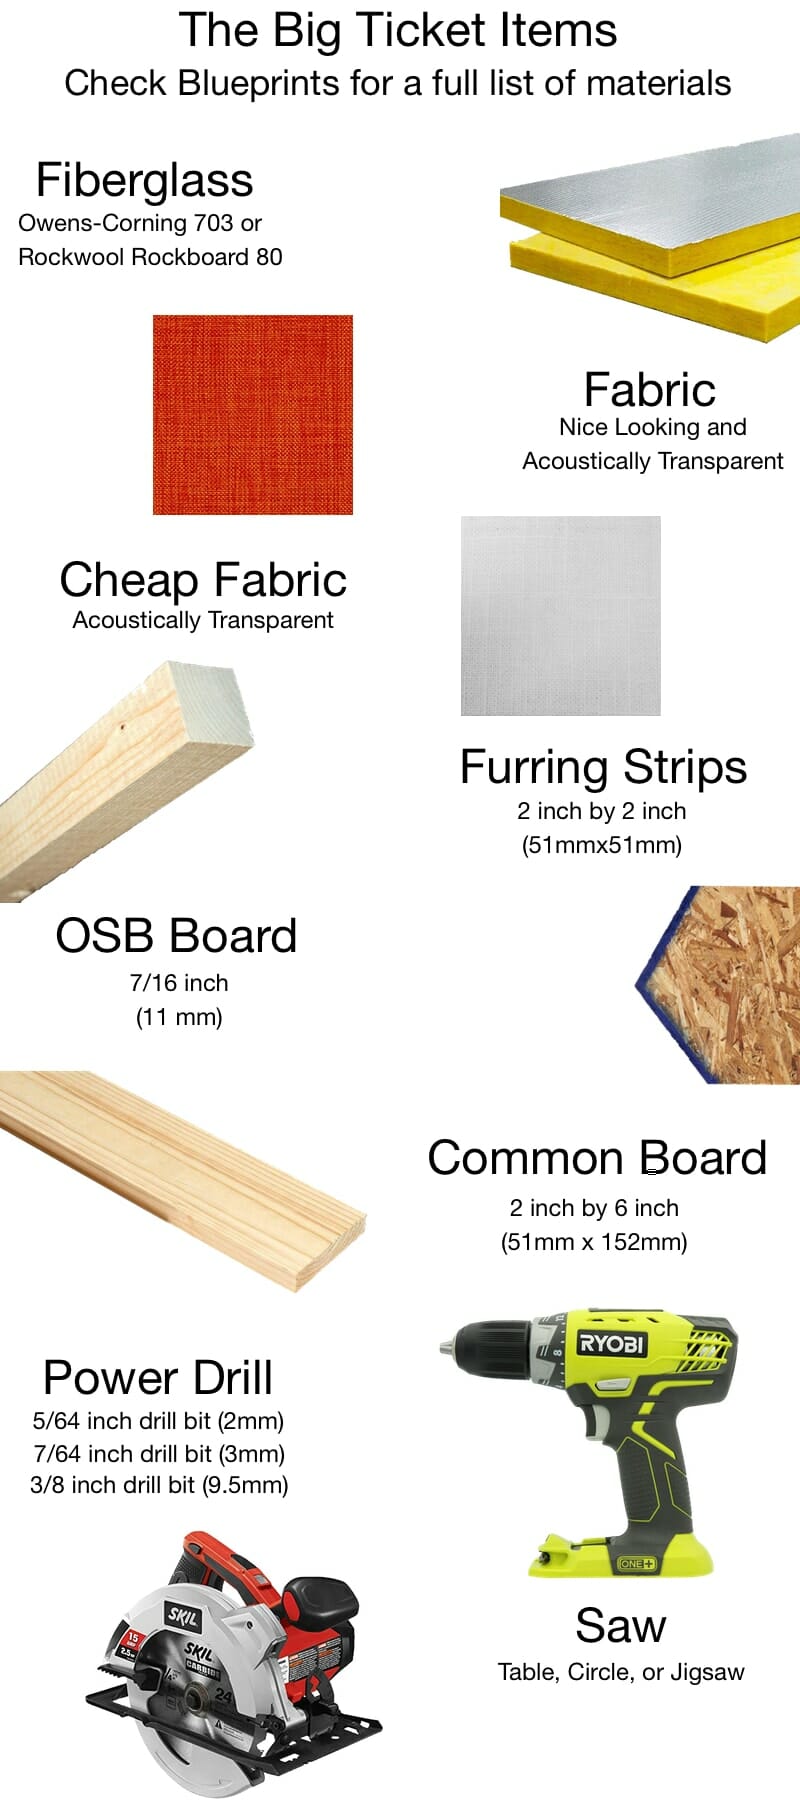
What You’ll Need
Here are the big-ticket items:
Getting the Power Tools
If you don’t already have access to a saw or power drill, you can rent these from a hardware store. Places like Lowe’s and Home Depot should have you covered.
These stores can also cut your wood for you. It’ll cost some money, but it’s a solid option if you aren’t comfortable using a saw.
How to Tell If Fabric Is Acoustically Transparent

You need acoustically transparent fabric for your panels. This means sound will pass through the fabric instead of bouncing off.
Luckily there’s an easy way to see if a fabric will work! Hold the fabric up to your mouth and breathe in.
If you find it easy to breathe, the fabric should work. But if it’s hard to get air through the fabric, it’s probably too thick.
Check arts and crafts stores like Joann Fabrics and Craft Stores. They have sales often, so you may save some money by going there.
Enlist the Help of a Friend
Friendship makes the world go round.

And friends also make construction projects much easier.
So enlist the help of a friend! Bonus points if they already know how to use a saw.
Finally, before we dive in, let’s talk about safety precautions.
Safety
This is the most important part of all.
Your safety is way more important than having a room that sounds good. There’s no need to risk life and limb while making these panels.
Power tools and fiberglass can be dangerous if you aren’t careful. So make sure you’re ready before you use them.
Here are some general guidelines, but it’s not an exhaustive list. So make sure to research your tools and materials before using them!
Using Power Saws
When using a saw, wear safety goggles.
Keep your hands away from the blade, and unplug your saw when it’s not in use. You’ll also want to wear protective gloves when changing blades.
If you’re using a saw you aren’t familiar with, make sure to brush up on how it works. Read the manual and watch a few video tutorials.
You’ll also need a couple of clamps to hold the wood steady. If the wood starts shifting around, you’re more likely to have an accident.
Handling Fiberglass
Wear safety goggles, gloves, closed-toe shoes, and long sleeves.

You don’t want fiberglass to touch your bare skin. It won’t be a disaster if it does, but you will be very itchy.
Breathing in fiberglass may be damaging to your lungs. Wear a breathing mask and make sure you don’t leave fiberglass laying around.
When you aren’t using it, it should be covered up.
It can also make asthma flare up. So if you have asthma, you may want to ask a friend to handle the fiberglass for you.
Power Drills
And finally, wear safety goggles while drilling. When you aren’t using it, keep your finger off the trigger and leave the safety on.
Now that we’ve covered safety precautions, let’s build some panels!
Step 1: Figure Out How Many You Need
Before you do anything, you need to decide how big you want your panels to be. That’ll help you figure out how many you need to build.
Typically, acoustic panels are 2 feet wide and 4 feet long (or 61 cm by 122 cm). They’re also usually 2 or 4 inches (5 or 10 cm) thick.
But if you want different measurements, that’s fine.
Larger panels will absorb more sound. So you’ll probably want them to be fairly big.
Otherwise you’ll have to make a ton of them.
Once you’ve decided how big your panels will be, this handy calculator will help you figure out how many to make.
Enter your room’s dimensions and the size of your panels. It’ll tell you how many you should build.
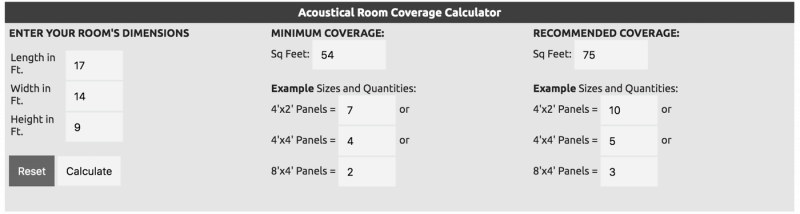
The folks at acousticsoundpanels.com say, “Rule of thumb usually calls for 15–30% of total area coverage.” So aim to cover at least 15% of your room in absorption.
You can also use the mirror technique to figure out where panels should go.
It’s a quick and easy way of locating the most reflective points in your room.
Step 2: Find Your Dimensions
Finding the right dimensions for your materials can be tricky. That’s why we’ve made a size calculator.
Just type in how big you want your panels to be. The calculator will tell you how long and wide each of your boards should be.
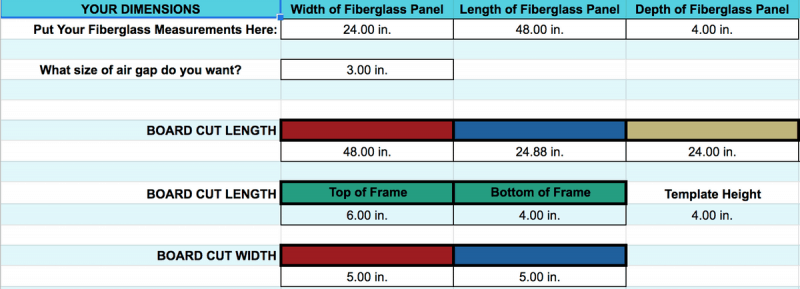
Like I said, most acoustic panels are 2 feet by 4 feet. But the blueprints will still work if yours are a different size.
Now Let’s Measure the Wood
Once you have your dimensions, double-check which pieces of wood they go with. The color above each number matches a color from the blueprints.
For example, this number corresponds with the OSB.
Once that’s squared away, measure the wood and mark where you’ll be making your cuts.
Different saws work in different ways. So be sure to familiarize yourself with your saw before you start cutting.
Bonus Tip: Speed Square
When making your marks, use a speed square.
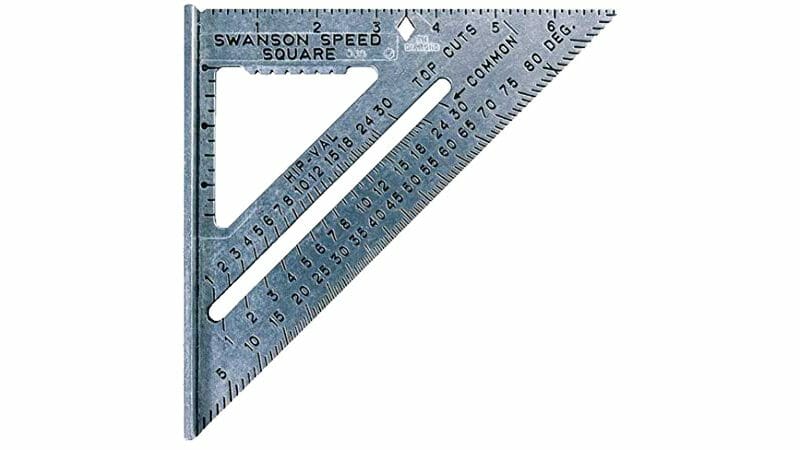
Your marks will be much straighter, so you won’t have to worry about accuracy.
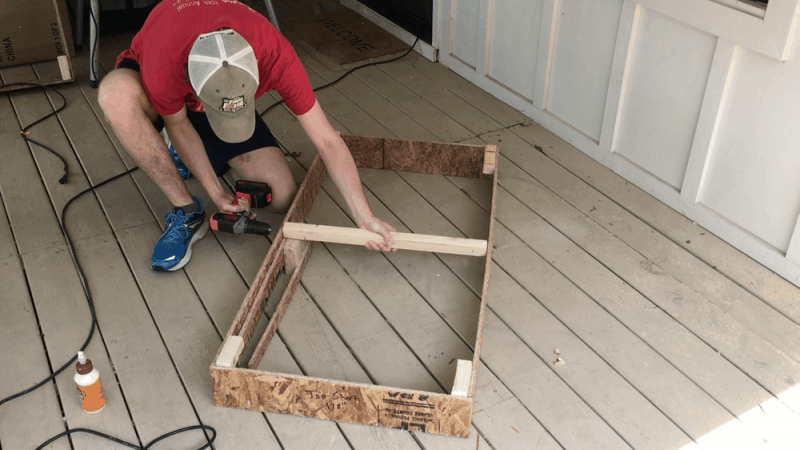
Step 3: Cut the Wood for the Internal Frame
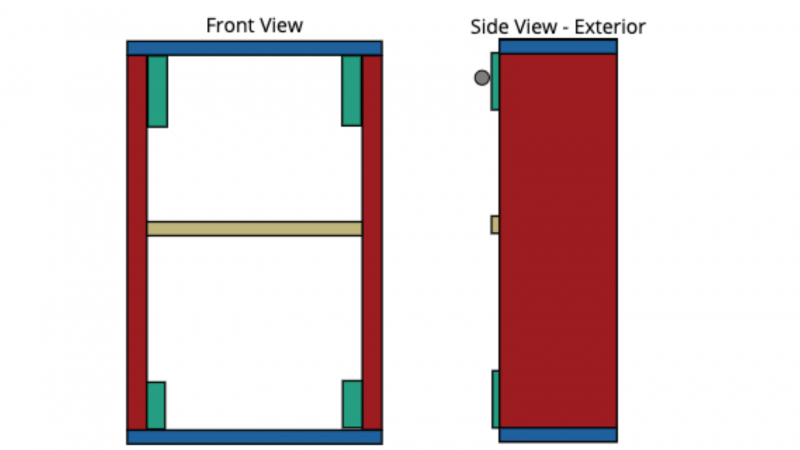
Each panel is made up of two frames: an internal and an external frame.
The internal frame is what you’ll put the fiberglass inside of and what you’ll wrap your fabric around. The external frame is just there to hold it all together.
You’ll want to build the internal frame first.
We’ll be using OSB for the internal frame’s sides.
Cut them according to the measurements you made earlier. You should end up with four sides of OSB.
Once you’ve got those, move onto the furring strips.
We’ll be using these as bracers to reinforce the OSB. But first we need to cut them down to the right sizes.
Double-check that your measurements match the blueprints. The blocks you cut for the top of the frame should be longer than those for the bottom.
Bonus Tip: Make a Wood Template
We’re about to put the internal frame together. But first, let’s make a simple template out of spare wood.
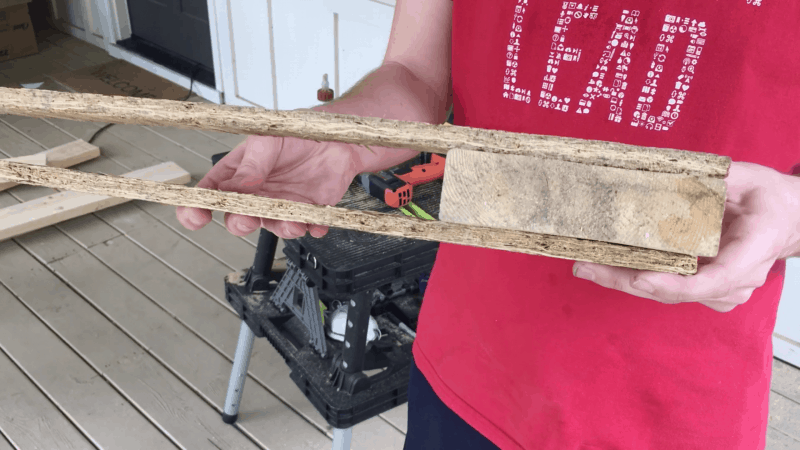
This template will make the next step a lot easier.
Cut a small piece of 2″ x 6″ board. Check the size calculator to see how long it should be.
Next, grab 2 small pieces of OSB. The size doesn’t matter as long as they aren’t wider than the 2″ x 6″ board.
Drill one OSB into the left side of the 2″ x 6″ and the other into the right.
The edges of the OSB should be flush with the 2″ x 6″.
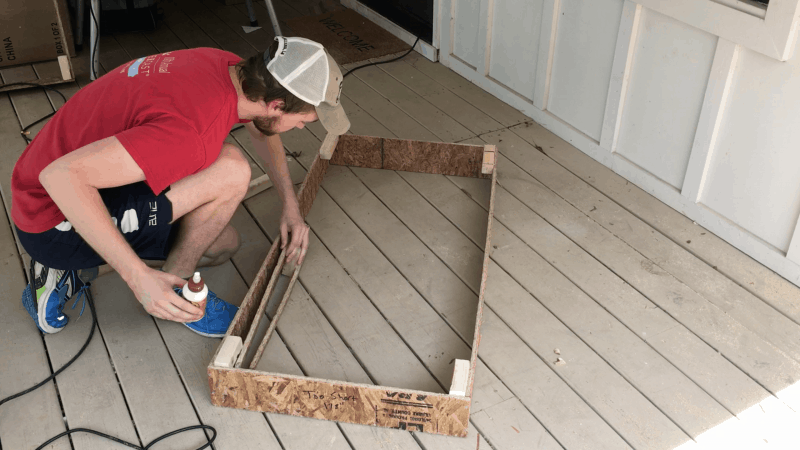
Step 4: Assemble the Internal Frame
Now that your wood is cut, you can start building the actual frame.
To ensure everything’s straight, we’re going to add on the furring strips first.
Adding the Furring Strips
Lean the top piece of the frame against the wood template. The OSB plank from the template should be lined up with the edge of the top piece.
All in all, it should form a right angle.
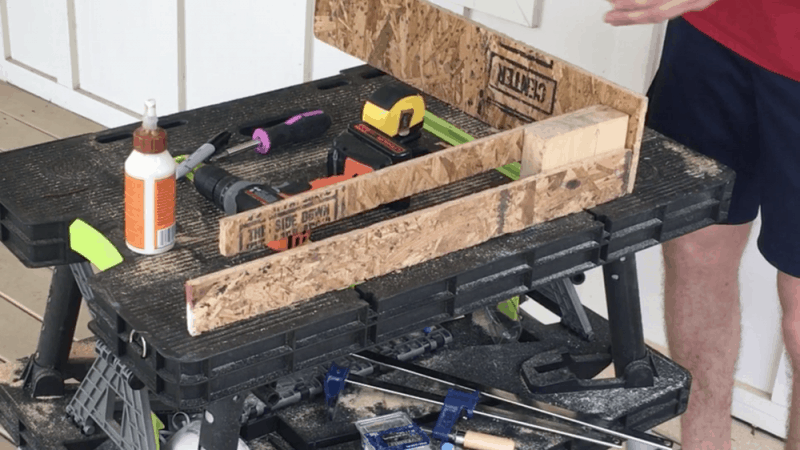
Add some wood glue to the top of the 2″ x 2″ furring strip (aka the bracer). Using the wood template as a guide, attach the bracer to the frame.
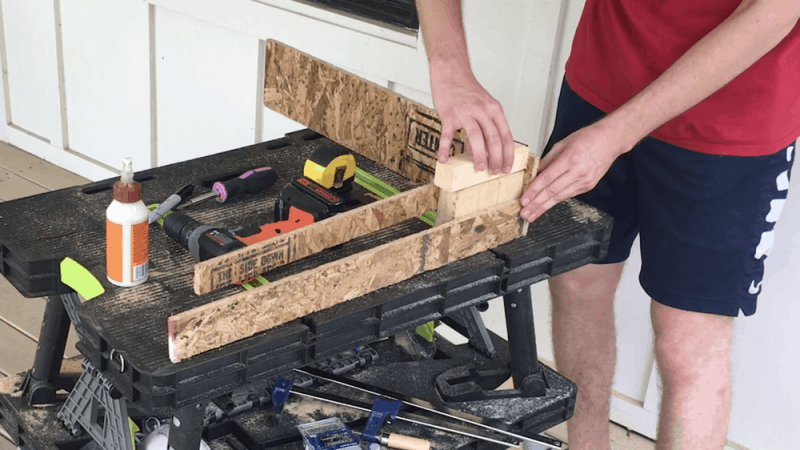
Hold it there for a few seconds so the glue can set, then grab your power drill. Now you’re going to add the pilot hole.
When you drill a pilot hole, you’re drilling a hole for the screw to go in later. This makes it a lot easier to add the screw.
Grab a 5/64″ drill bit (0.2 mm). Drill a pilot hole into the middle of the 2″ x 2″ bracer.
After that, grab your Phillips-head bit and a smaller screw. Attach the furring strip into the top piece.
Repeat the same process to attach the other three bracers.
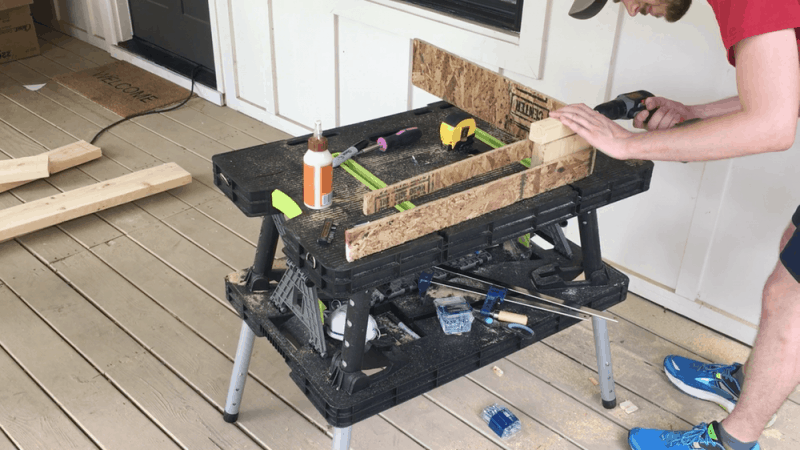
Glue It All Together
Now we’re going to attach the sides of the frame.
Place your wood template back on the top piece so the outer OSB is flush with the outside edge of the bracer.
Grab one of your OSBs for the frame’s sides. Put wood glue along the upper edge as well as the left side.
For extra measure, put some wood glue on the outward facing side of the bracer.
Attach the frame’s side to the top. They should form a 90-degree angle.
Give the glue a few seconds to set before grabbing your drill. Drill two pilot holes where the top of the frame and the side meet.
Drill three more pilot holes where the brace connects with the left side.
Grab your Phillips head and screw the planks together. Now the side of the frame should be fully attached to the top!
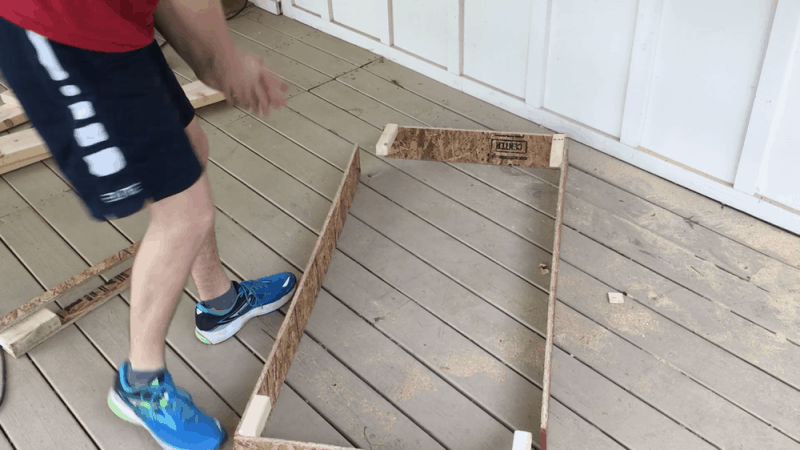
Grab the bottom of the frame as well as the other side. Repeat the process to attach the other side to the bottom.
Now you should have two L-shaped pieces of wood. Line them up and repeat the same process.
Your internal frame is almost done!
Attach the Center Bar
Place your wood template in the very middle of the frame.
Grab your 2″ x 2″ center bar and put wood glue on both edges. Place it on top of the template so the edges are touching both sides of the frame.
Drill a pilot hole into the center of the bar where it connects with the side and add a screw. Move the template over to the other side bar and add another screw there.
Voila! The internal frame is done!
Step 5: Add the Cheap Fabric to the Back
For efficiency’s sake, we’re going to cut all the fabric at once, though we’re only stapling on the cheaper fabric for now. The nicer fabric will go on after the insulation.
Measure and Cut Your Fabric
You’ll want the fabric to be a little bit longer than the length and width of the frame. That way you can pull it taut while you’re stapling.
At least 3 inches of additional length beyond each edge should be good.
Staple It On
Now that all the fabric is the right size, flip the frame over so it’s on its backside. The 2″ x 2″ bracers should be right in front of you.
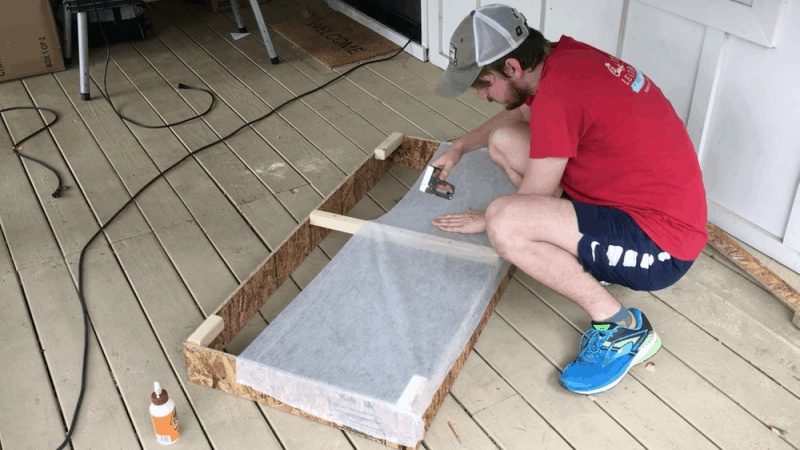
Grab the cheaper fabric, drape it over the frame, and staple it on.
Add a staple every 6 to 12 inches. There’s no mathematical formula for this part, you just want the fabric to be attached firmly.
Step 6: Insulation
Now that the frame’s ready, it’s time to add the fiberglass.
Be sure to wear gloves, goggles, sleeves, and a breathing mask while you’re doing this!
If you aren’t making a 2′ x 4′ panel, you’ll have to cut it first.
Optional: Cut Your Fiberglass
If your fiberglass isn’t the right size for the panels you’re building, you’ll have to cut it. All you need is a serrated knife and your safety gear.
Measure out where you’ll be cutting and mark it with a Sharpie. Using your knife, cut the fiberglass into your desired dimensions.
Put the Fiberglass Inside of the Frame
This is as easy as it sounds. Just flip the frame back over and put the fiberglass inside of it.
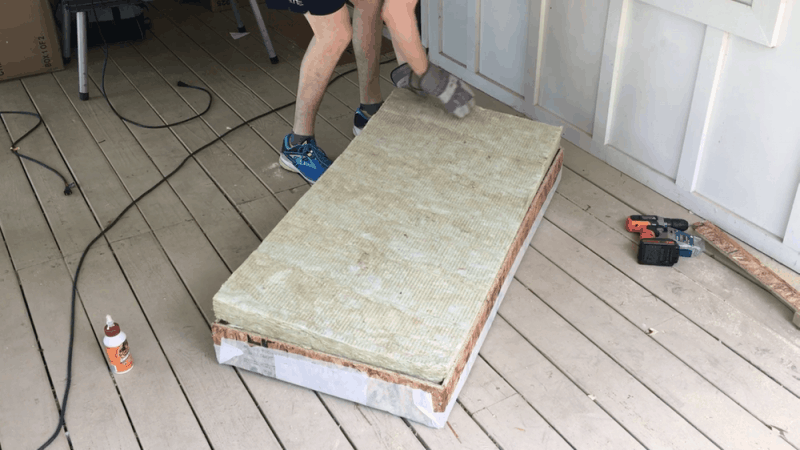
It may be a bit of a tight squeeze, but insulation is flexible. Don’t be afraid to push the edges so it all fits.
Step 7: Staple the Good Fabric onto the Front
The last step before we move on to the outer frame! Once the nice fabric is on, we’ll be back to woodworking.
Before putting the fabric on the frame, check for wrinkles.
Any creases or lines in the fabric will still be there once it’s stapled. So iron it beforehand.
Lay the fabric on top of the insulation and the frame. It should be centered so you have plenty of extra length on each side.
Staple one side of the fabric to the frame. But only one side.
Then ask a friend to pull the fabric tight. Your panel is going to look a lot more professional if the fabric is tight when you staple it.

Add a staple every 3 to 6 inches.
Cut Off the Extra Fabric
Now that the fabric is looking nice and tight, we don’t need the extra length on the sides.
Take a pair of scissors and trim the edges. Cutting about half an inch below the staples should be good.
It’s ok if your cuts don’t look great. They’re going to be covered by the external frame.
Step 8: Build the External Frame
Now we can start building the external frame. But first we need to cut the wood for it.
Cut the Wood for the External Frame
This time around, the cutting should be quicker and easier. You’re just cutting four planks of 2″ x 6″ board into two different sizes.
Go back to the size calculator. Check the measurements for the muted blue and pink boards to see how big yours should be.
Assemble the Pieces of the Frame
This part is simple enough. Take the boards you just cut and set them around the internal frame.
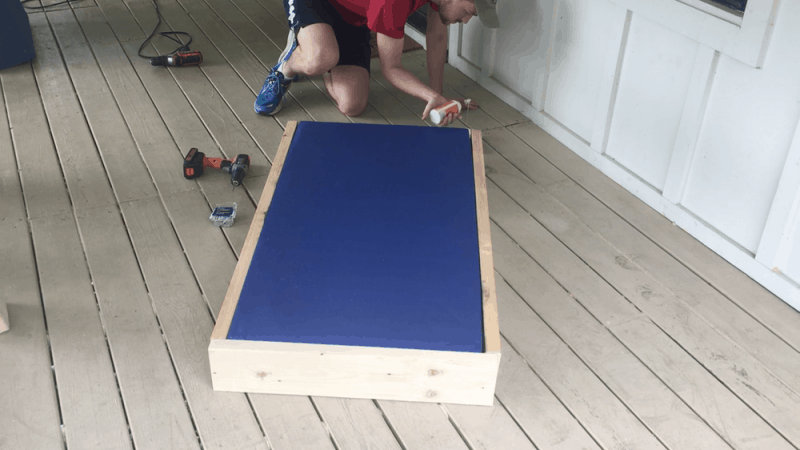
Apply wood glue to the tops and bottoms of each piece.
Then, while they’re setting, use the 7/64″ drill bit to add pilot holes. You’ll want two pilot holes at each edge where the sides meet the top and bottom of the frame.
Drill some longer screws into the frame, locking the frame in.
And that’s all! The external frame is done.
Step 9: Make Sure You Can Hang the Frame
The panel itself is done. But we need to make a couple last additions so we can hang it on the wall.
Screw D-Ring Picture Hangers into the Upper Bracers
Make sure you’re screwing them into the upper bracers.
It’s an easy mistake to make, but it’s important. As you’ll remember, the upper bracers are longer, so they can hold more weight.
Put a D-ring hanger on the middle of each upper bracer.

Using your 5/64″ drill bit, drill pilot holes where the hanger screws will go. Then screw a few of the shorter screws in to hold them in place.
Connect Picture Wire to the Hangers
For this, you’ll need some heavy-duty picture wire. It should be able to hold at least 50 pounds of weight.
Tie the wire around one of the D-rings.
Pull the wire out to the other D-ring. Try to make it a tight, straight line.
Over time, the wire will stretch. If it isn’t taut, you may be able to see the wire peeking out over the panel.
Tie the other end of the wire to the last D-ring.
Try to make sure you’re cutting the same length of wire for each frame. Otherwise, one panel might hang higher or lower than the others!
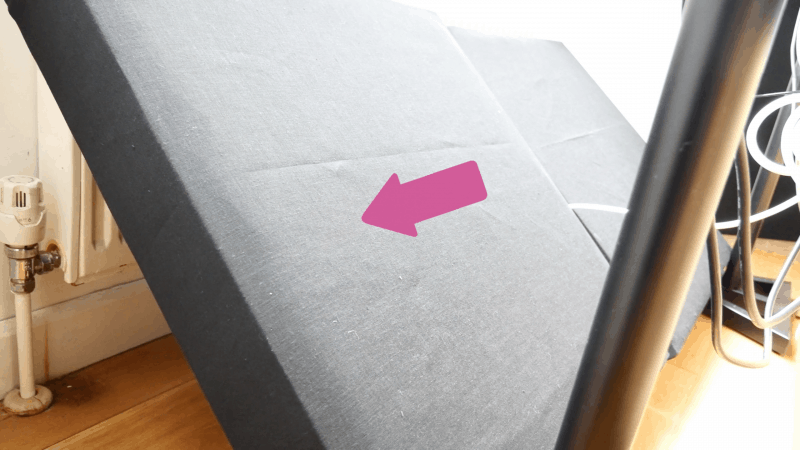
Add Felt Spacers
Acoustic panels are way more effective when there’s a small gap between the panel and the wall. Frequencies go in through the front, bounce off the wall, and go back through the panel.
You get another round of absorption out of just one panel!
Adding felt spacers to the back corners will help you get a solid air gap.
First, decide how much of a gap you want. Plug that number into the calculator and it’ll tell you the length of spacers you need.
Measure the number of spacers you’ll need to get the desired length. Then glue them together.
Repeat this until you have four different felt spacer towers. Put them on the back of your panel.
Your first instinct may be to put one in each corner. But I recommend putting them closer to the middle.

That way they aren’t as visible.
How Big Should the Air Gap Be?
It depends!
If you’re working with a smaller space, you may want a smaller gap. That way your panels don’t jut out into the room as much.
Depending on who you ask, you may hear anywhere from 1 to 5 inches as the recommended distance.
There’s no definitive answer. Just pick whatever makes the most sense for you!
Now your acoustic panel is done! There’s just one final step…
Step 10: Hang the Panel
Time to get this panel on the wall!
I’m going to tell you how to hang an acoustic panel on drywall. But it won’t be the same if you’re hanging it on some other surface, like wood or a stud.
If your wall isn’t drywall, look up how to hang heavy pictures on that surface. Then adjust the tips below to match that.
Prep Your Toggle Bolts
Time to get your toggle bolts ready. In addition to the toggle bolts themselves, you’ll need washers and nuts.
Screw them onto the toggle bolts in this order:
- Nuts
- Washers
- Anchors
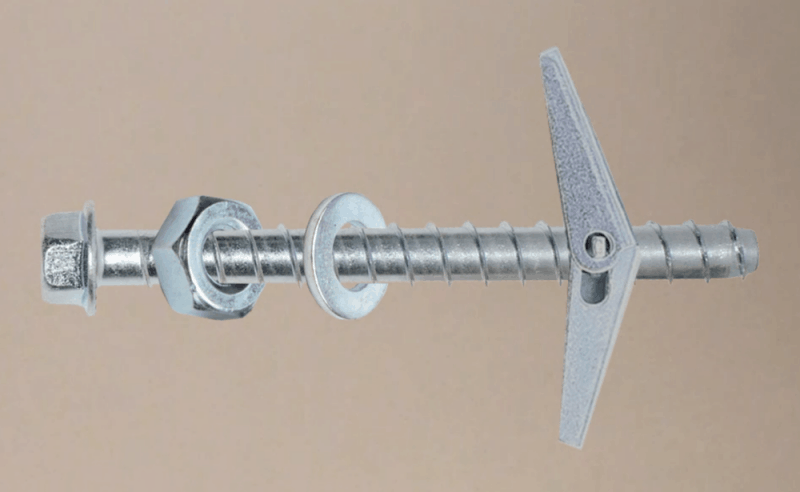
The nut and washer need to go all the way down to the base. But the anchor can stay towards the top.
Mark Where You Want to Hang the Panels
In a moment, we’ll talk about where to put the panels. But for now let’s figure out how far down the wall they should be.
Typically you don’t want them too high off the ground nor too close to the ceiling.
About halfway up the wall should be fine. Unless your room is super tall.
If the room is tall, put your panels closer to the floor.
Mark where you want the center of your panel to go.
But remember! You’re finding where the toggle bolts are going not the top of the panel.
You’ll have two toggle bolts for each frame.
Measure the distance from the top of the frame to the picture wire. Then subtract an inch or two to account for the wire’s slack. That’s the center point between where your toggle bolts will go.
Then measure the distance between the center and the edge and cut that number by three. Take that and make a mark at that distance to the right and left of your center point.
Say my edges are 24 inches apart. I’ll want to make a mark 4 inches (12 ÷ 3) to the left and right of the center point.
These marks are where you’ll place your toggle bolts.
Use a level to make sure your marks form a straight line.
Drill in the Toggle Bolts
Grab the 3/8″ drill bit and drill two holes, one where each toggle bolt will go.
Then push your toggle bolts through the holes.
Listen for a “click.” That means the anchor has deployed, grabbing hold of the drywall.
Hold the bolt taut and twist it to the right.
This’ll allow you to screw the bolt in while simultaneously applying pressure to the anchor. So it won’t fall out.
You don’t need to screw the bolt all the way in! Just to the point where you want the frame to hang.
Then screw in the nut. You do want to screw the nut in as far as you can.
Now the bolt should be firmly screwed into the wall. If you jiggle it, it shouldn’t move.
If it does move, the nut may not be tight enough.
And Finally, Hang Your Panel!
You’ll probably need a friend’s help again, as your panel may be pretty heavy.
Lift the panel up and place the wire on the toggle bolts. Double-check that it’s centered.
But Where Exactly Should You Place Your Panels?
You definitely want your panels to address the first reflections. These are the spots along the wall where the sound from your speakers will hit first.
To find these places, sit in your mixing position facing the opposite side of the room. Have a friend move a mirror along the wall.
Watch the mirror for places where you can see both of the speakers.
Any point at which you can see both speakers will need acoustic treatment. Use a pencil to mark these spots.
You’ll want to put two panels behind your speakers, as well.
Do You Need Anything Else?
Yes! Acoustic panels are important, but they aren’t the only treatment your room needs. You may want to make some bass traps.
Unlike acoustic panels, bass traps absorb low frequency content. Which is really important for having a well balanced room.
Conclusion: DIY Acoustic Panels
YOU DID IT.
If you want to dig deeper into music production and learn what it actually takes to make mixes that sound pro… And you’re an intermediate or advanced producer… Be sure to check out the free masterclass: Enjoy!Next Steps